How to make a saturated salt solution. How to grow a crystal at home from salt: instructions with photos
Diamond, amethyst, emerald, topaz, sapphire - all these gems captivate with their multifaceted beauty. They belong to the group of crystals and are most often made in natural or laboratory conditions. If you like experiments, then information on how to grow a crystal from salt is just for you.
Note to the amateur experimenter
Some people are skeptical about such processes and believe that growing a crystal at home is almost impossible. We hasten to dissuade you and tell you how to make a crystal from salt. Of course, you won’t be able to create a precious stone, but it is quite possible to create a polyhedron with an original texture that will dazzle with its beauty and enchant with its unusual geometric shape.
Before we explore detailed instructions How to grow a crystal at home from salt, let's clarify some points of this difficult process. To succeed and create a salt crystal on your own, consider the following aspects:
- Suitable for growing crystals different kinds salts, in particular table salt, potassium salt, sea salt, copper sulfate and even potassium permanganate.
- We choose a container of the appropriate size according to this principle: bigger means better and more beautiful.
- During the process of crystal formation, it is not recommended to shake or move the container, otherwise you may destroy its already fragile texture.
- For such an experiment, you can buy a ready-made kit necessary materials or use improvised means.
- The duration of crystal growth depends on the desired result.
- It is not recommended to remove the crystal from the container in which it is growing unless absolutely necessary.
- There is no need to add food coloring to the solution.
- As the solution evaporates, the container should be filled.
- Distilled water is best suited for preparing the solution.
- The container with the crystal should be placed in a place where there is no noticeable and sharp change in temperature.
- The crystal being grown must be protected from dust.
- You cannot paint a grown salt crystal with watercolor or gouache paint.
Few people know how to grow a crystal from table salt. This is not surprising, because we do not encounter this kind of activity every day. But for the sake of an experiment, you can refresh your memory of your school knowledge in chemistry. To grow a salt crystal at home, it is not necessary to know the entire formation mechanism geometric figure from solid particles, and you just need to properly prepare the solution.
- We use filtered or regular tap water;
- the amount of table salt added to the solution is individual;
- a sufficient amount of salt will be indicated by the difficulty of mixing it in water;
- the solution must initially be heated in a water bath to 50-60°;
- Only in the cooled solution do we place a small crystal;
- The prepared mixture must be filtered through a piece of gauze.
Home experiment: growing a personalized crystal
If you watch various experiments with delight, and the beauty of precious stones fascinates and delights you, then the information on how to grow a crystal from salt on a string is just for you.
You don't have to spend a lot Money to purchase the necessary materials. You already have everything you need to conduct such an experiment. Please note that individual crystals may not remain after preparing the solution. In this case, they can be replaced with a small plastic object, which we first soak in a saline solution and dry thoroughly.

Necessary materials:
- table salt;
- filtered water;
- crossbar (simple pencil, pen, plastic stick, etc.);
- capacity;
- gauze piece;
- a thread;
- paper.

Bright edges of geometry
Growing a crystal from salt at home is not difficult. You just need to be patient. As already mentioned, adding any dyes to the solution is not recommended. This can prevent the salt crystal from growing and ruin its strong texture. You can add to the solution natural dye- copper sulfate. Potassium permanganate is also quite suitable, then the crystal you grow will sparkle with red edges.

Necessary materials:
- copper sulfate;
- filtered water;
- capacity;
- a thread;
- crossbar;
- paper.
Crystal growing process:

If you add potassium permanganate, the crystal will acquire a rich crimson or red hue. Do not use gouache or watercolor paints as they will not adhere to the surface of the crystal.
Crystals surround us everywhere. We eat them, walk on them, use them to make various tools and devices. You can conduct an interesting experiment and grow them at home. Look at the photos of homemade crystals, you can get large and small, transparent and colored specimens. It all depends on your desire and patience.
Salt crystals
You can involve children in a simple experiment. All you need is salt and water. There is no need to use additional reagents, so it is a safe process. This is a fascinating activity; every day you can watch how the crystal gradually increases in size.


Preparing for the experiment
Before starting work, decide on the location where the container with the crystal will be located. During growth, do not move or tilt the dishes. It is better to take sea salt, as it does not contain foreign impurities.

Take distilled water or boil it and filter it. You can also use regular table salt for the experiment.

Do not pour the solution into metal containers. Novice researchers are interested in what crystals they can make themselves.

The size of the crystal depends on the duration of the experiment and the volume of the container. The base used is thread, wire, twigs or a piece of salt.

Growing
Take half a glass of water and pour it into a saucepan. Then the dishes are placed on the fire and brought to a boil. Let's look at what you can grow crystals from at home.

It will take several days to form a craft from table salt. Sea salt forms a crystal in 2 days. If you choose iodized salt, you will have to wait a long time for the results.

It is necessary to prepare a saturated solution. Add salt to warm water until it stops dissolving. We prepare the thread for the warp and tie a small crystal of salt to it.

The rope should not touch the bottom or walls of the container. The second end of the thread is tied to a pencil, which is placed on top of the container. Now we need to watch the growth.

Sugar crystals
Sweet and colorful products will delight children. To get them, just use the instructions for growing crystals at home. For the experiment you need 2 glasses of water, 5 glasses of sugar, wooden skewers, a saucepan, transparent containers, paper.

First of all, prepare the sugar syrup. It will require a quarter glass of water and two tablespoons of sugar. Place this mixture in a saucepan on the fire.

After this, dip the skewers one by one into the syrup and then sprinkle with sugar. The preparations must be thoroughly dried, it is better to leave them until the morning.

Growing process
Pour 2 cups of water into a saucepan and gradually add 5 cups of sugar. Stir the solution constantly. If the sugar has completely dissolved, remove the syrup from the heat. Leave it for 15 minutes to cool. Cut out circles from paper. They must be larger than the diameter of the containers.

To figure out how to properly grow crystals with your own hands, you need to carefully study the sequence of actions. This will help you get the desired result.


Pour the cooled syrup into glass containers; you can add food coloring to them. Then blanks with paper circles on them are lowered into glasses. The skewers should not touch the bottom or walls. It will take a week to grow sweet crystals.

Note! 
Copper sulfate crystal
This experiment requires strict adherence to safety precautions. We will need water, a glass container, and copper sulfate. You need to purchase a homogeneous bright powder in the store. of blue color. Pour 100 g into a jar and pour hot water, stirring constantly. We get a saturated solution, filter it and put it in the refrigerator.

The next day, select the largest crystal, fasten it to a thread and place it in a jar with a filtered solution.

The container must be covered with paper to prevent dust from getting in. The growth process lasts several weeks. Afterwards, take out the crystal and cover it with colorless nail polish.

Conclusion
Growing crystals is a fascinating process. To get an excellent result, it is important to follow the technology. To practice, you can buy a special kit for growing crystals at home. You can try sweet products at home tea parties.


At a certain point, the crystals stop growing. You can finish the experiment here, or prepare a saturated solution again and drop the crystal into it. He will grow even more. Growing crystals is an interesting and educational process.

Photos of crystals at home

Note! 


Note! 


Artificial stones have long gained popularity in jewelry. After all, for a jeweler, the value of a stone is determined not only by its scarcity in nature. Important role plays a number of other characteristics:
- color;
- light refraction;
- strength;
- carat weight;
- size and shape of edges, etc.
The most expensive artificial gemstone is cubic zirconia (synonyms: daimonsquay, jevalite, zirconium cube, shelby). Its price is low - less than $10 per 1 carat (that's 0.2 grams). But it is worth noting that as carats increase, the price increases exponentially. For example, a 10 carat diamond costs 100 times more than a 1 carat diamond.
Artificial crystals of jewelry stones can be grown at home. Most such experiments do not require special training, you don’t need to set up a chemical laboratory or even purchase special reagents.
To gain experience in growing crystals, start small. We will share techniques for growing beautiful crystals from anything you can actually find in your own kitchen. You won’t need any additional equipment at all, because everything you need is right on the shelves. We will also consider the technology of growing artificial rubies at home!
How to grow ruby crystals synthetically?

Growing ruby crystals can even be a home business option. After all, beautiful synthetic stones are already in great demand among buyers, so in case successful implementation projects can bring you good profits. Synthetically grown stones are used by jewelers and are also widely used in technology.
Ruby crystals can be grown using standard methods by selecting the right salts. But this will not be as effective as in the case of salt or sugar, and the growth process takes much longer. And the quality will be questionable. After all, a natural ruby on the Mohs hardness scale is second only to Diamond, occupying an honorable 9th place. Naturally, if we're talking about about business, in most cases they use a different method, developed more than 100 years ago in France.
You will need special apparatus, named after the inventor of this method, i.e. Verneuil’s apparatus. With its help, you can grow ruby crystals up to 20-30 carats in size in just a few hours.
Although the technology remains approximately the same. Aluminum dioxide salt with an admixture of chromium oxide is placed in the accumulator of an oxygen-hydrogen burner. We melt the mixture, watching how the ruby actually grows “before our eyes.”
Depending on the composition of the salt you choose, you can adjust the color of the crystals, obtaining artificial emeralds, topazes and completely transparent stones.
Working with the device will require your attention and some experience, but in the future you will have the opportunity to grow crystals that fascinate with their beauty, transparency and play of colors. In the future, such masterpieces are well suited for cutting and polishing, and accordingly, they can be used for their intended purpose.
It's worth noting that artificially grown crystals are not gemstones, so even if you decide to entrepreneurial activity to grow them, this will not require additional licensing from you.
The design of the device is simple, you can easily make it yourself. But on the Internet there are already enough craftsmen offering drawings of the original installation, as well as its improved versions.
Kit for growing ruby crystals at home
The very principle of ruby production technology is quite simple and is schematically depicted in the figure below:
Understanding the principle of operation, any device no longer seems so complicated. One of the sample drawings of the Verneuil apparatus:

Using this technology, you can also grow other expensive artificial stones, such as “Blue Topaz”, etc.
Growing salt crystals at home

The easiest and most accessible experiment you can do is to create beautiful salt crystals. To do this you will need several items:
- Regular rock salt.
- Water. It is important that the water itself contains as few of its own salts as possible, preferably distilled.
- The container in which the experiment will be carried out (any jar, glass, pan will do).
Pour warm water into the container (its temperature is about 50°C). Add kitchen salt to the water and stir. After dissolving, add again. We repeat the procedure until the salt stops dissolving, settling to the bottom of the vessel. This indicates that the saline solution has become saturated, which is what we needed. It is important that during the preparation of the solution its temperature remains constant and does not cool down, this way we can create a more saturated solution.
Pour the saturated solution into a clean jar, separating it from the sediment. We select a separate salt crystal, and then place it in a container (you can hang it on a thread). The experiment is completed. After a few days, you will be able to see how your crystal has increased in size.
Growing sugar crystals at home

The technology for producing sugar crystals is similar to the previous method. You can dip a cotton swab into the solution, then sugar crystals will grow on it. If the process of crystal growth has become slower, then the concentration of sugar in the solution has decreased. Add granulated sugar to it again, then the process will resume.
Note: if you add food coloring to the solution, the crystals will become multi-colored.
You can grow sugar crystals on sticks. To do this you will need:
- ready-made sugar syrup, prepared similarly to a saturated saline solution;
- wooden sticks;
- a little granulated sugar;
- food coloring (if you want colorful candies).
Everything happens very simply. Dip a wooden stick in syrup and roll in granulated sugar. The more grains stick, the more beautiful the result will be. Let the sticks dry thoroughly, and then simply move on to the second phase.
Pour the saturated hot sugar syrup into a glass, and place the prepared stick there. If you are preparing multi-colored crystals, then add food coloring to the hot finished syrup.
Make sure that the stick does not touch the walls and bottom, otherwise the result will be ugly. You can secure the stick with a piece of paper, putting it on top. The paper will also serve as a lid for the container, which will not allow any foreign particles to get into your solution.
In about a week you will have beautiful sugar lollipops. They can decorate any tea party, bringing complete delight not only to children, but also to adults!
Growing crystals from copper sulfate at home

Crystals are obtained from copper sulfate interesting shape, while having a rich blue color. It is worth remembering that copper sulfate is a chemically active compound, so crystals from it should not be tasted, and care must be taken when working with the material. For the same reason, only distilled water is suitable in this case. It is important that it is chemically neutral. Be careful and careful when handling copper sulfate.
In this case, the growth of crystals from vitriol occurs virtually according to the same scheme as in previous cases.
When placing the main crystal to be grown in a solution, you need to make sure that it does not come into contact with the walls of the container. And do not forget to monitor the saturation of the solution.
If you place your crystal at the bottom of the vessel, then you should make sure that it does not touch other crystals. In this case, they will grow together, and instead of one beautiful large sample, you will end up with a mass of indistinct shape.
Helpful advice! You can independently adjust the size of the faces of your crystal. If you want some of them to grow more slowly, you can lubricate them with Vaseline or grease. And to preserve the sky-blue beauty, you can treat the edges with transparent varnish.
There are 3 weight categories of diamonds:
- Small. Weight 0.29 carats
- Average. Weight from 0.3 to 0.99 carats
- Large. Diamonds weighing more than 1 carat.
Popular auctions accept stones weighing over 6 carats. Stones weighing more than 25 carats are assigned proper names. For example: “Winston” diamond (62.05 carats) or “De Beers” (234.5 carats), etc.
Crystals look attractive, attract the eye and fascinate. Gemstones used in jewelry are mineral crystals.
Crystals of natural mineralsThanks to modern technologies people have learned to grow such beauty on their own, and synthetic gems are difficult to distinguish from crystals natural origin. Table salt can also grow in the form of crystals. To see this, let's look at ways to grow salt at home.
Materials for growing salt
To grow a salt crystal, prepare an appropriate solution and special dishes. The process itself will take several months, so you will have to be patient. The growth of a salt crystal is affected by air humidity, room temperature, solution saturation, and the type of salt used. To successfully complete the experiment, you will need the following components:
A container made of material that is not capable of oxidation in salt water (a glass jar will do);
Table or sea salt;
Funnel;
Copper wire or thread;
Napkins or filter paper;
Wooden or glass rod for stirring the solution.
 Table salt crystals
Salt growing process
- Pour distilled water into a container and add salt. Salt must be added until mixing becomes difficult.
- Place the resulting mixture in a water bath and wait until the salt is completely dissolved in the water.
- Strain the solution through filter paper or a napkin into a prepared jar.
- Tie a small salt crystal to a thread and lower it into the cooled liquid. Tie the second edge of the thread to a stick, the length of which is greater than the diameter of the neck of the jar. The stick will help secure the thread with the crystal, which is constantly suspended.
- Cover the resulting structure with a piece of cloth or a napkin, then place it in a place with the least temperature changes.
- During the experiment, you must not touch the jar, move or pull the thread with the crystal. The structure must remain motionless.
- After 4 weeks the crystal will increase to the size of a bean, after 8 weeks the diameter of the stone will reach 4 cm. If a salt crystal is needed bigger size, you'll have to wait a few more months.
- Carefully remove the finished crystal of the required diameter from the jar and wipe with a napkin. To protect the crystal from external damage, it is recommended to coat the stone with clear nail polish.
- After the varnish has dried, you can admire the salt crystal.
A blue crystal is grown in the same way - for this, blue food coloring is added to the solution.
 Blue salt crystals
How to grow a white crystal from sea salt
To create a white sea salt crystal, you will need the materials described above. The process of growing salt occurs as follows.
- Prepare a saturated saline solution in a glass container. In 100 g hot water add 40 g of sea salt and stir the solution until the salt dissolves.
- Cool the resulting liquid, then filter.
- Let the solution stand for several hours, then filter again.
- Attach a grain of sea salt to the copper wire big size and lower it into a container with a solution so that the crystal does not touch the bottom.
- Cover the jar with a sheet of paper to prevent foreign objects and dust from getting inside.
- After two days, carefully remove the wire with the crystal, move it to another vessel and pour the solution into it.
- Once a week the liquid is filtered.
- After a few days, the growth of the salt crystal will become noticeable. You can grow the stone until a crystal of the required diameter is formed.
A stone grown from salt is characterized by increased fragility and fragility, so you should not hold it in your hands for no reason. After varnishing, it is recommended to store the crystal in a closed container to avoid damage. Using the methods described, you can grow a lot of salt crystals at home. different color using brightly colored food colors when preparing the solution. To find out what other crystals you can grow at home, click
Crystals are a beautiful and unique natural phenomenon that has fascinated humanity for many centuries. However, thanks to science and research by scientists, today you can make them yourself.
Growing crystals is an interesting and exciting activity not only for children, but also for adults
If you tell your child about amazing world crystals, then he will undoubtedly ask you: “How to make a crystal at home?”
Getting such a miracle of nature will be interesting not only for kids, but also for those who have never conducted such experiments at school. Therefore, you can not only catch up, but also instill in your child a love of science.
It is worth noting that any age of the child is suitable for this experiment. The only task for the parent will be a correct and accessible explanation of the formation of crystals. For this fascinating procedure, you can buy a ready-made kit or grow a crystal from scrap materials.
What is needed to grow crystals?
Before making a crystal at home, prepare the following:

It is also worth being patient, as growing crystals requires a lot of time and effort.
Growing crystals from table salt
Many people ask the question: “How to make a crystal from salt?” Indeed, it can be found in everyone's kitchen. So why spend money on a more “refined” material when you can just use salt!
As a rule, beginners begin to grow crystals from this material. To do this, you need to prepare a saline solution. Pour some heated water into a glass container (you can take a jar or glass). Add salt until it stops dissolving, always stirring the solution. To completely dissolve the salt, it is necessary to maintain high temperature water in a glass. Therefore it can be placed in warm place or place in a saucepan with warm water. By the way, if you are interested in how to make a crystal from sugar, then follow the same technique, replacing the salt with granulated sugar.
So, the concentrated solution is ready. Now you need to hang a thread with a crystal of the same salt attached to its end on a jumper (for example, a pencil). It is this that will become the foundation for the birth of our future crystals, which will form in 5-7 days.

So we figured out how to make a crystal at home from salt.
Growing crystals from vitriol
We have already talked about what it is natural miracle can be obtained not only from salt. Let's look at how to make a crystal from vitriol.
We would like to warn you right away that vitriol is harmful. Chemical substance. Therefore, you need to work with it very carefully. As a rule, this is done with gloves. Under no circumstances should this product come into contact with your eyes!
The methods for growing crystals from this raw material are very similar to the previous ones. Since vitriol is sulfur-copper salt, instead of table (edible) salt we add this chemical substance to warm water. Everything else is done in the same way as described above.
The only difference is the color. Crystals from copper sulfate will be dark blue, and from table salt - white.
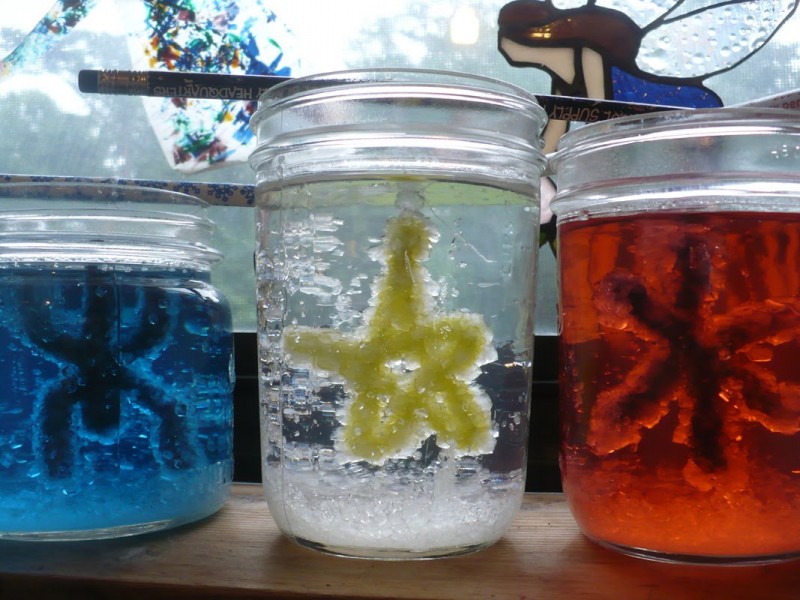
Crystal figures
Were you interested in learning how to make a crystal at home? Would you like us to tell you how to make crystal figurines?
There are two such methods. The first involves preliminary growing of crystals different colors(for example, from vitriol and salt) and further fastening them with glue to obtain one or another figure. It could be a snowman, a cat, and so on. That is, it all depends on your imagination.

And the second method involves making a blank before making a crystal from salt (or from another similar substance). The workpiece is made of wire. The shapes can be different: these are stars, hearts, circles, squares, treble clefs, that is, whatever your imagination allows you to create. After you have made the frame, you need to wrap it with ordinary threads and dip it in a saline solution, then dry it. After drying, small crystals form on the threads. They will be the basis for growing the main crystals. In 5-7 days you will have a beautiful crystallized figure.