Android recover deleted files. How to recover deleted data on Android
Loss of information on your favorite gadget... This cup has probably not passed over anyone. And the point is not why this happened - personal carelessness, a virus attack or a software failure, but what to do next to fix it. Don't despair, restore deleted files It’s difficult on Android, but it’s possible, despite the fact that there is no shopping cart on Android.
There are two not very different methods for recovering deleted data - using a PC and without it. They are based on the use of special resuscitation programs that find deleted information on media. There are a great many such programs, but the principle of their operation is approximately the same, so we will consider only the most common and proven ones.
To do this we need:
Laptop or personal computer with Windows OS installed;
USB cable for connecting your tablet or phone;
software to recover deleted files. There shouldn’t be any problems with this - there are a huge number of them on the Internet and they are distributed mostly free of charge.
Let's look at two of the most popular applications 7-Data Android Recovery (Download from the developer’s site) and Dr.Fone (Download).
7-Data Android Recovery
This program has gained its popularity because it can be used to recover any type of information, be it texts, photos, audio, or video files. Also, unlike many similar utilities, it allows you to work not only with the memory card, but also with the system partition of the device itself.
So, connect to the PC in USB debugging mode, run installed application. The next step is to select the partition where the files that need to be recovered were located.
7-Data Android Recovery itself will start scanning the partition for search, as a result of which a sign will appear containing the deleted information. Let me make a reservation that this procedure can take considerable time, since it directly depends on the size of the memory occupied by the folder.
Select the desired file and click Save.
Simple, fast, not complicated, works with system partitions.
Dr.Fone
For this utility to work, you need to do a little configuration of the gadget itself, namely, enable root rights (rights that allow you to change system settings and work with system program settings) and connect in USB debugging mode.
After launching the program, it immediately begins searching for deleted files on Android. Let me remind you again - this may take some time. As a result, we get a table of files available for recovery.
Select the deleted file and click the Recover button. We indicate the path to the folder where it can be restored.

As a result of the above actions, the information received is saved on HDD computer.
Restore directly to an Android device
Unfortunately, a computer may not always be at hand, but this is absolutely no obstacle to recovering deleted files on Android. You can get by with one device by downloading the utility directly to it. The Dumpster program (download) copes well with this task. It is installed in the same way as all other applications for Android and plays the role of a kind of recycle bin for storing deleted files. By the way, in the settings you can specify which types of data are preferably stored and which can be deleted immediately.

It will not be difficult for the user to recover deleted data, since after launching the application will independently scan the internal memory of the device and provide a list of all deleted data. After which you can select a file that will be restored to the folder where it was located before deletion.
As you can see, deleting information is not always irreversible. But it still happens that despite all efforts, lost information cannot be saved.
If you couldn't restore it?
If all of the above methods are unsuccessful, you will most likely not be able to recover your data.
But, you can still try logging into photos.google.com using your account. This record is requested from the user when the device is first turned on and can subsequently be used to store and retrieve information from various resources. So there is always a chance that your photos are synchronized and will be found on this resource.

In the same way, you can try to restore contacts using the link contacts.google.com. But what may come as a surprise here is a list of contacts collected from all devices and applications mixed together.
In conclusion, I would like to remind you that no matter what miracles modern applications for data recovery work, the most reliable and reliable option is to synchronize all data with your account, or create archival copies on other storage media.
- Tutorial
Nowadays, more and more smartphones come without an SD-card slot, and information has to be stored on the built-in memory with access to it via MTP. This connection mode does not allow standard means to restore phone data after a wipe or accidental deletion.
Today, using the example of a combination of Xiaomi Mi2s and Windows 8.1, I will try to tell you how you can recover lost data. For those interested, welcome to the cat.
It should be noted that if you mistakenly formatted the internal memory of your smartphone/tablet/smartpad, then you should not be upset, and most importantly, in no case should you write anything to the device’s memory, this way you will be able to recover more data.
The MTP protocol does not allow the computer to recognize the connected device as a USB drive and recovery programs cannot scan such a device and save the data, so we will need to copy the entire internal memory partition as a system image.
Preparing your Android device
You will need root and USB debugging enabled.PC preparation
In order to copy the system partition, we need:- Drivers for your device (in case of problems habrahabr.ru/post/205572);
- ADB (adbdriver.com or developer.android.com);
- FileZilla server.
VHDtool
We create a folder with the address C:\cygwin64\000 (the name does not matter, just don’t use letters other than Latin), our image will be located here. Copy it to the VHDtool.exe folder.FileZilla
During installation, we agree to all standard settings.After installation, FileZilla will start automatically, but you need to exit the program and run it as Administrator.
When you start FileZilla it will ask for the server name, leave everything as it is.
Listen on those ports 40
timeout settings - the default is 120, 60, 60, and we set 0 everywhere and click OK.
Go to edit - users. In the users window, create a new user. In my case this is the qwer user.
Click Add - write the name - password pass - click OK.
Next, in the same Users menu, select the Shared folders tab on the left. We go there and add the folder into which our block will be uploaded. Click Add and add the folder C:\cygwin64\000. The path to this folder will appear in the window. If there is no letter H to the left of the inscription C:\cygwin64\000, then you need to click Set as home dir. Then, highlighting the line C:\cygwin64\000, you need to check the Read and Write rights. Then click OK.


A.D.B.
We will need the following files:- adb.exe
- AdbWinApi.dll
- adb-windows.exe
- AdbWinUsbApi.dll
- fastboot.exe
You can download them at.
Or extract the Android SDK from the distribution kit.
Copy them to the folder C:\cygwin64\bin
Checking ADB operation
We launch the console from the folder C:\cygwin64\bin; to do this, just enter cmd in the address bar of Explorer
Enter the command:
The list of connected devices should not be empty; if after the line List of devices attached is empty, then you have not installed USB drivers or have not enabled USB debugging.
When everything goes well, the console looks like this:

20352f2c – my Xiaomi Mi2s
USB modem mode
We will need to connect the device via USB to your PC and enable USB modem mode. I'm using CyanogenMod 11 and this mode is located on the path: Settings > Wireless network> More... > Modem mode > USB modemScreenshot

Now we need to find out what IPv4 address your computer received.
Using the ipconfig command on the command line
or
We follow the path: Control Panel\Network and Internet\Network and Sharing Center

Click on the inscription 'Connect by local network’ further Information and copy the IPv4 address.

In my case it is 192.168.42.79
Important! Every time you reconnect USB cable and the on/off switch for IPv4 modem mode will change.
What memory block do we need?
All the memory in your device is divided into logical blocks, we don’t need to download everything, just understand which section contains the erased information.Now we need to look at the list of memory blocks, to do this we enter the following commands line by line:
Adb shell su find /dev/block/platform/ -name "mmc*" -exec fdisk -l () \; > /sdcard/list_of_partitions.txt
Hint: if you are too lazy to manually rewrite commands or are afraid of making a mistake, then you can use copying, but pasting a line into the console in the usual way will not work, so you need to right-click on the console window, then select Edit > Paste.

After which the file list_of_partitions.txt will appear in the internal memory, which we need to copy to the PC and study.
You can copy it to our 000 folder using a simple command (it should be executed in a separate window command line):
adb pull /sdcard/list_of_partitions.txt C:/cygwin64/000
My file looks like
Disk /dev/block/platform/msm_sdcc.1/mmcblk0p27: 25.6 GB, 25698483712 bytes 4 heads, 16 sectors/track, 784255 cylinders Units = cylinders of 64 * 512 = 32768 bytes Disk /dev/block/platform/msm_sdcc.1 /mmcblk0p27 doesn't contain a valid partition table Disk /dev/block/platform/msm_sdcc.1/mmcblk0p26: 3758 MB, 3758096384 bytes 4 heads, 16 sectors/track, 114688 cylinders Units = cylinders of 64 * 512 = 32768 bytes Disk /dev/block/platform/msm_sdcc.1/mmcblk0p26 doesn't contain a valid partition table Disk /dev/block/platform/msm_sdcc.1/mmcblk0p25: 402 MB, 402653184 bytes 4 heads, 16 sectors/track, 12288 cylinders Units = cylinders of 64 * 512 = 32768 bytes Disk /dev/block/platform/msm_sdcc.1/mmcblk0p25 doesn't contain a valid partition table etc...
The internal memory in my device is 32 GB. Therefore, I am looking for the largest partition, in my case it is mmcblk0p27 with a size of 25.6 GB, in yours it will most likely have a different name, or will not have a p** at all. Of course, no one guarantees that the largest partition will be the one on which just recently your photos, videos, documents, etc. were stored, but in 90% of cases this turns out to be exactly the memory partition that we need. Otherwise, you will have to copy all the images in order and check each of them.
Copy the memory partition to the PC.
If you have already closed the cmd window, then launch it again.
Enter the commands line by line:
Adb shell su mkfifo /cache/myfifo ftpput -v -u qwer -p pass -P 40 192.168.42.79 mmcblk0p27.raw /cache/myfifo
Don't forget to make appropriate adjustments to your code!
Let's decipher what is written:
Qwer - name account in FileZilla (you have your own if you changed it)
pass – password for your account in FileZilla (you have your own if you changed it)
40 – FileZilla server port
192.168.42.79 – FileZilla server address (you have your own)
mmcblk0p27.raw – memory block to be copied (you have your own)

Open a second command line window and enter the commands:
Adb shell su dd if=/dev/block/mmcblk0p27 of=/cache/myfifo
We look at the FileZilla window and see that the downloading of mmcblk0p27.raw to the C:\cygwin64\000 folder has begun, now you can close the cygwin windows and take a tea break.

Convert and restore
Are you back? Did you download the file? Great. Turn off the phone, connect the Internet. Launch Cygwin.bat and enter the following commands.Cd C:/cygwin64/000/VhdTool.exe /convert mmcblk0p27.raw
Don't forget to correct mmcblk0p27 to your block number!
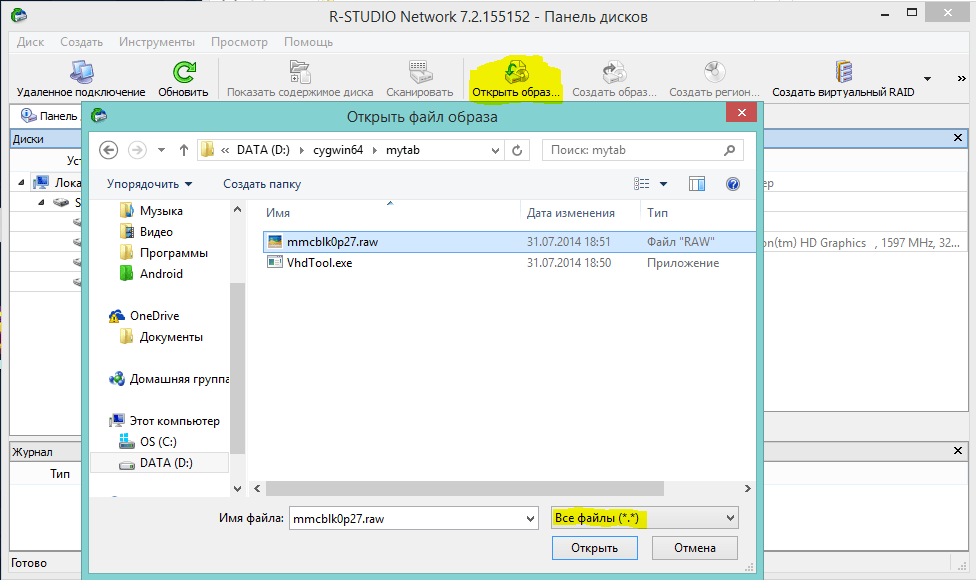
The conversion took me a couple of seconds. The output is the same mmcblk0p27.raw file in the C:\cygwin64\000 folder, but slightly different. This converted file can be mounted as a virtual disk, or, for example, through R-studio, data can be restored directly from our image. That's what I did.
Hint: important points marked yellow.
Results
My goal was to explain in popular language how to copy a system partition from an Android device to a PC. Perhaps some will blame me for the difficulties associated with a USB modem and ftp, and will say that it was probably easier to pull out the image. I’ll answer this: I tried other methods described on 4pda and xda-developers, it didn’t work out for me, but with ftp it worked on the second try, and when writing the article everything generally went like clockwork.I was able to recover all the lost photos without loss of quality, and even those that I had not even thought of recovering. During the restoration, photographs were discovered that I took in August last year, when I just bought the phone and tested the camera.
In conclusion, I would also like to mention another small utility that recovers data -
Surely everyone has had cases when, with one wrong movement of your hand, you accidentally deleted important information from a mobile gadget. And if on a personal computer similar problems are solved relatively easily, then with smartphones and tablets things are much more complicated.
If you delete a file on your phone, it is, in principle, possible to restore it, and the matter is not as difficult as it seems at first glance. But there are some nuances here that concern not only the software part, but also the hardware. Nevertheless, there is always hope for not resuscitating lost data.
From our article you will find out whether it is possible to recover deleted files from your phone and how to do it with the least loss for both mobile device, and for your nerves. We will look at the main tools needed for this event and provide brief instructions on each.
Features of mobile platforms
It’s worth mentioning right away that devices running iOS and Windows Phone in this regard, they are no good and lost information is resuscitated extremely reluctantly and only with rare exceptions. So if you delete a file on your phone, it is not possible to recover it on these OSes. The only thing that is at least somehow amenable to specific software aimed at resuscitating data is memory cards. And, alas, everything is permanently deleted from internal drives.
The Android platform, unlike iOS and Windows Phone, is much more flexible in terms of data recovery. Despite the abundance of different proprietary firmware, they all provide more or less free access to the internal storage, not to mention memory cards. In the case of Android, it is much easier to recover deleted files on your phone. This is the platform we will be considering.
How to revive files?
In order to recover deleted files on your phone, you will have to turn to third-party software for help. There is a lot of the latter on the Internet, but not every utility adequately copes with the assigned tasks.
Some programs do not try to recover deleted files from the phone at all, but introduce a virus there. So you need to be extremely careful when choosing such software. We will consider the most popular and well-proven applications with big amount positive feedback from users.
Dr.Fone for Android
Many advanced users recommend this product. The utility allows you to recover deleted files both from the phone’s memory card and from the internal storage. And it copes with the task extremely effectively. At least noticeably better (higher resuscitation rate) than other similar software.

This is a desktop application, so for it to work we need a personal computer running the Windows operating system. The program performed equally well both with the new tenth version of the OS and with the older ones - “eight” and “seven”.
In order to recover deleted files from your phone's memory, you need to install the program on your computer, run it and connect your mobile gadget via a USB interface. It is also worth noting that you need to enable the “USB Debugging” mode on your smartphone or tablet.
After the program determines the model of your device, it will begin installing drivers for it (an Internet connection is required). After which a working window will appear with a list of data for resuscitation. To recover deleted files from your phone, you need to place the appropriate beacons - audio, photo, video, or all together.

The program also allows you to revive call history, contacts, SMS, as well as messages from the popular WhatsApp messenger. The utility scans all drives, including external ones. So Dr.Fone for Android can also recover deleted files from your phone’s flash drive.
It is worth noting that the acquired administrator rights (root) significantly increase the chances of successful data recovery.
Terms of distribution
Such effective and multifunctional software, alas, simply cannot be free. The developer distributes it only under a paid license without any exceptions such as promotions, bonuses, etc. Therefore, if you want to recover deleted files from your phone and do it as efficiently as possible, you will have to fork out for a key.
As a starter, the developer offers a trial version, where the utility, after scanning, determines what and how it can resuscitate. If you are satisfied with the preliminary data, then you can already think about purchasing a license.
DiskDigger
Another program that allows you to recover files deleted from your phone. The utility's work is aimed mainly at resuscitating photo images - JPG, PNG, BMP and GIF. You can find it on Google Play.

To get started, you need to download and install the application. After launch, a wizard-assistant window will open, where you need to click on the “Start image search” button. Then the utility will analyze all available drives and provide a preliminary result. From the list presented, you need to select the files that you are going to restore, and then click on the “Recover” button.
If the settings did not specify the location where the files will end up after the procedure, a window with a file manager will appear. Here you need to select a folder where all images will be sent after recovery.
The utility can resuscitate files without obtaining administrator rights, but judging by user reviews, root access significantly increases the chances of success. Also in the settings you can set more detailed data for searching for deleted images: size, volume and creation date.
Terms of distribution
The program is distributed under a free license and, unlike other similar products, is completely devoid of annoying advertising. Nevertheless, the latter still occurs, but it cannot be called aggressive. Because the developer uses this utility to advertise its related and noticeably more functional product - DiskDigger Pro. It is paid and allows you to recover not only images, but also other types of files.
GT Recovery for Android
Same as in the previous case, this mobile app and a personal computer is not needed to resuscitate files. The utility has proven itself very well in working with, so to speak, problematic gadgets and allows you to recover deleted files on Samsung, Motorola, LG phones and other devices with proprietary firmware that reluctantly or do not at all provide access to system data of the Android platform "

The application has wide capabilities and allows you to revive not only photo, audio and video content, but also SMS, contacts, text documents, calls, as well as messages from the social messengers WhatsApp and Viber.
The utility can be found on Google Play. After downloading and subsequent installation, the main window with the assistant wizard will open. Here everything is divided into sections, upon opening which the program prompts you to start scanning the device.
Upon completion of the scan, a list of found files is displayed that can be resuscitated. Having placed the beacons on the ones you need or selected all, you need to click on the “Restore” button. After which the program will prompt you to select a location on the drive to save the data.
If you have administrator rights, the chances of success increase noticeably and there are more sections for recovery in the master-assistant. But even without root access, the program performed very well.
Terms of distribution
The utility is distributed completely free of charge, but the developer, alas, decided to monetize it properly using advertising. Annoying banners, offers from Aliexpress and installation packages with games rain down quite often. Nevertheless, the product is very smart and effective, so if you don’t want to spend money on serious decisions and don’t often play around with the “Delete” button, then you can be patient.
EaseUS Mobisaver for Android
It is also a mobile file recovery utility, so there is no need to involve a personal computer. Reviews about the program are mostly positive and you can find it on Google Play. It’s worth warning right away that for the application to work correctly, you must obtain administrator rights. Otherwise, the utility simply will not work.

The program, alas, does not have Russian localization, but there should be no problems with either installation or subsequent use. The application interface is simple, intuitive and even a novice user can understand it.
In order to restore files, you need to run the utility and in the window that appears, select the required section for resuscitation: video, photo, audio, documents, contacts or SMS. After which the program will begin scanning drives for deleted data.

Judging by user reviews, the utility copes with resuscitation on such fastidious gadgets as Samsung, LG, Motorola, NTS and Nexus from Google. The application also supports older versions of the Android platform - 2.3 and 4.0.
Terms of distribution
The utility is distributed free of charge and is surprisingly practically devoid of advertising. She is not at all large quantities and you can’t call her aggressive. Those who need advanced features without any restrictions on the number of files for resuscitation will have to fork out for the Pro version. It functions exactly the same as the free one, but is devoid of advertising and works with a wider list of mobile gadgets.
Finally
All the utilities described above do not provide a 100% guarantee of recovering lost files. It is also worth considering that the chance of resuscitating deleted data increases significantly if you carry out this procedure immediately after accidental erasure. New files overwrite sectors and tracks on the drive, and old information disappears irrevocably.
In order not to suffer with the recovery procedure, it is better to make it a rule to backup your data. Moreover, today it is not at all necessary to do all this manually. There is special software that will periodically make copies of all your files without your participation. All you have to do is identify which ones.
In addition, the abundance of cloud services allows you to completely forget about the problem of data recovery. Google Drive, Dropbox, Yandex.Disk and many other similar solutions are at your service. If you are an ordinary user and all your data takes up no more than 5 GB, then the services of these services will be free for you.
Sometimes it happens that a user accidentally deletes important data from a phone/tablet running Android OS. Data may also be deleted/damaged due to a virus or system failure in the system. Fortunately, many of them can be restored.
If you reset Android to factory settings and are now trying to restore the data that was previously on it, then you will not succeed, since in this case the information is deleted permanently.
Available recovery methods
In most cases, you will have to use special programs for data recovery, since operating system The necessary functions are not included. It is advisable that you have a computer and a USB adapter at hand, since the most effective way to recover data on Android is only through a desktop PC or laptop.
Method 1: File Recovery Apps on Android
Special programs have been developed for Android devices that allow you to recover deleted data. Some of them require the user to be rooted, others do not. All these programs can be downloaded from Play Market.
Let's consider several options.
This program has two versions. One of them requires the user to have root rights, and the other does not. Both versions are completely free and can be installed from the Play Market. However, the version where root rights are not required does a slightly worse job of recovering files, especially if a lot of time has passed since they were deleted.
In general, the instructions in both cases will be the same:
1.Download the application and open it. There will be several tiles in the main window. You can select at the very top " File recovery" If you know exactly which files you need to recover, then click on the corresponding tile. In the instructions we will consider working with the option “ File recovery».

2. A search will be made for items to be restored. It may take some time, so be patient.
3. You will see a list of recently deleted files. For convenience, you can switch between tabs in the top menu.
4. Check the boxes next to the files that need to be restored. Then click on the button Restore" These files can also be permanently deleted using the button of the same name.

5. Confirm that you are going to restore the selected files. The program may prompt you for the folder where you want to restore these files. Please indicate it.
6. Wait for the restoration to complete and check how correctly the procedure went. Usually, if not much time has passed after removal, everything goes well.
This is already a shareware application that has a limited free version and an extended paid version. In the first case, only photos can be recovered, in the second case, any types of data. Root rights are not required to use the application.
Instructions for using the application:
1. Download it from Play Market and open it. In the first window you will have to make some settings. For example, set the format of the files that need to be restored in the “ File types" and the directory in which these files need to be restored " Storage" Please note that some of these options may not be available in the free version.

2. After setting all the settings, click on “ Scan».

3. Wait until scanning is completed. Now select the files you want to recover. For convenience, at the top there are divisions into pictures, videos and other files.

4. After selecting, use the button " Recover" It will appear if you hold down the name of the desired file for a while
5. Wait until the recovery is complete and check the files for integrity.
This app requires root access but is completely free. In fact, it's just " Basket» with advanced features. Here, in addition to restoring files, you can make backup copies. With this application it is also possible to recover SMS.
Application data is stored in Titanium Backup memory and can be transferred to and restored to another device. The only exceptions are some operating system settings.
Let's look at how to recover data on Android using this application:
1. Install and launch the application. Go to " Backups" If the required file is located in this partition, then it will be much easier for you to restore it.

2. Find the name or icon of the desired file/program and press it.
3. A menu should pop up where you will be asked to select several options for action with this element. Use the option " Restore».
4. The program may ask you to confirm your actions again. Confirm.
5. Wait for the recovery to complete.
6. If in " Backups"The required file was not found, in the second step go to " Review».

7. Wait while Titanium Backup scans.
8. If the required element is found during scanning, follow steps 3 to 5.
Method 2: Programs for recovering files on PC
This method is the most reliable and is performed in the following steps:
- Connecting an Android device to a computer;
- Data recovery using special software on a PC.
More details: How to connect a tablet or phone to a computer
It should be noted that the connection for this method is best done only using a USB cable. If you use Wi-Fi or Bluetooth, you will not be able to start data recovery.
Now select the program that will be used to restore data. Instructions for this method will be discussed using an example. This program is one of the most reliable in terms of performing such tasks.
1. In the Welcome window, select the file types you want to recover. If you do not know exactly what type a particular file belonged to, then place a marker next to the item “ All files" To continue, click " Next».

2. At this step you need to specify the location where the files are located that need to be restored. Place a marker next to " In a specific location" Click on the button Browse».

3. “ Conductor", where you need to select your device from the connected devices. If you know in which folder on the device the files that were deleted were located, then select only the device. To continue, click on " Next».
4. A window will appear indicating that the program is ready to search for residual files on the media. Here you can check the box next to “ Enable Deep Scan", which means conducting a deep scan. In this case, Recuva will take longer to search for files to recover, but there will be no chance of recovery necessary information will be significantly more.

5. To start scanning, click " Start».
6. Once the scan is complete, you can see all the detected files. They will have special marks in the form of circles. Green means that the file can be restored completely without loss. Yellow - the file will be restored, but not completely. Red - the file cannot be restored. Check the boxes next to the files you need to recover and click " Recover».

7. “ Conductor", where you need to select the folder where the recovered data will be sent. This folder can be located on an Android device.

8. Wait for the file recovery process to complete. Depending on their volume and degree of integrity, the time the program will spend on recovery will vary.
Method 3: Restore from Recycle Bin
Initially, smartphones and tablets running Android OS do not have “ Baskets", as on a PC, but it can be done by installing a special application from the Play Market. Data falling into such a “ Cart” are removed automatically over time, but if they were there recently, you can put them back in their place relatively quickly.
For the functioning of such “ Baskets"You don't need to add root permissions for your device. Instructions for recovering files are as follows (discussed using the example application):
1. Open the application. You will immediately see a list of files that were placed in " Cart" Check the box next to the ones you would like to restore.

2. In the lower menu, select the item responsible for data recovery.

3. Wait until the process of transferring the file to its old location is completed.
As you can see, there is nothing complicated about recovering files on your phone. In any case, there are several methods that will suit every smartphone user.
Finding something missing from Android important information(videos, photos, contacts, etc.), it is necessary to exclude writing new files to it and begin to return the lost ones as quickly as possible. In this case, you will most likely be able to revive the erased content in full. Let's consider the procedure for recovering data on Android phone if they are accidentally removed.
Ways to recover lost information
Special or unintentional erasing of user files from mobile devices running Android OS does not lead to their complete deletion. Data fragments will remain in storage until new content is written to replace them. To avoid permanent loss of personal information, you must refuse to copy any files to the same storage medium. Otherwise, the chances of success will tend to zero.
To recover data from Android, you can use one of the following tools:
- Previously created backup;
- Synchronization with Google cloud service;
- A resuscitation program.
Each method of returning erased information has its own strengths and weaknesses, and also requires compliance with certain conditions. Therefore, we will consider these methods in more detail.
Recovering deleted data using backup
To protect files on Android from accidental deletion, it is recommended to periodically write them to a safe place. If you need to save videos, photos and audio content, you can simply transfer them to your PC manually. In this case, when erasing data from the internal memory of the phone or external micro sd card backup copy will not be harmed.
Despite the simplicity of this method of reservation, it does not allow you to duplicate the phone book, SMS messages, personal settings and other specific information. They are copied using other tools, one of which is the backup system.
To create an Android backup with all user data, you can use the standard Recovery Mode recovery environment:
The system backup file will be written to the phone’s built-in card, but you can always copy it from there to a PC or another location. Now, if necessary, you can restore data from internal memory through the same Recovery environment by running the Restore function. 
One more effective way File recovery on Android is synchronized with Google cloud storage. This procedure is available to all mobile device owners and is absolutely free. The only thing that is required of you is to have a stable Gmail account.
Synchronization with Google for Android is done as follows:

After completing these steps, user data will be recorded in the Google archive and, if there is an Internet connection, will be available from any workplace. When auto-synchronization is activated, such copying will be performed continuously at certain intervals.
Now, if or, you can restore files by going to the “Recovery and Reset” menu and activating the appropriate procedure. By using cloud storage it is also possible to revive specific data types individually. For example, if you have lost a video or photo, use the Google Photo tool. The Google Contacts service will help you return numbers from your phone book. 
Recovering files using additional software
Restoring data on Android using the methods described above is relevant when you have a previously created backup of the system or your smartphone is linked to the Google service. If these conditions are not met, the erased information can only be revived using special software.
Data recovery programs are available on the Internet in large quantities, but the most effective utilities are:
- 7-Data Android Recovery;
- Dr.Phone;
- Undelete.
This software allows you to recover data from the internal memory of a mobile device, as well as from a built-in micro SD card. This is where it differs from similar resuscitation applications that can only work with external storage.
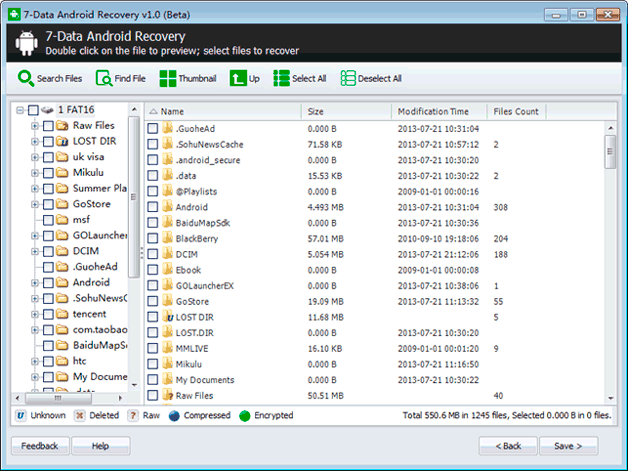
Recovering erased files through 7-Data Android Recovery
All recovery programs that work with the internal drive require advanced rights (root access). Therefore, before restoring data, you need to unlock the superuser profile on your phone. This can be done using the Framaroot utility:

After the Superuser profile is unlocked, you can proceed directly to resuscitation measures:

After you have succeeded in recovering erased photos on Android and other types of data, you can transfer them to your phone or leave them on your computer.
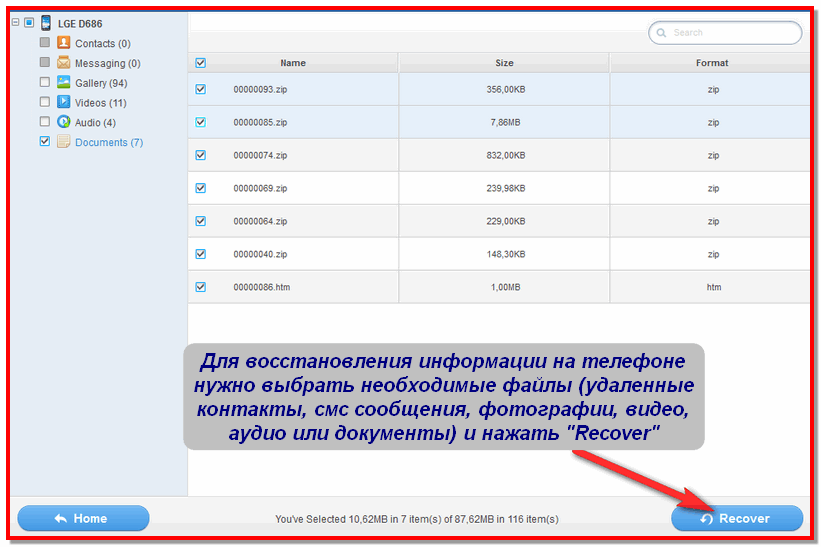
Recovering accidentally deleted files using Dr.Phone
The specified application also recovers data from the internal memory of the gadget via a computer. Therefore, before starting the main work, you will need to install Dr.Phone on your PC and then connect the problematic smartphone to it. After that we do the following.