How to make a bottle cone step by step. Master class craft product modeling design crocus cone from plastic bottles plastic bottles. Pine cone: manufacturing stages
Cones- at first glance, unnecessary items, but if you think about it, you can make a lot of beautiful crafts for children from them. Many different figures and animals can be made using pine cones, and today we will try to make a hedgehog. Let's turn on our imagination and think about how we can make a beautiful hedgehog.
How to make a hedgehog from cones with your own hands?
There are many different options for how to make a hedgehog, we will try to consider a simple option that would suit everyone. To make a hedgehog we need:
Cones
. Plasticine
. Eyes
The easiest option is to simply take a cone and stick legs and a head made of plasticine to it.
Let's take a closer look at how this is done.
1. We take a piece of plasticine and mold it into a cone, then stick it to the top of the cone.


3. We do the same procedure with the eyes. We make a notch, then stick brown plasticine.

4. Now, to make the eyes a little more beautiful, let's take two small pieces of white plasticine and stick them in the middle of the eyes.

5. Now you should make the ears. We take a piece of plasticine and make two small triangles, and then stick them to the head.
![]()
6. We do the same for the legs.

7. Now you can make fruit for the hedgehog. Using two colors of plasticine, roll into a smooth ball.


8. This is how easy it is to make a hedgehog out of pine cones.

The hedgehog is ready!
Even the smallest children, who can already do something with their own hands, can make such a craft.
VIDEO. How to make a hedgehog from pine cones yourself?
A hedgehog can be made from pine cones and plasticine in a slightly different way. It's all up to your imagination. You can get such a round-cheeked hedgehog if you give the plasticine nose, ears and paws a slightly different shape.

Try it, experiment, and you will definitely end up with a great craft!
Hedgehog made from cones and a plastic bottle
For this simple craft we will need:
1 plastic bottle and 2 caps;
Double-sided adhesive tape;
Good glue;
Deep plastic plate;
Thick paper;
Watercolor.

1. The first thing to do is to carefully cut the bottle.

2. Make shallow cuts at equal distances along the entire length. Fold the edges a little.

3. Now we need to fasten the plate and bottle, body and head for our hedgehog. Duct tape will do the job perfectly.

4. Using paint and a brush, color our “hedgehog” with, for example, brown and gray paint.

5. Attach the eyes with glue. You can make them from plain paper or remove them from an old toy.

6. Now you need to cover the perimeter of the plate with cones. Ordinary construction adhesive will serve as an ideal assistant. Due to its thickness and strength, it will best cope with the task.

7. Cover the plate from bottom to top with cones.

8. That's all, now you can decorate the hedgehog with leaves and send it to the exhibition.


Video. Hedgehog made from cones and bottles.
Crafts from pine cones.
Cones- an easy-to-work material and it makes beautiful crafts; they can be made bright and varied. To make your work brighter, the cones can be painted.
How to paint pine cones?

Colored pine cones- is a decoration in itself, especially on the eve of the New Year holidays.

For paint, it is better to use cans of graffiti paint or simple watercolor paint. The process, of course, is messy, but it’s worth it, the buds turn out fantastic!

How to make a spider from pine cones?
You can’t even imagine how many crafts you can make from pine cones. Here, for example, is an original spider made from cones:

To make it work for you, prepare:
Plasticine and threads for eyes;
Wire for legs;
Cones painted black.
Making a spider is as easy as making a hedgehog! Here are simple illustrated instructions:

New Year's decorations from pine cones
New Year is coming, and many of us like to make home decorations for this holiday ourselves. Pine cones are also suitable “material” for New Year’s crafts.
This is how you can simply make a wreath of pine cones on New Year:

All you need is an old metal hanger, painted pine cones and a pretty ribbon.
And here is another version of the Christmas wreath:


As you can see, you can create real masterpieces from simple pine cones! It's simple, beautiful, and most importantly - interesting!
For example, such wonderful animals are also made from pine cones!
Bear made of cones

Penguins made of cones

Bunny made of pine cones

Often kindergartens and schools are asked to bring some kind of craft from improvised materials. And in September-October, every children's institution necessarily organizes the best autumn crafts.
This cute one would be a great option hedgehog from a bottle and pine cones, which is not difficult to complete, but cannot be done without the help of an adult. It will show you how to make a craft, step by step.
How to make a hedgehog from a bottle and pine cones
For the craft you need the following materials:
Plastic bottle with elongated nose,
Small iron plate
Cones,
Needles,
Multi-colored maple leaves,
Scissors, glue gun,
Colored cardboard (for eyes)
Primer,
Acrylic paint Brown color,
Accessories for a hedgehog - rowan brushes, apples, leaves,
Rectangle of cardboard.
We cut off the spout from the plastic bottle, and make cuts along the edge so that we can attach the nose. Using tape, attach the cut to the plate.

Apply 2 layers of primer to the workpiece. Before applying the second layer, you must wait until the previous one has completely dried.

After the primer has dried, paint the workpiece brown. When the paint dries, we begin gluing the cones.

It is better to apply the glue not to the bump, but to the surface of the plate in a large drop. And immediately plant a cone in this drop.
We cover the entire back of the hedgehog this way.

Now let's prepare the place where our hedgehog will sit.
We cover the edges of a rectangular sheet of cardboard with maple leaves.

In a chaotic manner we glue needles on top of the leaves.

Place the hedgehog in the center on the glue.

We glue cones in the gaps between the hedgehog and the pine needles.
We mask the plate with pieces of moss or pine needles. On the hedgehog's needles we plant a maple leaf, an apple, berries and other things edible for the hedgehog.
Let's make the eyes. To do this, cut out 2 circles from thick white cardboard. You can circle a 5-kopeck coin. We cut out smaller rounds from gray paper, and even smaller ones from black paper.

We glue the circles on top of each other.

Glue on the finished eyes. The tendrils will be dried pine needles, which we attach to the base of the lid.

Our adorable hedgehog is ready to take part in anything!
Both children and adults are incredibly delighted with such a cutie.
Using this master class you can make the following hedgehogs (photos from ours):


Instead of a plastic bottle, you can use any elongated vegetable (zucchini or eggplant), then it will be a craft made entirely of natural material.

More options for hedgehogs:
from coffee beans

Cone scales, orange peel roses:

From pumpkin and straw:

Another, more environmentally friendly option: – master class

If you find an error, please select a piece of text and press the keys Ctrl+Enter. Thank you for helping to make our portal better!
Bouquet of napkins
A new master class by Elena Ermasheva on how to make a bouquet of napkins with your own hands. For so...
A simple doll or a Maslenitsa doll - choose
DIY doll for Maslenitsa Another work in the “Handicraft” nomination from Olga Pivnevo...
Raft from plastic bottles
Continuing the theme of crafts from waste materials, Dmitry Dubrovsky will tell you how he made a raft from...
Landscape design of plots is relevant both for ordinary summer residents and for employees of children's educational institutions. The decoration can be used as a flowerpot or added to the plot. Let's see how to make hedgehogs.
Step-by-step photo master class on how to make “hedgehogs” from plastic bottles and pine cones with your own hands
For the master class you will need the following materials:
- plastic bottles of different sizes;
- paints;
- wire (thickness 3 mm);
- cones;
- glue or liquid nails.
Cut off the front and back of the bottle. Insert them into each other, smearing the edges with glue (degrease the surface before work). The wider the bottle, the larger the size of the craft. You can use special small wide bottles that are sold in children's departments.

Paint the blanks black. Then use gray paint to decorate the face. Draw the eyes in several stages. Please note that simple gouache may peel off the plastic after drying, so take special paint or cover the bottles with papier-mâché (paper egg molds or gray toilet paper are soaked in boiling water, crushed and mixed with PVA).


Now glue the cones, placing them tightly against each other. Large spaces can be covered with small unopened buds. Please note that it is better to treat the top cones in advance (spray paint or varnish). At the end of the work, you soak the hedgehogs with varnish, screw on the mustache (wrap the wire around the neck and screw on the lid).


Install hedgehogs on the site. They can stand along the path, enclose a flower bed or be located in flowers. Such hedgehogs can also be made for theatrical performances or arrange it in the form of a flowerpot. You just need a wide bottle, in the middle of which a slot is made and a pot is inserted into which you insert either dried flowers or plant needle-shaped plants.
The easiest way to teach a child to love nature is in the form of play. The “Hedgehog” craft made from pine cones is best suited for this task. Firstly, the baby learns to work with natural materials. Secondly, by using a plastic bottle, you together save the environment from pollution. And thirdly, made with your own hands prickly hedgehog from the cones will become a true friend to the child, and he is unlikely to offend a living hedgehog.
Before you start crafting at the table, you will have to go into the forest for pine cones. This walk together will set you up for positivity. It’s good for the child to jump and run in the fresh air. Having splashed out his energy, he will be more diligent at the table.
To make a hedgehog from pine cones, you will need:
- 2 white plastic bottle caps,
- plastic bottle;
- deep plate (you can do without it);
- a can of brown spray paint;
- scissors;
- scotch;
- plasticine.
Cut half of a plastic bottle. Make cuts at the bottom so that the neck can be attached to the plate (it can be replaced with the bottom of a bottle). Secure the 2 parts with tape. Now paint the resulting base of the future hedgehog made of cones with an aerosol and let it dry thoroughly.
The body is ready, it's time to make the hedgehog prickly. To do this, glue the collected ones onto a plate. It is better to use so-called “liquid nails” - hot glue melted in a special gun.
The pine cone hedgehog is almost ready, all that remains is to revive it. To do this, make eyes from 2 lids, gluing the pupils from plasticine. The nose can also be made from a plasticine ball or the neck can be wrapped with electrical tape. You can also make a mustache for a hedgehog.

The composition will be completed with apples and berries made of plasticine. ina, herbarium leaves on a hedgehog’s needles. Such a craft can “live” anywhere: at home, at school, or become a decoration of a country landscape.
Useful tips
Toy eyes
PVA glue.

To make sure that there are no insects in the cones, it is better to clean them.
1. Cut thin pipe cleaners into small pieces (3-5 cm) - these will be hedgehog needles.
2. Cut out several small triangles from felt - these will be the ears of the hedgehogs.
3. Apply PVA glue to the ends of the cut pipe cleaners and insert them into the cone between its scales.

4. Glue felt triangles to the pine cones to make ears for your future hedgehogs. You can bend the triangles and then glue them to make the ears rounded.

5. Take a small pompom and glue it to the top of the pine cone - this will be the nose.

6. Take two small pieces of cut pipe cleaner, bend them in half and glue toy eyes to the fold. Let the glue dry for about 1 hour.


7. Insert the blanks with eyes into the pine cone between its scales.

Hedgehog made from fir cones and polymer clay (step by step)

You will need:
Polymer clay (black, beige or any light tone)
Black beads (in in this example their size is 4 mm)
Cocktail straw (optional)
Toothpick (for adding details)
PVA glue.
1. Roll a ball out of beige clay, and then make a cone out of it - this will be the face of a hedgehog.


2. Attach the muzzle to the pine cone and smooth the ends of the clay so that it sticks well to the pine cone.
3. From clay, roll two large “sausages” (for the hind legs), two medium ones (for the front legs) and two small circles (for the hedgehog’s ears).
4. Attach large and medium clay sausages to the pine cone so that they form the legs of a hedgehog. Make sure your hedgehog is standing well and adjust the position of his paws accordingly. Use a toothpick to add details - toes.


5. Squeeze small circles to make “pancakes” and attach to the bump in the place where the hedgehog’s head is - these will be the ears.
* Instead of pancakes, you can simply make small holes in the balls.
6. Roll a small ball from black polymer clay and attach (press) it to the tip of the muzzle.
7. Insert black beads in place of the eyes.


8. If you want to make your hedgehog smile, you can do it with a toothpick or a cocktail tube cut in half lengthwise.
How to make a simple hedgehog from fir cones

You will need:
Toy eyes
Plasticine (if desired).
1. Cut out a hedgehog’s face from felt - its shape resembles a triangle with one rounded top.
2. Glue the face to the pine cone.

3. Glue toy eyes to the face. If there are none, then you can cut out two circles from black felt and glue them.
4. Cut a small circle from black felt and glue it in place of the spout.
5. If you wish, you can make paws from plasticine or clay and attach them to the pine cone.
You can make a bunny in a similar way, only to create the paws and ears you will need a thin white pipe cleaner.


Hedgehog made from cones and birch bark (instructions)

You will need:
Birch bark (it can be replaced with regular paper or cardboard)
Pompom (in this example we used eucalyptus flower buds, but they can be easily replaced with a pompom, plasticine, clay or even a button)
Plasticine or small buttons (for eyes)
PVA glue and glue stick.
1. Cut a piece of birch bark shaped like half a moon. Twist it to form a cone and glue the ends together - this will be the face of the hedgehog.


2. Glue a pompom or attach plasticine to the tip of the cone - this will be the nose.
3. Making hedgehog ears. Cut two small circles from birch bark, make a cut on each one the length of the radius of this circle and twist it into a cone. Glue the ends together.


* To make ears, you can use plasticine or cut out two semicircles from paper, which you simply glue to the pine cone.
4. Glue all the parts to the pine cone.
* If you want to make eyes for a hedgehog, use plasticine or small buttons that need to be attached to birch bark (the hedgehog's face).
Hedgehog made of cones and plasticine

You will need:
Plasticine or clay
Toy eyes.
1. Roll 1 large ball from plasticine for the head, 4 medium balls for the paws, 3 small balls for the ears and nose.
2. Make a cone out of a large ball and attach it to the bottom (smooth) part of the pine cone.
3. Attach the paws and use scissors to create a pattern on them to make the paws more detailed.

4. Attach the nose to the cone. For the nose, you can use black plasticine or clay, while for the muzzle you should use a lighter-colored material.
5. Add artificial eyes and use scissors or a toothpick to make the hedgehog smile.
6. Attach balls that act as ears and make small holes in them for more detail.
Here is another version of such a hedgehog made of plasticine:

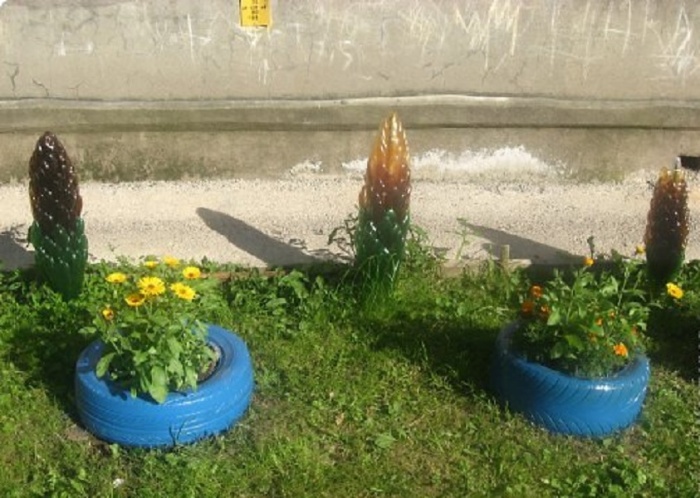
Crafts are often intended for landscape design plot, but sometimes they look relevant in an apartment. One of bright examples Cones made from plastic bottles are widely used. Small, neat specimens will organically fit into the New Year’s interior of the room, while giant products will effectively decorate local area. The proposed master classes will help you master the art of forming cones for various purposes.
Pine cone: manufacturing stages
Pine cone, depending on the chosen size, can become a decoration for a plastic Christmas tree in the yard, be used at home as a New Year's toy, or serve as a keychain.
To make one copy you need to prepare:
- Plastic bottle 2 l. The color is chosen arbitrarily, a brown or dark green product looks natural, transparent plastic can be interestingly colored at your own discretion.
- A pine branch is formed from a plastic bottle in a rich green hue.
- Sketches of the layers of a pine cone, made on thick paper.
- Large dark colored bead and wire.
- Marker, scissors and candle.
So, a master class pine cone from a plastic bottle:

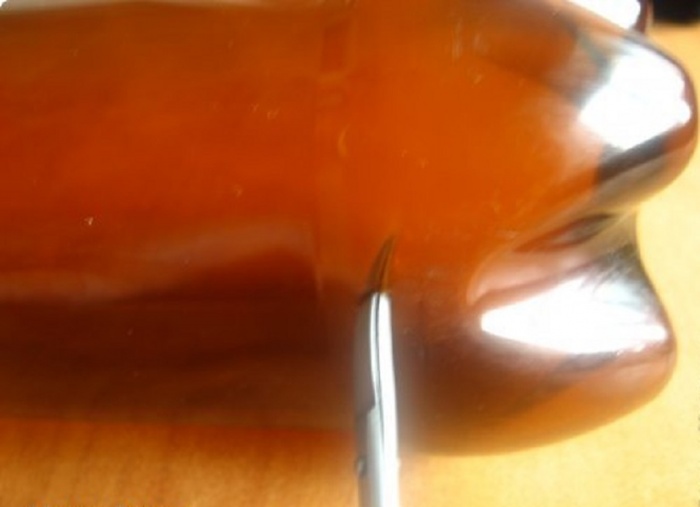
A cone without a frame looks uninteresting. A twig will help you achieve a spectacular composition. To do this, a strip is cut out of a green plastic bottle, and frequent cuts are made on both sides. The workpiece is held above the candle so that the “needles” move in different directions and the branch becomes fluffy.
At this point, the transformation of the bottle into a pine cone can be considered complete.

Giant cone
The second method is ideal for decorating the area. This could be a children's playground, a summer cottage or a house flower garden.
- Many bottles of the same volume and shape. Can be used plastic containers 1.5 l, 2 l or 2.5 l. It all depends on desired result. Attention! The container is selected in one, two or three shades. Usually brown, dark yellow and green specimens are used.
- Corrugated fittings or a smooth, pointed stick for stringing workpieces. The length depends on the volume and number of bottles prepared for the cone.
- Manicure and stationery scissors (entirely metal, without plastic handles).
Giant cone made from plastic bottles master class:
- By tradition, all bottles are carefully cleaned of stickers.
- A puncture is made on the side of the bottle, near the bottom.

- We begin to cut out the petals from it with nail scissors, capturing the convexities of the bottom by about 5 mm, as shown in the photo.

- As a result, something like an asterisk remains from the bottom. This stage is the most labor-intensive; it must be done with all the bottles.

- Work on the lump continues with the rest of the plastic container. Use large scissors to make cuts, not reaching a few centimeters to the neck. The process is identical for all bottles.

- Having prepared several blanks, they are inserted into each other; they should fit tightly. This is done in order to decide on the cuts, make them larger or leave them the same.

- When all the elements are ready, you can start assembling the giant cone. A pin is fixed in the ground and they begin to string all the plastic parts from the bottles, making an offset on each piece in such a way as to hide
further words of the author

These are the cones I make from plastic bottles.
We cut 12 squares of different sizes from a plastic bottle. 
We round the corners and cut out something like a daisy.
3.
When all the details are ready, light a candle and burn the edges of the petals so that they fall down and the flower itself into a convex bowl.
4.
Keep the part at a distance from the flame so that the plastic only deforms, but does not melt.
5.
When all the parts are ready, arrange them according to size.
the top three are smaller than the bottom piece by a quarter. We make a puncture in the center with an awl, and then string the remaining parts in descending order.
6.
We attach a bead between the parts, they will also create the tail of the cone.
7.
8.
When the cone is ready, cut out a spruce sprig from a green bottle, form it above the candle and secure it above the cone.
9.
The Christmas tree toy is ready.
10.
You can't buy this anywhere.
11.
I’ve been making these Christmas trees for more than ten years, and I’ve come up with more than a dozen options myself. The easiest one, even first graders can do it.
12.
The principle is the same. We only make cuts in a circle towards the center, straight.
13.
A puncture is made in the center with an awl and the needles are bent up and down in order. A puncture is made in the lid of the cream or mineral water into which a skewer of the required length is inserted.
14.
The parts are strung in descending order, with a large bead placed on top of the glue. The Christmas tree can be decorated with polystyrene foam, rain, etc.
15.
Glue the Christmas tree onto a stand made of disk, you can put gifts or plant an animal next to it. Our Christmas tree has been a constant success for many years.
16.
One of my first Christmas trees. Hugo Pugo
further words of the author
These are the cones I make from plastic bottles.
We cut 12 squares of different sizes from a plastic bottle.
We round the corners and cut out something like a daisy.
3.
When all the details are ready, light a candle and burn the edges of the petals so that they fall down and the flower itself into a convex bowl.
4.
Keep the part at a distance from the flame so that the plastic only deforms, but does not melt.
5.
When all the parts are ready, arrange them according to size.
the top three are smaller than the bottom piece by a quarter. We make a puncture in the center with an awl, and then string the remaining parts in descending order.
6.
We attach a bead between the parts, they will also create the tail of the cone.
7.
8.
When the cone is ready, cut out a spruce sprig from a green bottle, form it above the candle and secure it above the cone.
9.
The Christmas tree toy is ready.
10.
You can't buy this anywhere.
11.
I’ve been making these Christmas trees for more than ten years, and I’ve come up with more than a dozen options myself. The easiest one, even first graders can do it.
12.
The principle is the same. We only make cuts in a circle towards the center, straight.
13.
A puncture is made in the center with an awl and the needles are bent up and down in order. A puncture is made in the lid of the cream or mineral water into which a skewer of the required length is inserted.
14.
The parts are strung in descending order, with a large bead placed on top of the glue. The Christmas tree can be decorated with polystyrene foam, rain, etc.
15.
Glue the Christmas tree onto a stand made of disk, you can put gifts or plant an animal next to it. Our Christmas tree has been a constant success for many years.
16.
One of my first Christmas trees. Hugo Pugo
Crafts are often intended for landscape design of a site, but sometimes they also look relevant in an apartment. One striking example of widespread use is cones made from plastic bottles. Small, neat specimens will fit organically into New Year's interior rooms, giant products will effectively decorate the local area. The proposed master classes will help you master the art of forming cones for various purposes.
Pine cone: manufacturing stages
A pine cone, depending on the chosen size, can become a decoration for a plastic Christmas tree in the yard, be used at home as a New Year's toy, or serve as a keychain.
To make one copy you need to prepare:
- Plastic bottle 2 l. The color is chosen arbitrarily, a brown or dark green product looks natural, transparent plastic can be interestingly colored at your own discretion.
- A pine branch is formed from a plastic bottle in a rich green hue.
- Sketches of the layers of a pine cone, made on thick paper.
- Large dark colored bead and wire.
- Marker, scissors and candle.
So, a master class pine cone from a plastic bottle:

A cone without a frame looks uninteresting. A twig will help you achieve a spectacular composition. To do this, a strip is cut out of a green plastic bottle, and frequent cuts are made on both sides. The workpiece is held above the candle so that the “needles” move in different directions and the branch becomes fluffy.
At this point, the transformation of the bottle into a pine cone can be considered complete.

Giant cone
The second method is ideal for decorating the area. It could be a playground country cottage area or a house flower garden.
Available materials and tools:
- Many bottles of the same volume and shape. You can use 1.5 L, 2 L or 2.5 L plastic containers. It all depends on the desired result.
Attention! The container is selected in one, two or three shades. Usually brown, dark yellow and green specimens are used.
- Corrugated fittings or a smooth, pointed stick for stringing workpieces. The length depends on the volume and number of bottles prepared for the cone.
- Manicure and stationery scissors (entirely metal, without plastic handles).
Giant cone made from plastic bottles master class:
The cone can be made monochromatic or combine 2-3 colors. Keep a large number of plastic containers are not always convenient, so after accumulating 5-6 copies, the bottles can be cut, as described in the master class, and left folded. This way they won't take up much free space.