Smart LED strip for TV. Dynamic TV backlight. Benefits of LED TV Lighting in the Background
The backlight works from the USB connector of the TV, turns on/off along with the TV and the brightness can be adjusted.
For production you will need:
- White LED strip 12-24 volts (color tone to taste);
- Voltage-increasing module MT3608 (costs 29 rubles in China);
- USB "plug";
- a few wires;
- soldering accessories;
- Voltmeter;
- Ammeter;
- all sorts of little things.
Manufacturing process
First, we measure the size of the TV and figure out how to place the tape, cut off the required amount.

We solder the resulting 4 pieces of tape with flexible wires. Be sure to observe polarity.

The backlight will be connected from the USB connector of the TV, but there is only 5V and this is not enough for us. To operate LED strips you usually need 12 or 24V. Therefore, we use the MT3608 voltage-increasing module; it will increase the voltage from 5 to 12V. We solder the wires from the USB “plug” to the module input (VIn).


We sing the tape to the output of the module.

In principle, it should already work =)
To be able to regulate the brightness, I glued a “swivel” with a piece of a match to the variable resistor regulating the voltage (the “bum option”), thanks to this the resistor can be turned forward and backward only half a turn. The extreme positions will correspond to the minimum and maximum brightness; you select them yourself. (the yellow thing on the board is a tantalum capacitor; it reduces voltage ripple at the output and is unnecessary, ripple is already minimal).

After everything is assembled, you need to check the current consumed by the circuit at maximum brightness, for this you can use a USB voltammeter or, as in my case laboratory block nutrition. The voltage on the tape should not be higher than the nominal voltage.

The current should not exceed the maximum permissible for the connector.

After all the checks, we unstick the tape and glue the module onto the adhesive tape.


All is ready! enjoy

Finally
It is not necessary to do it exactly as I did and I did not invent the wheel.
You can make everything neater and more beautiful
The backlight does not overheat and does not blink, the conversion frequency is about 1.2 MHz
I am not responsible for a broken TV or work-related injuries, please be prudent and careful.
You can buy a 5V LED strip and dispense with the voltage-raising module.
You can use an RGB strip + remote control module if you want a remote control and special effects, but this will quickly get boring.
If the power of the USB connector is not enough, then you need to connect a 5 volt relay instead of the strip and through it turn on/off together with the TV not only the backlight, but also any other equipment plugged into the outlet, for example, acoustics.
Ambilight is a technology additional backlighting for Philips TVs. Implemented this technology by embedding LEDs on the back of the TV, as a rule, these are modern Philips smart TVs. Technology background Ambilight lighting is dynamic, this means that when watching a video with the backlight turned on, the background around the TV will change the color background depending on the color gamut broadcast on the TV display. Today, Ambilight technology has five generations, development is carried out by improving the number of colors displayed and possible effects.
- generation of televisions were equipped with simple lamp backlighting.
- the generation of TVs with Ambilight received two-channel backlighting. The backlight color is tied to the main color on the screen.
- The generation is called Ambilight Surround; it is a three-channel backlight, characterized by lamps independent from each other and three guiding zones: right, left and top.
- generation - Ambilight Full Surround, background lighting is directed in four zones: top, bottom, left and right. A screen panel was added to the TV body, this made it possible to achieve a softer background.
- generation - Ambilight Spectra - is capable of creating volumetric backlighting, thanks to 126 LEDs and a powerful processor that analyzes the image on the screen, as well as movement, creating a dynamic background projection, expanding the display.
.jpg)
.jpg)
Ambilight technology operates on such characteristics as: color, brightness, contrast, lighting direction, intensity and speed of backlight change.
For maximum effect, you need to pre-set the TV by going to the menu and selecting the “Wall Color” section to indicate the color of your wall behind the TV. Also an important factor is the distance at which the TV is located from the wall; Philips recommends leaving 25 centimeters.
If desired, in standby mode, you can use Lounge light is an Ambilight function that allows you to use the TV's backlighting as dim room lighting.
Today I will tell you and show you how to make dynamic monitor backlighting.
Surely you know that sitting at a computer in dark time 24 hours is harmful to the eyes, and this is due to the contrast between the monitor and the darkness. Therefore, to reduce eye strain, backlighting is needed. Of course, you can get by table lamp, but to create more comfort or just for beauty.

For dynamic backlighting we need:
1) Address LED Strip Light.
2) Resistor from 200-500 Ohms.
3) Arduino.
4) Thick and thin wire.
5) Solder.
6) Soldering iron.
7) Flux.
8) Electrical tape
9) Wire cutters

Assembly and setup:
1) We will connect everything as per the diagram below. The scheme itself is outrageously simple. The tape is connected from a 5V power supply (the author of this homemade product will connect it to the computer’s power supply), the ground of the tape and the DI contact are connected to the Arduino, and the DI contact is through a resistor, that’s all. Thus, the strip is powered by the computer’s power supply, and the Arduino is powered by the computer’s USB and receives information for the LED strip via USB.

2) First, let’s take a thick wire that will go to the power supply and a thin one for the Arduino, strip it, tin it and solder everything as in the photo below.

3) Next, solder two thin wires to the Arduino, not forgetting the resistor.

4) Now the fun part, you need to attach the tape to the monitor. The number of LEDs on the left and right should be the same, for example twenty on the left and twenty on the right, the same on the top and bottom, for example thirty on the top and thirty on the bottom, this is very important.

5) Lay out the tape on the table. Rectangle with the required length both width and s the right amount LEDs as in the photo below. Notice that the beginning of the tape with the DI contact is in the lower left corner and the end of the tape is also in the lower left corner, this is also very important.

6) Well, we glue the tape to the monitor and Arduino with double-sided tape.

7) Now we connect power to the tape and Arduino via USB to the computer.
8) Flash the Arduino. The firmware and instructions on how to do this can be found at.

9) Next, open the firmware file. We look where you connected the Arduino and remember, then go to “tools” and look for “port” and select that one USB port, to which you connected the Arduino and select it. In our case, this is port number five.

10) Then in the first setting (highlighted in yellow, in the photo below) we indicate our number of LEDs. And we complete the firmware.

11) Now install the AmbiBox program, it will be in the archive with the firmware. Everything is simple there. But at the end, when selecting a device, you need to specify “Adalight”.

12) Let's launch. We immediately set the language to Russian. And automatic activation when the computer starts, also so that this program does not interfere with the computer starting, we set the delay to 20s.

13) And now go to the next tab and immediately click on “more settings”.

14) Don’t be scared and remember the number of the USB port to which the Arduino is connected and select the desired port.

15) Next in the program we can select the mode for capturing color from the screen. For the author, only the first six work, but you can poke around yourself and choose the mode that suits you or just works. The author chose the “GDI FS Aero” mode; the distinctiveness of this mode is that standard transparent windows will be displayed in the backlight.

16) Click “show capture zones” and see that they are not configured at all. First, select the number of your LEDs.

17) The program should reboot. Then click on the zone setup wizard. And we adjust your parameters into the program, you can see an example in the photo below. I also advise you to increase the color setting zones, so the result will be prettier.
As you know, it is not recommended to watch TV in complete darkness to protect your eyesight. And with overhead light - I don’t like it - it’s too bright. When watching TV, I turn on the floor lamp and everything seems to be fine, but I wanted to organize lighting for the corner where the TV is. And don't let it shine in your eyes. Well, like one well-known company - Ambilight technology.
For this purpose, I purchased a warm LED strip white USB powered, because I didn’t want to bother with the separate on/off switch of this very backlight. Well, why didn’t I take an RGB strip - I’m quite happy with the white mono light and don’t need another remote control on the sofa. Well, here, as they say, who wants what - choose for yourself.
The tape came in a bag, wound on a reel, total weight- 45 grams. 
I ordered the length of the tape - 2m. I decided to place it on three sides (except the bottom) of a 46-inch TV. I think this will be enough for normal lighting.
The tape shines quite brightly from the USB connector 

As you can see, the tape consists of a base with LEDs and resistors applied to it. WITH reverse side- double sided tape. 
There are 120 LEDs located on two meters. 
Started with fitting 
These same 120 diodes were distributed as follows: top - 60 pieces, right and left - 30 each. 
Since it’s impossible to bend the tape normally and beautifully at 90 degrees at the corners of the TV, I cut it into these same 3 parts. Fortunately, the places where you can cut are indicated (see photo above).
I applied the tape to the selected and previously degreased areas. Then, taking precautions, I soldered these parts 
All that remains is to connect the design to the standard USB port of the TV 
And - here it is, what I wanted, rear view 
And now - in front 
Well, a little on top, just in case 
As intended, the backlight turns on when you turn on the TV and turns off with it. No unnecessary movements.
It took about an hour to do everything without rushing, including cleaning the work area and tools.
I “drove” the homemade product a little - the diodes practically did not heat up, you couldn’t feel it with your finger. I have doubts about the reliability of the supplied adhesive tape, I don’t know how it is? If necessary, I think it will be easy to replace with something stronger (I mean good tape).
Somehow like this. Good luck to all.
You've probably seen modern TVs with dynamic backlighting called Ambilight, developed by Philips. The essence of her work is to illuminate the space behind the TV with different combinations of colors depending on the events happening on the screen. However, to purchase such a TV you need to shell out several tens of thousands of rubles, so it is not available to everyone.
At the same time, fans of watching films on a monitor screen and fans computer games Philips Ambilight TVs are not needed.
PaintPack vs Ambilight. Ours are winning!
What should ordinary computer scientists do, who also want to contribute to the surrounding space? amazing game light magically escaping from the monitor? We present to you new development called PaintPack. This module is designed to implement the same idea as Ambilight technology, but allows you to achieve “light around” any computer monitor, and not a large TV specifically purchased for this purpose.
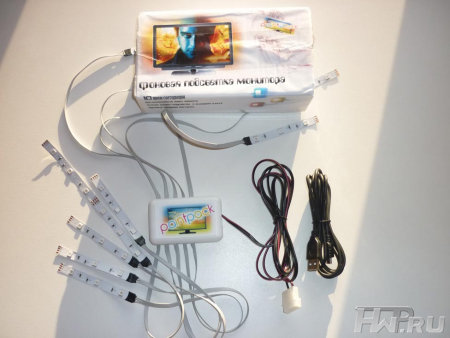
A device called PaintPack, in a simpler version, is a small box with ten cables with bright LEDs. These LEDs are placed evenly around the back of the monitor and provide uniform illumination to match the activity in the monitor. this moment on the screen. Second more advanced option Russian analogue Ambilight is a PaintPack light strip with 30 LEDs, connected into separate blocks of several pieces for convenient placement on the monitor and creating brighter and more detailed lighting.
This is many times lower than the price of TVs with Ambilight, and at the same time you are buying a device that can be easily removed and connected to different monitors depending on the need.
PaintPack - for beginners and professionals
Using the PaintPack module does not present any difficulties even for a person with minimal computer training. In order for the device to work and immerse you in a world of new visual sensations when watching movies or playing your favorite toys, just place the LEDs on the back of the monitor, connect the module to one of the USB connectors and install the included software.

To attach the LEDs, the manufacturer carefully provides special Velcro made from double-sided tape. The program for controlling the monitor backlight can be downloaded completely free of charge on the seller’s website paintpack.ru. Here you will find detailed instructions about what needs to be done and in what sequence for proper installation and configuration of the device.
Thus, every beginner who has installed the program on their own at least once and knows the location of the USB connector on their computer will be able to connect and configure the PaintPack module.

A person who is familiar with a computer and its related peripheral devices You will certainly like the PaintPack module because of its wide possibilities for self-customization to individual needs.
A short guide to installing and configuring the PaintPack module
The operation of the PaintPack module is ensured by a special application that can be downloaded for free on the manufacturer’s website. The program is periodically updated as new features are added to it.

After the program is successfully installed, you need to attach the device body to the back wall of the monitor, approximately in its center. Then the LEDs are glued, they can be arranged in any order at your discretion or depending on the availability of free space. The main condition for placing LEDs is their uniform distribution along the perimeter of the monitor body and located at a distance of 15-30 centimeters from the wall. You can then start the program, turn off the lights and enjoy the magnificent light show.

For most users the settings will be sufficient software by default, which were initially set by the manufacturer. If you still want to fine-tune the LEDs, then to do this you need to start earlier installed program. In the program window, select the item with settings and see on the monitor the capture areas for different LEDs. Each LED can be set to glow white or display different colors depending on what is happening on the screen. Also simple removal checkboxes can turn off individual LEDs. This completes the setup; you can test the operation of the backlight and then enjoy it when watching movies or clips, while playing games and other computer entertainment.

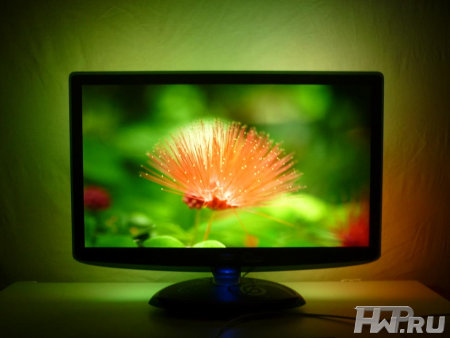
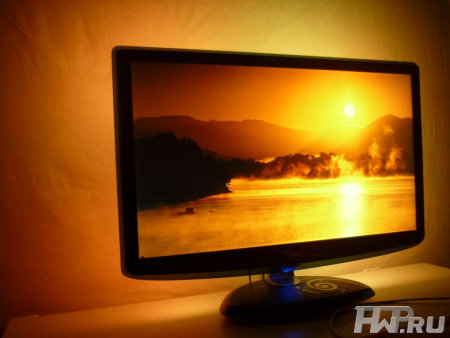
Various special effects from movies and clips, for example, explosions or dynamic chases, look especially beautiful when using the PaintPack module.
PaintPack is a great gift
We all know how difficult it is to choose gifts for loved ones several times a year. In such situations, manufacturers who produce completely new things come to the rescue. PaintPack is one great example of such a gift. The backlight module is a unique device of its kind. You will probably be surprised that the production of such affordable and universal Ambilight analogues has not yet been mastered in any technical area. developed country peace.

Even numerous Chinese electronics factories do not yet produce devices like PaintPack. Therefore, if you are choosing a gift for an advanced computer user, then the PaintPack module will certainly be a pleasant surprise for him, the existence of which he did not know. This gift will be no less pleasant for a child, a girl, and even your parents, who will certainly be pleased with the beautiful lighting of the space behind the monitor.
PaintPack official website -www.paintpack.ru
Roman aka Paintpack
19/12.2011