DIY pastry bag. How to make a pastry bag with your own hands: from paper, from a bag, from fabric
Housewives often bake cakes and pastries at home. The main device for decorating baked creations is pastry bag. But what if it’s not there? In this case, you need to make a pastry bag with your own hands, photo and step by step instructions will help. Exist different ways for the manufacture of such an element.
Homemade plastic piping bag
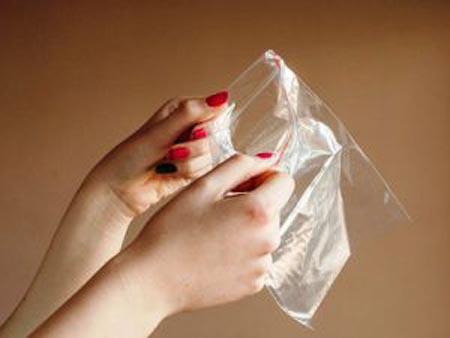
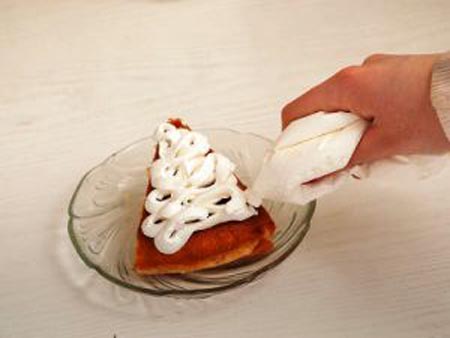
The most common method of making a baking bag is the use of a plastic bag. For these purposes, it is recommended to take material with high density. The package may have a zip fastener. Regular polyethylene material can simply be tied in a knot.
Step-by-step instructions for making a bag:
- IN plastic bag pours pre-prepared cream or pastry mousse.
- The bag is secured with a clasp or tied in a knot (with an elastic band).
- A small piece is cut off from one corner of the material with scissors.
The result is a practical pastry bag made of cellophane. The larger the corner is cut, the thicker the cream is squeezed out. Therefore, if you need to make a beautiful thin inscription on the cake, then you should cut off a small corner. In any case, experts recommend experimenting with the result in advance. 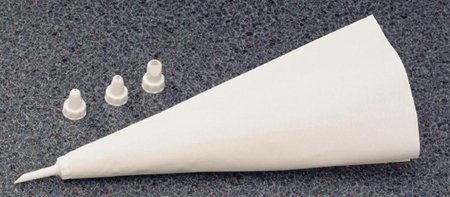 Using a homemade piping bag, you can easily decorate ready-made cookies or prepared cakes. Thanks to this device, housewives make symbolic inscriptions or beautiful images on baked goods. Besides plastic bag, some craftswomen use a sheet of parchment or fabric. Enough to sew a bag required sizes and make a hole in it.
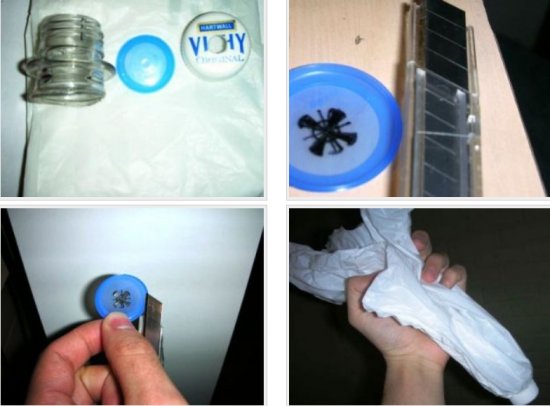
How to make a piping bag from a bottle
To make a functional device you will need a small plastic bottle. You can use it to make a bag for curly designs. This product will last for a long time. 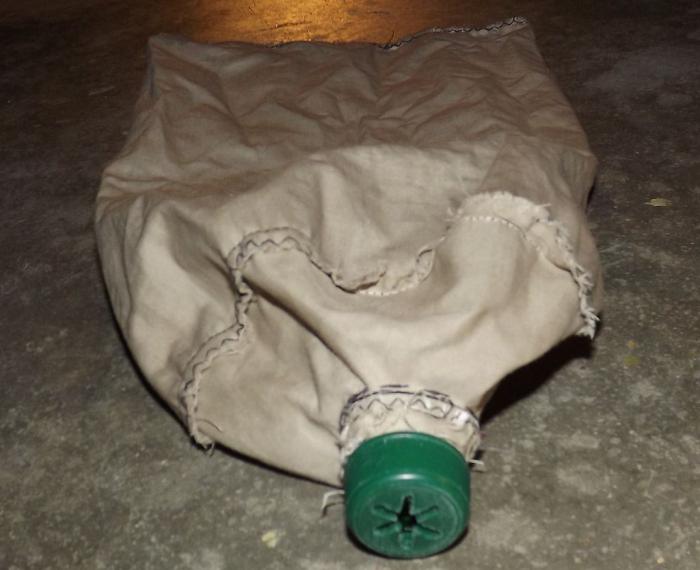
For preparation you will need the following items:
- bottle cap;
- cut off neck from a bottle;
- plastic or fabric bag;
- knife.
- You need to draw the desired pattern on the lid and carefully cut it out.
- The lid is screwed onto the cut neck.
- A hole is made in a pastry bag made of fabric or a bag to insert a neck with a lid.
- All elements are connected to each other.
- Cream is poured into the resulting bag and the desired pattern is made.
 Thanks to this method, you can make different designs of flowers, snowflakes or geometric shapes. It is enough to use different lids with holes. Thus, the design of a cake or other dish will amaze guests with its originality.
There are different options for preparing a confectionery device. It can be used to decorate not only sweet dishes. It is used to decorate salads and soups. The photo shows a do-it-yourself pastry bag that every housewife can make easily and quickly. Such methods are especially relevant for women who rarely use such devices. Therefore there is no need to buy them.
A pastry bag is an indispensable assistant for any housewife who loves to bake cookies, pastries and cakes, decorating them with patterns of creams. It is a narrow conical bag into which attachments for decoration are inserted. Naturally, you can buy it in a store, but it’s easier and more interesting to make it yourself. Moreover, it is not so difficult. There are three production methods: paper and bag and fabric. In our master class we will show you all the methods.
How to make a pastry bag with your own hands from paper
You can watch the video for more details:
How to make a piping bag from a plastic bag
You will need a plastic bag, paper and scissors. And, naturally, the desire to create!

You can use any plastic containers, for example, a milk or ketchup carton, an office file, etc.
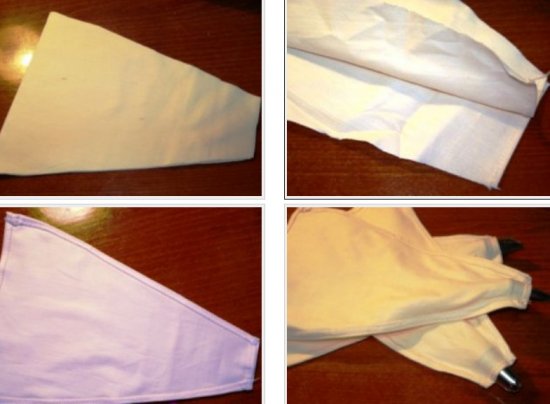
Fabric pastry bag
- First you need to choose a fabric. Make sure it washes well and doesn’t fade. It is best to give preference to teak.
- Cut out a triangle from the material. Sew it into a cone. Cut off the bottom corner.
- Now you need to sew in the nozzle and fold the seams. Just don’t twist the work, otherwise the cream may get stuck in the seams.
 Now our easy work is ready. Remember that after each implementation the bag must be washed and then dried well. Pastry bags made from paper and bags are usually used for a short time, but they can simply be made again.
Many people ask the question: how to make decorations with cream? Well, let's find out.
First you need to put the nozzle on the made bag. Fill it with cream to the middle and close it.
You should make patterns with your left hand, and hold the bag with your right hand and lightly press on it.
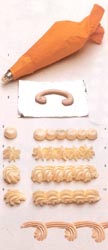
You can draw any kind of sketch on sweets, but stars and dots are especially popular. To make dots, use a round tip. Squeeze the point and finish pressing the bag by lifting it vertically. It is also necessary to work with the stars. When you are nervous, your hand may shake, causing the pictures to become blurry. To prevent this from happening, just substitute left hand, as a support. To apply small patterns and inscriptions, keep the nozzle close to the cake.
That's all the secrets. All that remains is to wish the hostesses delicious baked goods and creative flights of imagination.
Many people love sweets, be it pastries, pastries or cake. Most We are used to buying such products in stores, and this has its advantages. We don't waste our time in the kitchen, covered in flour, trying to create something delicious. It happens that we still want to tinker in the kitchen and please our loved ones with something delicious, for example, cakes with custard above. But there is no pastry bag and there is no time to run to the store in search of it either. The three master classes presented will tell you how quickly and easily you can build a pastry bag from improvised materials.First class mother. Pastry bag from a bag
Necessary materials:
Plastic bag;
Scissors;
Every home has a simple plastic bag and scissors. And if the need arises for a pastry bag, it can be quickly and easily constructed.
Execution steps:
1. Take the package, if it has a zip fastener, then this is only a plus. Carefully fill the bag with cream.
2. Next, close the bag with a zipper or tie its end into a knot.
3. Using scissors, cut off the corner of the bag. The pastry bag is ready, now you can squeeze out the cream.
The disadvantages of such a bag are that the cream is not squeezed out evenly from it and it will not be possible to make any shaped decorations.
The advantage is that such a bag is disposable and can be easily thrown away later.
Second master class. Kitchen parchment pastry bag
Necessary materials:
Kitchen baking parchment or wax paper;
Scissors;
Execution steps:
1. First of all, cut out a triangle from kitchen parchment and roll it into a cone.
2. Using scissors, cut out a corner at the end of the cone.
3. Then we fill our bag with cream, making sure that the cream does not come out of the cracks.
4. Then we fix the edges of the bag by bending its edges at the top.
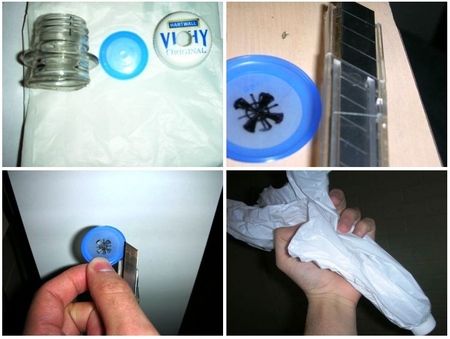
5. If you are not satisfied that the cream will come out uniformly. Then you can perform an additional nozzle.
Materials for additional nozzle:
Plastic bottle;
Marker;
Construction knife;
Execution steps:
1. Take plastic bottle and cut off the neck with a knife.
2. Then we take the bottle cap, and with a marker we draw the pattern we need and cut it out.
3. Then screw the lid to the neck and attach the resulting nozzle to the pastry bag.
The advantages of such a bag are that you can attach many different attachments to it.
Third master class. Fabric pastry bag
Necessary materials:
Any dense fabric, such as teak;
Nozzles;
Execution steps:
1. First of all, cut out triangle shapes from the fabric, and then sew them together.
2. Cut off the corner of the resulting cone.
3. Next, sew the necessary attachment into the bag and bend the seams outward.
The advantages of such a pastry bag are that such a bag will last a very long time.
When making such a bag from fabric, you should remember that the fabric must be dense and so that it does not fade. Such a bag should be washed without detergents.
These pastry bags are easy to use and do not require much time to make. And they are perfect for those who don’t cook often.
Enjoy your meal!
It is very convenient to be able to properly make a cornet with your own hands, especially if you don’t have a ready-made pastry bag on hand. I described this process in great detail and showed in the photo how you can spend less than a minute to get two ready-made cornets. Therefore, if you need to decorate a dessert or cake and don’t know what to replace the pastry bag with, then using my step-by-step photo material, you can make a cornet with your own hands easily and simply.
For work we will need:
- food paper in roll;
- sharp knife with a long blade.
How to make a piping bag at home
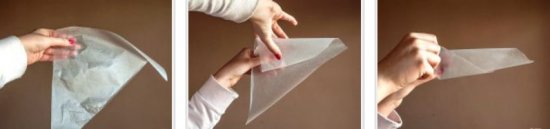
Take the paper by the upper left corner and fold it at an angle of 90°. Cut the folded triangle along the fold.
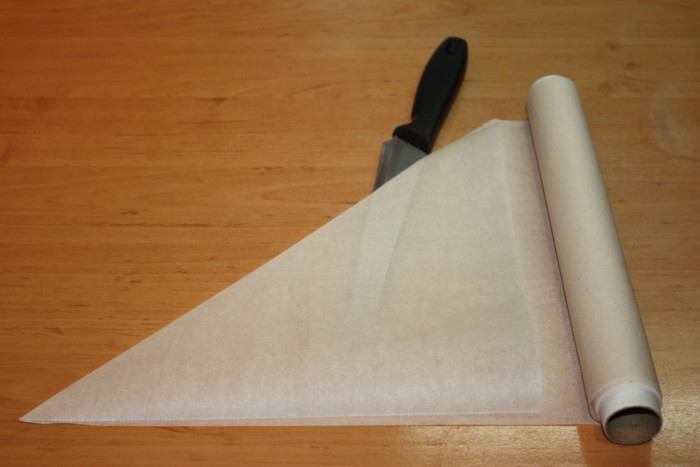
We also fold the remaining half and cut along the fold.
These are the two triangles we got.
To make the cornet larger or smaller, you must select the paper size accordingly. The wider the paper, the larger the cornet you will get. I have paper 28 cm wide. For the convenience of further explanation, I marked the corners with numbers: 1, 2, 3.
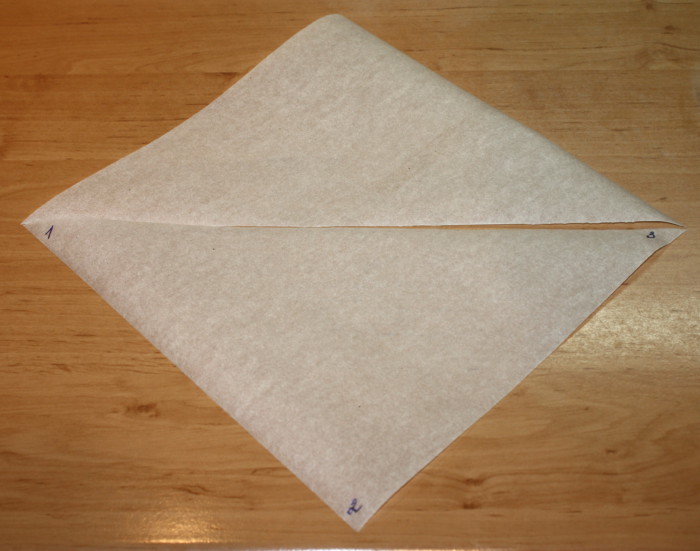
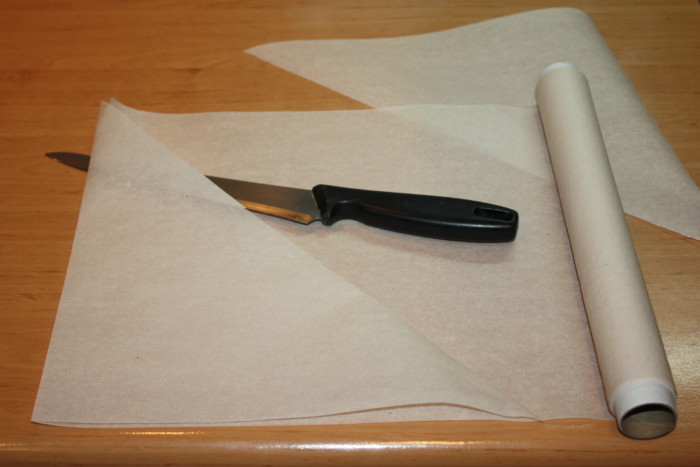
I turned the paper triangle over so that the numbers were facing out, but the paper was translucent and they were clearly visible. We hold the paper by corner 2, while corner 1 is to your left. We take corner 3 and connect it to corner 2, as shown in the photo and do not let go, fix it with your left hand. Pay attention to the tip of the future cornet. It should be sharp if you fold it correctly.
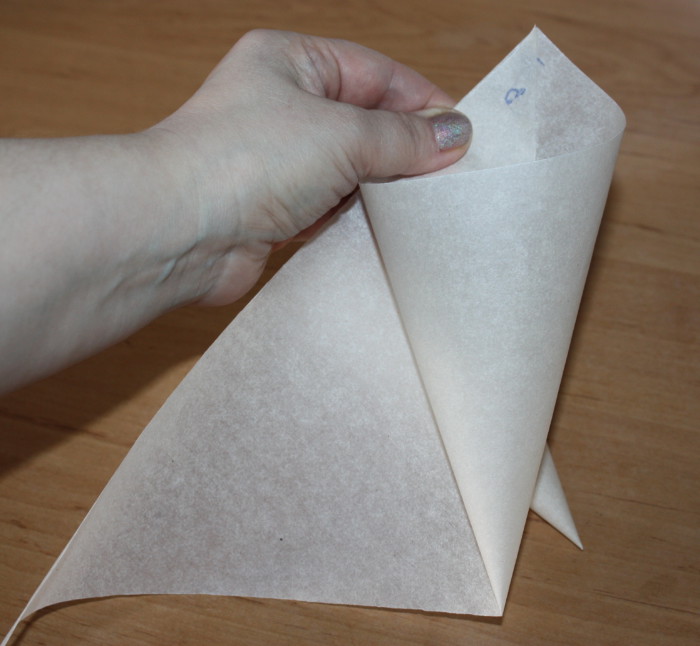
Now we take corner 1, wrap the cornet in it and connect corner 1 with corner 2, but not from the inside, like corner 3, but from the outside.
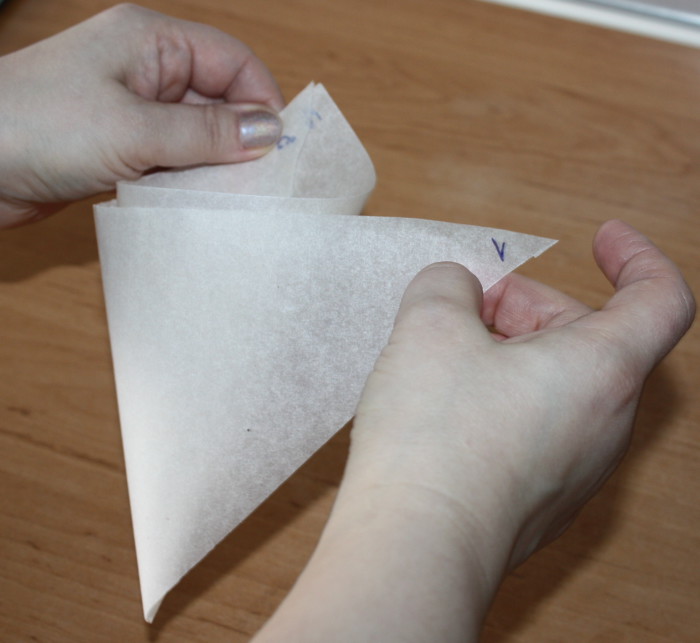
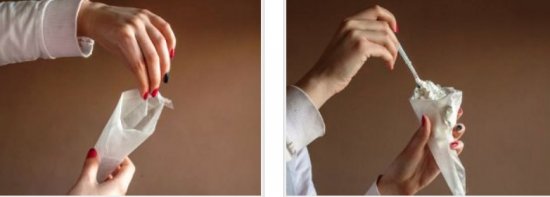
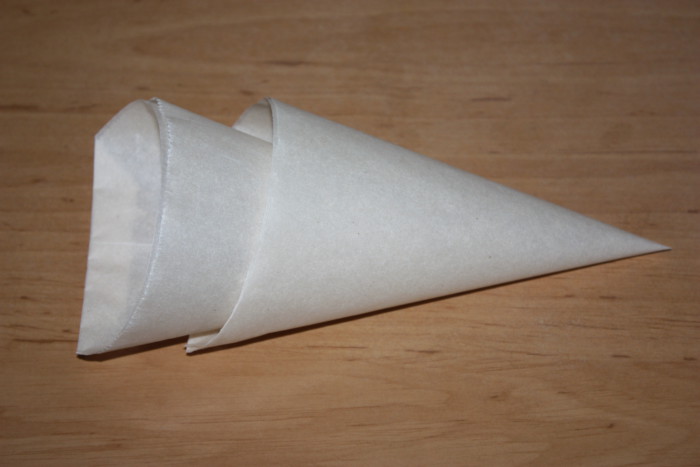
This is the assembled cornet I get: all the corners are connected and the tip is sharp.
![]()
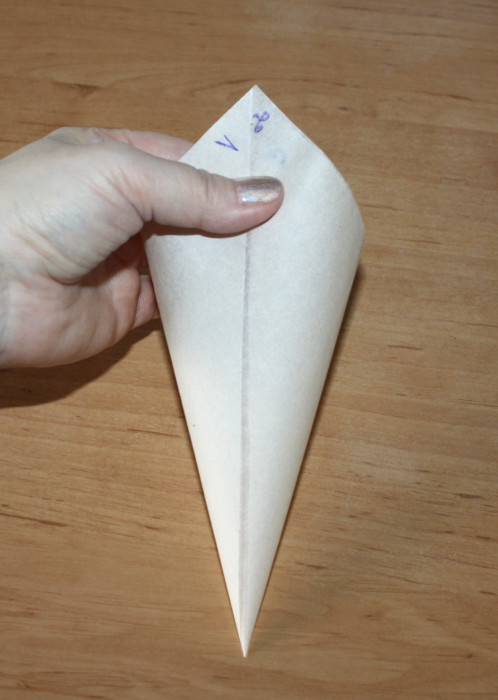
And this is what a handmade pastry bag looks like from the other side.
Now, fix all three corners connected at the top. There is no need to rush here; carefully bend the top of the corners twice and fix the bends.
That's all. The cornets are ready. All we have to do is fill them with the required content and cut the tip to the desired size.
This is how quickly, easily and simply you can make a pastry bag at home.
A pastry bag is indispensable assistant any housewife who loves to bake cookies, pastries and cakes, decorating them with patterns of creams. It is a narrow conical bag into which attachments for decoration are inserted. Of course, you can buy it in a store, but it’s easier and more interesting to make it yourself. Moreover, it is not so difficult. There are three manufacturing methods: from paper and bags and fabric. At our master class we will show you all the ways.
You can watch the video for more details: You will need a plastic bag, paper and scissors. And, of course, the desire to create! You can use any plastic container, for example, a milk or ketchup carton, an office file, etc.
- First you need to choose a fabric. Make sure it washes well and doesn't fade. It is best to give preference to teak.
- Cut out a triangle from the material. Sew it into a cone. Cut off the bottom corner.
- Now you need to sew in the nozzle and fold the seams. Just do not turn the work inside out, otherwise the cream may get stuck in the seams.