Children's sundresses
We sew children's dresses - easy and simple with Olga Klishevskaya
Hello dear moms, I'm starting a series of articles on tailoring children's dresses. The motto of these articles will be "Down with complex drawings and intricate calculations of patterns".
Many are scared off by complex patterns, taking measurements, various mathematical calculations, especially if at school you were not very friendly with geometry and drawing.
My goal will be to explain everything so that even mothers who do not have a mathematical mindset can sew clothes for their child.
I will show you how to sew beautiful children's dresses by yourself - I will tell you everything in as much detail and in an accessible language as possible, without resorting to abstruse tailor's terms.
For each dress, I will draw pictures-schemes, in which I will try to reflect step by step the tailoring of a children's dress, starting from creating a pattern to working with fabric. Even those who do not have sewing skills and a sewing machine will be able to please their daughter with a new thing sewn by loving mother's hands. So let's get started.
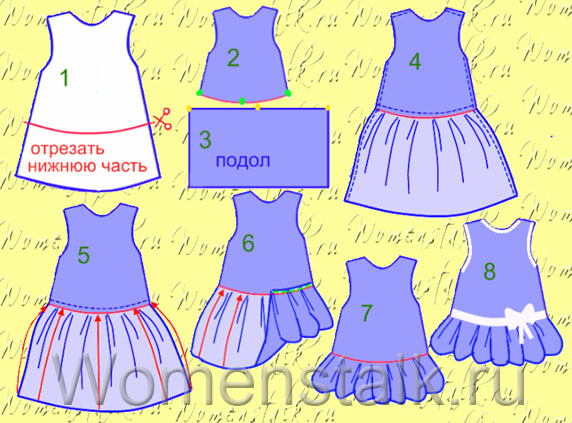
A simple one-piece dress is the basis of all dresses.
Let's start with a simple one-piece dress. I will tell and show how to make a pattern of a one-piece children's dress, and then sew all these dresses using this one pattern.
Yes, yes, having only one pattern, we will sew in the future a lot of different beautiful models of children's dresses. Maybe let's get started...
We draw a pattern.
As I promised, nothing super complicated will happen. Open your baby's closet and find a T-shirt there that fits her(that is, not cramped and not large, but more or less in size).
This T-shirt will serve as our assistant in creating a pattern for the future dress.
We also need a sheet of paper large enough to fit the pattern of our future dress - I use a tube of unnecessary old wallpaper for this (if you don’t have old ones, buy a tube of the cheapest wallpaper in the store - this roll will be enough for you for many patterns, like a baby , as well as yourself).
We unfold a sheet of wallpaper on the floor inside out (so that the pattern does not distract from the pattern), press the edges with something, so that he does not arch and crawl on the floor(I press my husband's dumbbells or thick books). On top we put a straightened (pre-ironed with an iron) T-shirt and draw a T-shirt around the contour with a pencil. Circled, - everything, we no longer need a T-shirt.
Note:
If you don't have sleeveless shirts , but there is only a T-shirt with a sleeve, do not worry, it will also fit. When you trace the T-shirt, use a simple pin to outline the armholes through the sleeve of the T-shirt. Along the entire seam of the armhole, poke holes with a pin through the T-shirt and the paper underneath. For this, it is better to spread the paper not on a hard surface, but on a carpet - this way holes will be better pierced. And then, along this perforated line, draw a contour of the armholes with a marker (armholes are a hole for the hands).
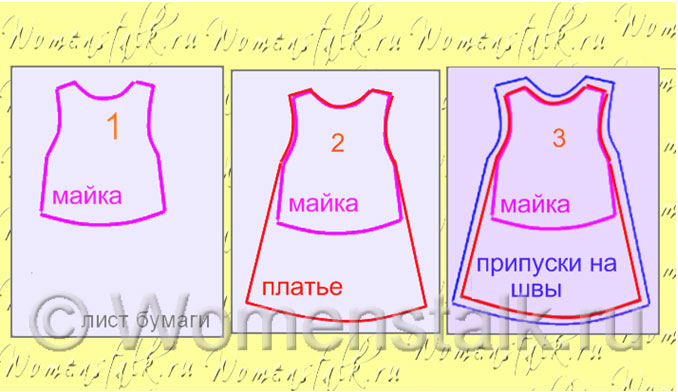
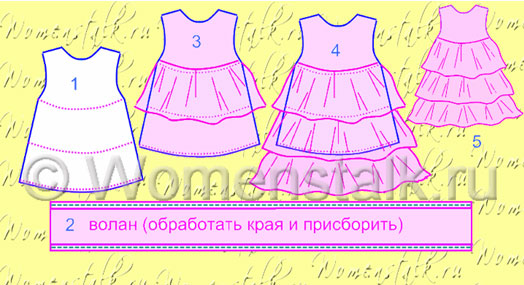
And now, on top of these T-shirt contours, we will draw our pattern .
The contours of the drawn T-shirt will greatly facilitate the creation of the pattern. They will help us to depict a proportional silhouette of the dress, where you do not need to calculate the length of the shoulder, the width under the bust, the length of the armhole (the armhole is a hole for the arm) - all this will already be on the drawn T-shirt. We look at the picture above. They circled the T-shirt (Fig. 1), drew a dress along the contour of the T-shirt (Fig. 2).
Pay attention to 3 points:
- the shoulders of the dress should be slightly sloping
- the bottom of the dress is not a straight line, but rounded
- lateral lines from the armpits down slightly diverge to the sides (like a trapezoid)
There's another one here important note:
For those who doubt whether the pattern drawn in this way will suit your child, there is a simple tailor's way to check this. This method will also allow you to draw any shape of armholes (holes) on your dress. The contours of the armhole and neck do not have to be the same shape as the shirt. You can choose any shape and depth of armholes and necks. There is only 2 rules, under which the drawn pattern is ideal for your child.
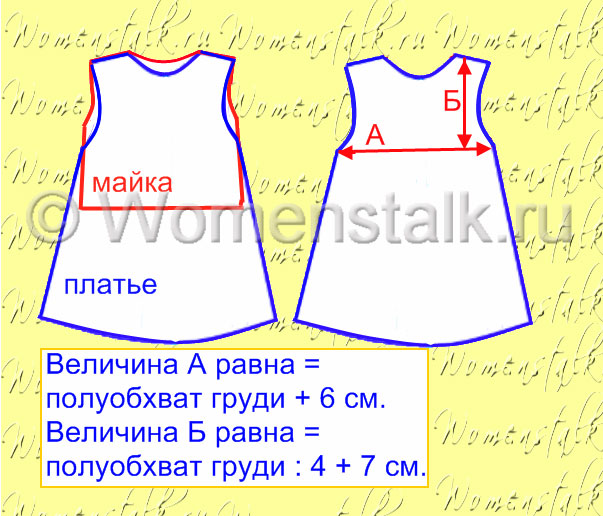
The dress has 2 important parameters that determine whether the dress will fit to your child. They are shown in the picture below:
1st parameter is the width of the dress along the armpit line (value A)
2nd parameter is the size of the armhole from the armpit line to the shoulder (value B)
To do this, you need to take only one measurement - baby chest circumference - take a centimeter and wrap it around the chest on its most convex part and remember the number (this will be the value girth chest), and now divide this figure by 2 (this will be the value half-girth chest).
Now look at the picture - it says how to calculate the values \u200b\u200bof A and B
For example, girth breasts of my two-year-old daughter (height 85 cm, weight 11 kg) - 50 cm. So to get half-girth- 50 divided in half = 25 cm.
A value = 25 cm + 6 cm = 31 cm.
That is, the dress drawn by me should have a width from armpit to armpit of 31 cm. Then it will be in size - it will not be tight - since these additional 6 cm are added precisely for the free fitting of the dress.
And if you want the dress to grow a little, then add not 6 cm, but 7-8 cm. B value = 25 cm: 4 + 7 = 6 cm2 mm + 7 = 13 cm2 mm(these millimeters can be safely neglected). That is, if the height of the drawn armhole is 13 cm, this armhole is ideal for my baby.
That's all, following these 2 simple rules, we will always have a pattern of a dress that is suitable for our baby. And no complicated drawings.
So, we drew the outlines of our future dress. Now making seam allowances- retreated from the contours of the dress by 2 cm and again drew it with a bold bright marker (Fig. 3 in the first diagram). These will be the final contours of the dress with allowances for the side and shoulder seams, an allowance for the hem at the bottom and an allowance for the armhole and neckline.
(By the way, there are tailor's standards here: for side and shoulder seams - an allowance of 1.5-2 cm, for the armhole and neck - 1-1.5 cm, for the hem of the hem - 4-6 cm). But I just look at the fabric - if it crumbles a lot on the cut, then it’s better to make a larger allowance, otherwise while you’re sewing and trying on half of the allowance will turn into a fringe.
And yet, when you draw a dress, don't be upset if you get crooked- one shoulder is more slanted than the other, or the left armhole is not the same shape as the right. It does not matter, since we will transfer to the fabric only one half drawn pattern (left or right - which one turned out more beautiful) - and when cutting, the dress detail will turn out to be absolutely symmetrical.
Now you will understand...
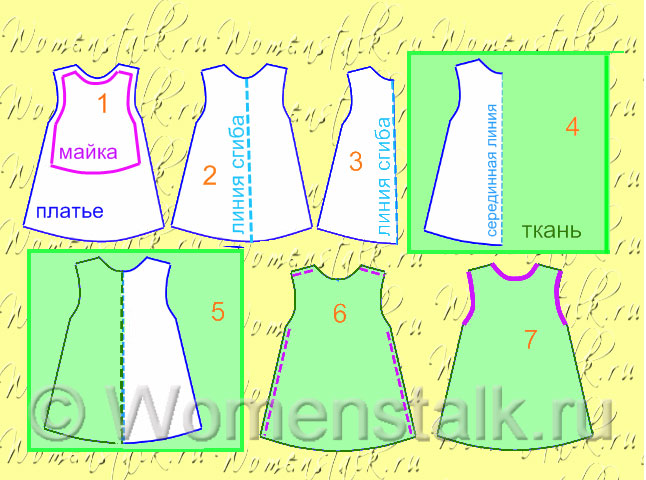
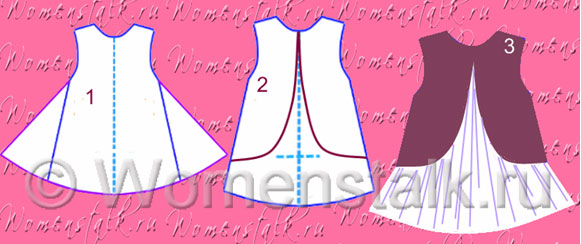
Divide the pattern in half to get one shelf.
In order for the dress part to end up symmetrical (that is, the left and right sides of the part are the same), we need only one half of the resulting pattern.
To do this, fold the cut out pattern in half - approximately shoulder to shoulder, armpit to armpit (approximately, because if you drew crookedly, then the shoulders and armpits of the left and right halves may not exactly match when added).
Compiled and received fold line(Fig. 2), which just runs in the middle of the dress, and it is necessary to cut the pattern along this line in order to end up with only one half of it (shelf - as the tailors call it - left or right, whichever is more beautiful and even) - fig.3.
The pattern is ready. It would seem that everything is simple, the way it is.
We transfer the pattern to the fabric and sew.
We have in our hands a pattern of one shelf (left or right) and now we need to transfer it to the fabric and cut out the detail of the back and dress.
The resulting shelf pattern was first laid with one side on the fabric - outlined with chalk (Fig. 4), then it was mirrored with the other side (by moving the central midline of the shelf to the similar line just drawn with chalk) (Fig. 5) - and also circled. And the result is an absolutely symmetrical finished part of the front or back of the future dress.
By the way, if you don’t have a crayon, you can use a colored pencil or sharpen an ordinary bar of soap with a knife (light soap draws well on colored fabric) It’s great to draw on white fabric with children’s colored wax crayons.
We cut out exactly the same detail for the back. Yes, many dresses (especially summer ones) have exactly the same front and back details. But you can draw a back pattern that is different from the front pattern, it will take you 2 minutes. Read below
Note "back pattern and its differences"
Usually, the classic pattern of the front and back of the product differ from each other in the depth of the neck and armholes(armholes are armholes).
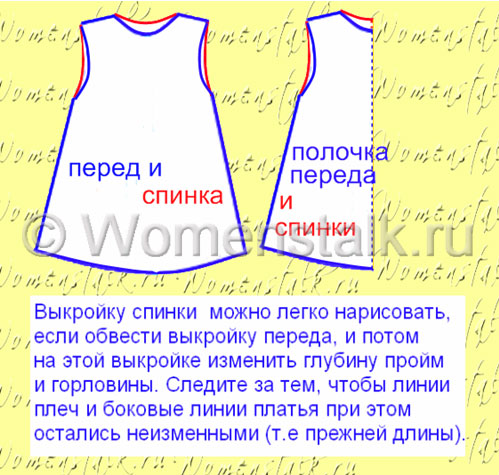
As seen in the figure above, armholes and front neck are more curved inward, i.e. deeper (blue outline), and at the back they are less deep(red outline).
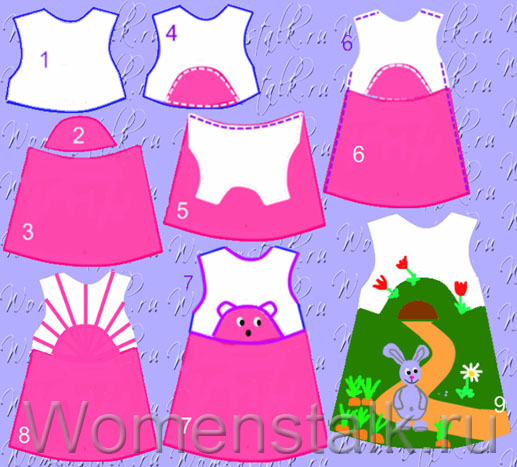
And if you look at the photos of the dresses at the beginning of the article, you will notice the difference in the neckline and armholes in front and back.
After examining many ready-made children's dresses in the store, I came to the conclusion that there are few dresses in which there is a difference in the cutout of the armholes of the back and front. That is, the armholes of the back and front coincide in most sleeveless dresses. And at dresses with sleeves back armholes are less deep than front armholes - as in our diagram above). The difference in the depth of the neck, as a rule, is present, but also not always.
Conclusion:
for children's summer dresses without sleeves, the same armholes and the same necklines at the front and back are absolutely acceptable.
for children's dresses with sleeves, we make the armholes of the back less deep.
You are your own creators and artists of the future dress. As you draw, so be it - in any case, you will get a beautiful dress, do not worry.
Sew front and back together.
Now (Fig. 6) we put both parts on top of each other with the front side inward and manually connect the side and shoulder seams with coarse stitches.
We try on and, if everything is fine, we sew these seams on a typewriter, after which we pull out this rough thread (for those who do not have a typewriter, you can simply contact a clothing repair shop or atelier; stitching a couple of seams will cost you $ 1).
We bend the edge of the hem and also either sew it on a typewriter or tack it manually with hidden stitches (ask your mother or grandmother - she will show you how).
Now you need trim the neckline and armholes(Fig. 7). You can simply fold the edges inward and sew. And you can buy a braid or a slanting trim and process the neck with it - this is done in most children's dresses.
That's all our do-it-yourself children's dress is ready.
You can decorate it with flounces, appliqué, embroidery, ribbons, bows. All this is detailed in the following parts of the article.
You can sew sleeves to the dress for this, read a series of articles - all conceivable and inconceivable sleeves for children's clothes are collected there, and it is told how to sew them yourself.
If the neckline of your dress is not wide enough to fit a child's head, then the dress can be provided with a clasp - in my separate article, I have collected all the existing clasps on children's clothing together and told in detail in the pictures how to make them yourself.
Our pattern today will serve us pattern when creating all subsequent models of children's dresses - and there will be many of them - all are different and one is more beautiful than the other.
And you will no longer need to draw a pattern. You will only sew and enjoy the quick and easy process and beautiful results.
And under your dress, right now you can quickly and easily
Each time when modeling a new dress based on a pattern-pattern, we will have to make some notes on it, this should not be done on the template (otherwise, we will soon have it all in notes from different models, and you will be confused in search of the stroke you need ). Just copy the template - that is, put it on a sheet of wallpaper and circle it - and already on this freshly obtained pattern, draw what you need. Modify the pattern by shortening it or marking the sewing lines of the ruffles as on the dress in this article. Now you will see and understand everything.
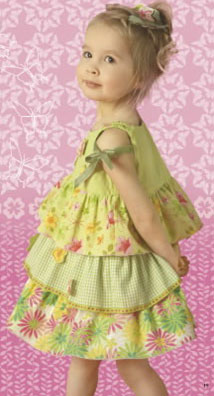
This is the children's dress we will sew today. Somehow I found this photo in the bowels of the Internet and I really liked this, charming in its simplicity, delicate dress with lush flounces and a flirty bow on the shoulder. I wish I could sew something like this then, but at that time I still vaguely imagined how it was sewn. But today I know how to make it and I will teach you.
It's fast and easy. We just need our pattern-template from the first part of the article (link to the article above) and a pencil.
Model 1. Dress with 3 flounces.
We make notes on the pattern.
We take a ready-made pattern from the first part of the article (see the link to the article above) and on this pattern-template we outline the lines, to which we will sew shuttlecocks (Fig. 1). The lines are not drawn straight, but slightly rounded, like the bottom line of the template pattern (lower edge of the hem).
We sew a base dress.
First, according to the template pattern (Fig. 1), a detail of the back and front was cut out of the fabric and the side and shoulder seams were stitched. We processed the neck and armholes, bent the bottom of the hem, that is, formed the base to which we will sew the flounces. We have already told all the details of how to sew a base dress in a previous article.
We make shuttlecocks.
We cut strips of fabric of the length and width we need (Fig. 2). Length strips - at your discretion, the longer the shuttlecock you have, the thicker the folds will be when sewing it on (cut off the excess). The top shuttle will be shorter, the middle one will be longer, and the bottom one will be the longest. We prepared 3 shuttlecocks, processed their edges, bent and stitched (Fig. 2)
Width there should be enough frills so that the upper frill covers the seam of the lower frill - that is, 3-5 cm more than the distance between the marked lines on the pattern (+ one centimeter per fold of the upper and lower edges - the edges of the frill must be processed before they are sewn on).
Sew frills to the dress.
Now, on this finished dress, the same lines were outlined in chalk as on the pattern - frill sewing lines(Fig. 1). Now we take the top frill and sew it by hand to the dress along the outlined small line, starting from the side seam and around the entire dress. When sewing, we make uniform tucks-folds.
Then, in the same way, we sew the remaining 2 shuttlecocks.
And that's it - our baby dress is almost ready. Now, if you wish, you can buy a piece of an ordinary bow or ribbon and sew one strip to the armholes of the back and front (the armholes are holes for the arms), and tie them on the girl’s shoulder with a neat bow - see the photo at the beginning of the article.
As you can see in the photo, flounces for the dress can be cut from fabric of different colors. You can make a bright rainbow.
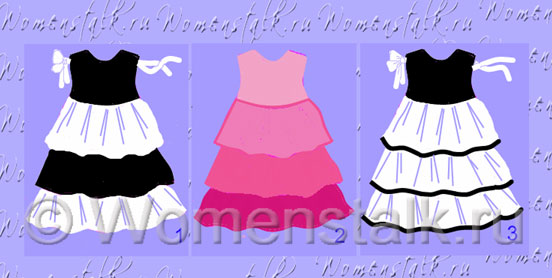
Or smooth transition of different shades of the same color scheme, - that is, the bodice of the dress is light pink, the first frill is rich pink, the second frill is dark pink, the third frill is already closer to cherry blossom (Fig. 2).
Or do black and white classic: the bodice is black, the first frill is white, the second frill is black, the bottom frill is white (Fig. 1).
Or elegant black and white version: black bodice, white frills, and sew black lace along the edge of each white frill. On the contrary, the flounces are black, and the lace is white and the same lace is sewn around the neck and armholes.
If your dress needs a fastener (in the case when the baby's head does not fit into the neck), then in the article you can choose any type of fastener for your two-layer dress, or do it easier, widen the neck.
In short, fantasize, create! Based on this model, you can get such different dresses.
Good luck with your sewing!
So… Here is our future children's dress.
Model 2. Dress with a puffy folded hem.
The upper part of the dress is sewn according to our pattern pattern. And the petticoat (incomprehensible and complicated at first glance) is actually made very, very simply, but it looks cute and original. Such pleated skirts entered youth fashion around 2003 and were very popular among girls. Now this element can still be found on modern models for adults and on children's clothing. So let's get started...
Bodice pattern This dress is a cropped pattern pattern. We take a template pattern - we make a copy of it (so as not to spoil the template itself) and shorten this new copy pattern to the level we need. That is, the level from which the hem will begin with us - it can be at the level of the waist, or at the level of the hips, - as you wish. Please note that the cut line is not straight but slightly rounded. See diagram below:
We transfer the pattern to the fabric and sew the bodice
We transfer the resulting pattern to the fabric, we get the detail of the front and back (the pattern of the front and back can absolutely match or differ in the depth of the neck - see).
Immediately sew the back and front, put the parts on top of each other with the right side inward and first swept the side and shoulder seams by hand, and then stitched them on a typewriter. Who does not have a typewriter, go to the studio, or to the clothes repair point - there you will quickly sew these seams for a little money.
You can immediately process the edges of the armholes and necklines - just bend the edges and sew, or process with piping.
We calculate the size of the hem.
In order not to be mistaken with the length of the hem, it is best to put the finished bodice of the dress on the child and measure the desired length of the hem directly on it. We put a centimeter to the bottom edge of the bodice and measured down to the desired level of the edge of the hem. The dress can just cover the ass or be below the knee - it's up to you.
Now you need to cut a piece of fabric for the hem. His length should be twice as large as the measurement we just made. Since the hem will fold in half during the sewing process (Fig. 5, 6). + a couple of centimeters will go to the bend of the cut edge. And also keep in mind that the hem will rise slightly due to the splendor.
For example, you want a hemline to the middle of the knee, put on the child the upper part of the semi-finished dress and measure it from the edge of the dress to the knee with a centimeter. It turned out 20 cm. This means that the length of the hem rectangle (Fig. 3) will be twice as large - 40 + 3 cm for the edge bend + 3-5 cm for splendor = 46-48 cm. This is the height and draw a hem rectangle.
Hem Width arbitrary, that is, also at your discretion. The wider the cut rectangle for the hem, the more creases you will create when you sew the hem to the bodice.
The hem can be cut off in one piece - half cut on the back, half on the front. Then you get only one side seam on the hem. Or cut 2 pieces separately for the front and separately for the back - as your piece of fabric allows you.
Sew the hem to the bodice.
Now you need to sew the hem to the bodice. Pay attention to the hem, we sew it with the wrong side up (!), Then when we fold it in half (Fig. 5, 6), it will turn to the front side.
The most important thing is to evenly sew the hem to the bodice., because it will be ugly if there are more folds-tucks on the left than on the right.
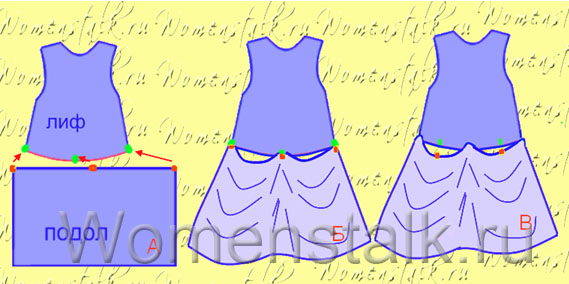
To ensure that the folds are evenly distributed along the “sewing » , you need to make small strokes marking the middle of the bodice on the lower edge of the bodice, and also mark the middle of the hem with a stroke (Fig. A). And immediately pin the middle of the hem to the middle of the bodice with a pin. This pin, as it were, will divide the hem into 2 parts. Well, the corners of the hem are also pinned to the side seams of the bodice (Fig. B).
And now again make strokes in the middle of the left half of the hem and the right half, mark similar strokes on the bodice (Fig. B). And also connect them with a pin.
Now we thread the needle and manually sew on the hem, forming folds-tucks and taking out the pins along the way. They sewed it on by hand - now they put it under the machine and stitched it (Fig. 4).
Now we will sew the lower raised edge to the same line hem (Fig. 5, 6). To do this, the lower edge must first be processed (curl 1-2 cm to the wrong side and stitch). And this already processed edge we must too evenly sew to the bodice. That is, also use strokes and pins.
Done, the hem is sewn (Fig. 7)
dress decoration
As well as hem sewing line you can also hide it under a braid or satin ribbon and sew on a flirty bow (Fig. 8).
Children's dress with their own hands - ready.
If the dress needs a fastener (front, back or on the shoulder, with buttons or a zipper), then you will find the whole variety of fasteners with detailed explanations and step-by-step pictures in the article .
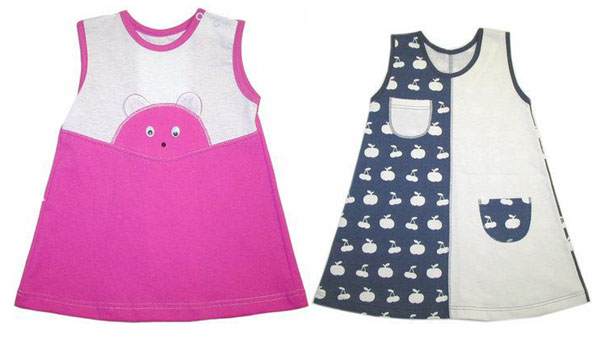
We will consider the option when, on the basis of our whole pattern, a dress is sewn from pieces of different fabrics, such as, for example, in these dresses:
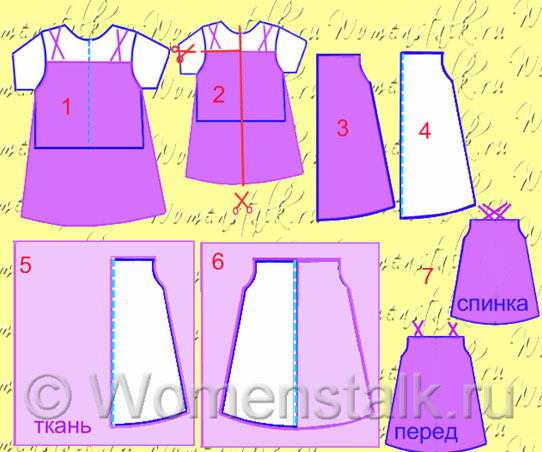
As in all dresses based on a pattern-pattern, we first make a copy from the template - put the template on a sheet of wallpaper and trace around the contour.
Now on this new pattern you can make notes, you can cut it into pieces, which is what we are going to do. See the picture below
So, Model 1. Dress "animal in ambush"
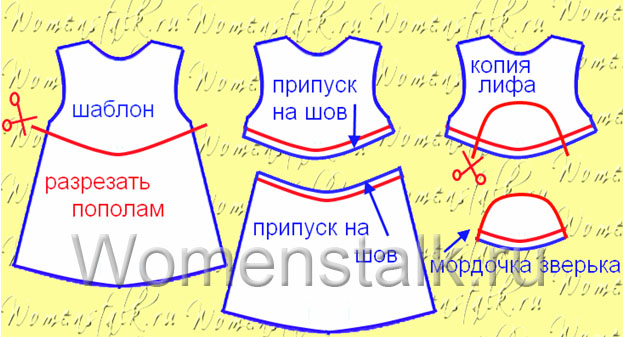
We modify the pattern-template.
On the pattern draw a line dividing the dress into 2 parts white and pink (you can use a curved line, you can use a straight line - as you draw it will be). By the way, if you want to draw a smooth curved line (and there is no compass in the house), just find a rounded plate or dish, make notes on the side edges of the pattern, attach the dish close to these marks and circle around the edge of the dish with a pencil - you get the perfect rounded line.
Along this line cut the pattern into 2 parts, and on the cut edge, mark what needs to be added seam allowance. That is, when you put the pattern on the fabric and trace it, then add 2 cm along the cut line. Other seam allowances are not needed - we already made them when we created this template - see .
So we got a pattern of the bodice (the white part of the dress) and the hem (the pink part). Now you need to make another copy of the bodice pattern (see the figure above) and on this copy draw the outline of the head of the animal and cut it out. Here is our third pattern.
A note about the clasp. If our template pattern has a wide enough neckline and the child’s head passes freely in the dress, then the clasp (which we see in the photo at the beginning of the article - 2 buttons on the shoulder) is not needed, in fact. But if this is not the case, then there are 2 solutions: either increase the neckline on the pattern, or provide a fastener for the dress. Read more about how to make this (and not only this) fastener in our special article. . If you do not like this fastener, you can insert any other of the ones described in this article (for the first 3 fasteners from the article, you do not need to make changes to the pattern at all) - choose what is easier for you.
We transfer the pattern to the fabric and sew the details.
Everything is now possible take fabric, white and pink, and transfer our 3 patterns to it(do not forget to make an allowance for the seam connecting the upper and lower parts of the dress from the side of the cut - the rest of the allowances are already contained in the template itself). The back of the dress may also contain an animal face or simply consist of two halves of white and pink.
Cut out fabric pieces(Fig. 1, 2, 3). We immediately apply our pink face of the animal to the white bodice - we place it strictly in the center and pin it with pins (so that it does not move), we tack it manually with large stitches (Fig. 4). And now you can pull out the pins and sew on a typewriter (who doesn’t have a typewriter, go to the studio - in a couple of minutes and a little money all the seams will be done for you).
Now connect the top and bottom the front of the dress (Fig. 5), we do the same with the back. Then we put the finished back and front on top of each other with the front side inward and sew the side and shoulder seams (Fig. 6)
Now the final chord - decoration(Fig. 7), we take a pink braid (or another contrasting color) and hide our seams with this braid. From it we form the ears of the animal. To make it smoother, it’s better to first baste the braid by hand (burn the ends of the braid with a lighter so that they don’t unravel), and when everything is smooth and beautiful, sew on a typewriter.
With the same braid, you can process the armholes and the neck, or you can simply bend the edges of the armholes inward and sew.
We make the nose and eyes of the animal, you can use ordinary buttons, or buy special eyes for toys in the “button” department of the store.
Everything, a children's dress with your own hands is ready.
Based on the same pattern, you can create other designer dresses.. Let's play designer.
For example, I was born sun dress idea(Fig. 8). The rays must be sewn onto the bodice immediately - let the ribbons diverge from the central lower point of the bodice and in all directions like rays. Bend the ends of the rays over the armholes and neck. And then sew our semicircle (disk of the sun) on top of the rays.
Or a more complex and painstaking application, where the semicircle turns into a mink of some animal, and then flowers and berries. I chose a hare and a carrot (Fig. 9). I will definitely tell and show how to make applications on fabric in one of their future articles.
If you want this dress to have a sleeve, then you will find everything you need in the article. baby dress with buttons and straps , that is, a dress that unbuttons on the shoulders (see photo below).
And we will create this dress based on the pattern pattern that we made with you in the first part of the article. As you can see, a pattern-pattern is a valuable thing: they drew it once, and now we are making the 4th model of a dress according to it.

 we do not on the pattern itself, but on its copy.

As can be seen in this diagram, after we manually swept one dress to another, retreating 2-3 cm to the hem (Fig. 1), we got that the edge of the upper dress can be folded back (Fig. 2, 3) and processed separately from the lower edges - bend (Fig. 4) and stitch the bend (Fig. 5). The same with the edges of the lower dress - bend (Fig. 4) and sew on the bend (Fig. 5).
That is, at the lower dress, we bend the edge to the front side and tack. At the top dress, we bend the edge to the wrong side and tack.
We got 2 separately processed edges - the edge of the upper dress (pink with a white dotted line) and the edge of the lower dress (blue with a white dotted line) - Fig.5.
And now you need to attach these already processed edges of the upper and lower dresses to each other again and stitch them to each other (Fig. 6) - you get a neat armhole, where all the edges are hidden inside between the dresses. It remains to take out all the rough thread with which we manually tacked the dresses from the edge.
By the same principle, we process the neck and other armholes.
Everything, our do-it-yourself two-layer children's dress is ready.
This dress, if you fantasize, you can find more many design options. Here's what I suggest:
Model 1. Puffy underdress + dense top dress with rounded shelves.
Here everything is, perhaps, clear and according to the figure.
At the top dress pattern make the shelves rounded.
And the pattern of the lower dress we will get if we make changes to the pattern pattern. You just need to expand the template, starting from the armpits. See diagram below:
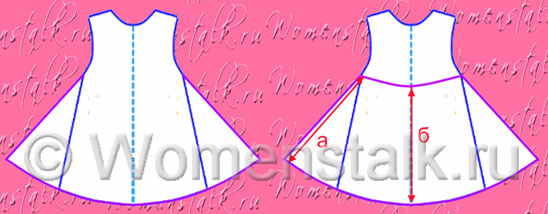
In order for the hem to turn out to be even (both in front and from the sides), you must follow the rule a = b, that is the height of the hem in the center (b) should be equal to the height of the hem on the sides (a). Therefore, we measured the height of the hem of the template (b), then measured exactly the same length on both sides and connected everything with a rounded smooth line.
By the way, in this way you can also sew simply one-piece puffy dresses.
And if you don’t like the tight and narrow top of this model, then you can also make the top dress according to this, extended template. Then the top cape will turn out to be as lush as the dress. In a similar way, it is just tailored for the next model.
Model 2. Tight bottom dress + light transparent top dress.

And if you still haven’t created a template, then you can take a child’s T-shirt as the basis for the pattern, put it on a sheet of wallpaper, circle it along the contour, and use such a “template” (Fig. 5) to draw our pattern (Fig. 6, 7, 8) .
With this baby dress, the same pattern can be used for both front and back. Or, if you like, you can make the front with a rounded neckline (Fig. 2, 7, 8), and the back just in a straight line (Fig. 3) - as is often the case in women's adult dresses.
We transfer the pattern to the fabric.
It is absolutely not scary if a hand-drawn dress turns out to be not quite symmetrical (that is, the right side is not the same as the left). Since to transfer the pattern to the fabric (Fig. 5, 6 in the diagram below), we will use only one half of it (Fig. 2, 3, 4), right or left (which one you got better) and as a result, the dress detail ( back or front) will in any case be symmetrical.
So, we cut off the right or left side from the resulting pattern (Fig. 2), put the resulting shelf on the fabric on one side and circled it with chalk (Fig. 5), then turned it over and circled it again (Fig. 6). Received the front part. Now do the same again - to get the back detail.
We sew the details of the dress.
Now (see diagram below) put the details of the back and front on top of each other with the right side inward and stitched the side seams (Fig. 8).
Then they processed the edges of the armholes and the neck - bent and stitched (Fig. 9)
Now sew on the straps. You can just have one regular strap on the shoulder, or you can come up with an interesting overlap of several straps (Fig. 10, 11.12)

How to sew a strap.
As straps, you can use a finishing edging (sold in the fabric departments or in the departments of sewing accessories). For those who do not know what a piping is, it is a strip of fabric bent from the edges (in the figure below we see it under the number 3). But often the edgings are made of wear-resistant synthetic materials, and a baby is better off with a shoulder strap made of “hebeshechki”. Therefore, if you did not find anything suitable among the edges, we will make a strap sa