How to draw armor. Step by step lesson: how to draw a knight
We decided to devote today's lesson to a real medieval knight.
Everyone knows that a knight is not just a warrior who fought dragons in the medieval epic and often came into contact with others fairy-tale characters. As well as Japanese samurai, knights - bearer title of nobility. The knightly class had a very big influence throughout the history of Europe, many men from various social strata dreamed of becoming a knight in the Middle Ages.
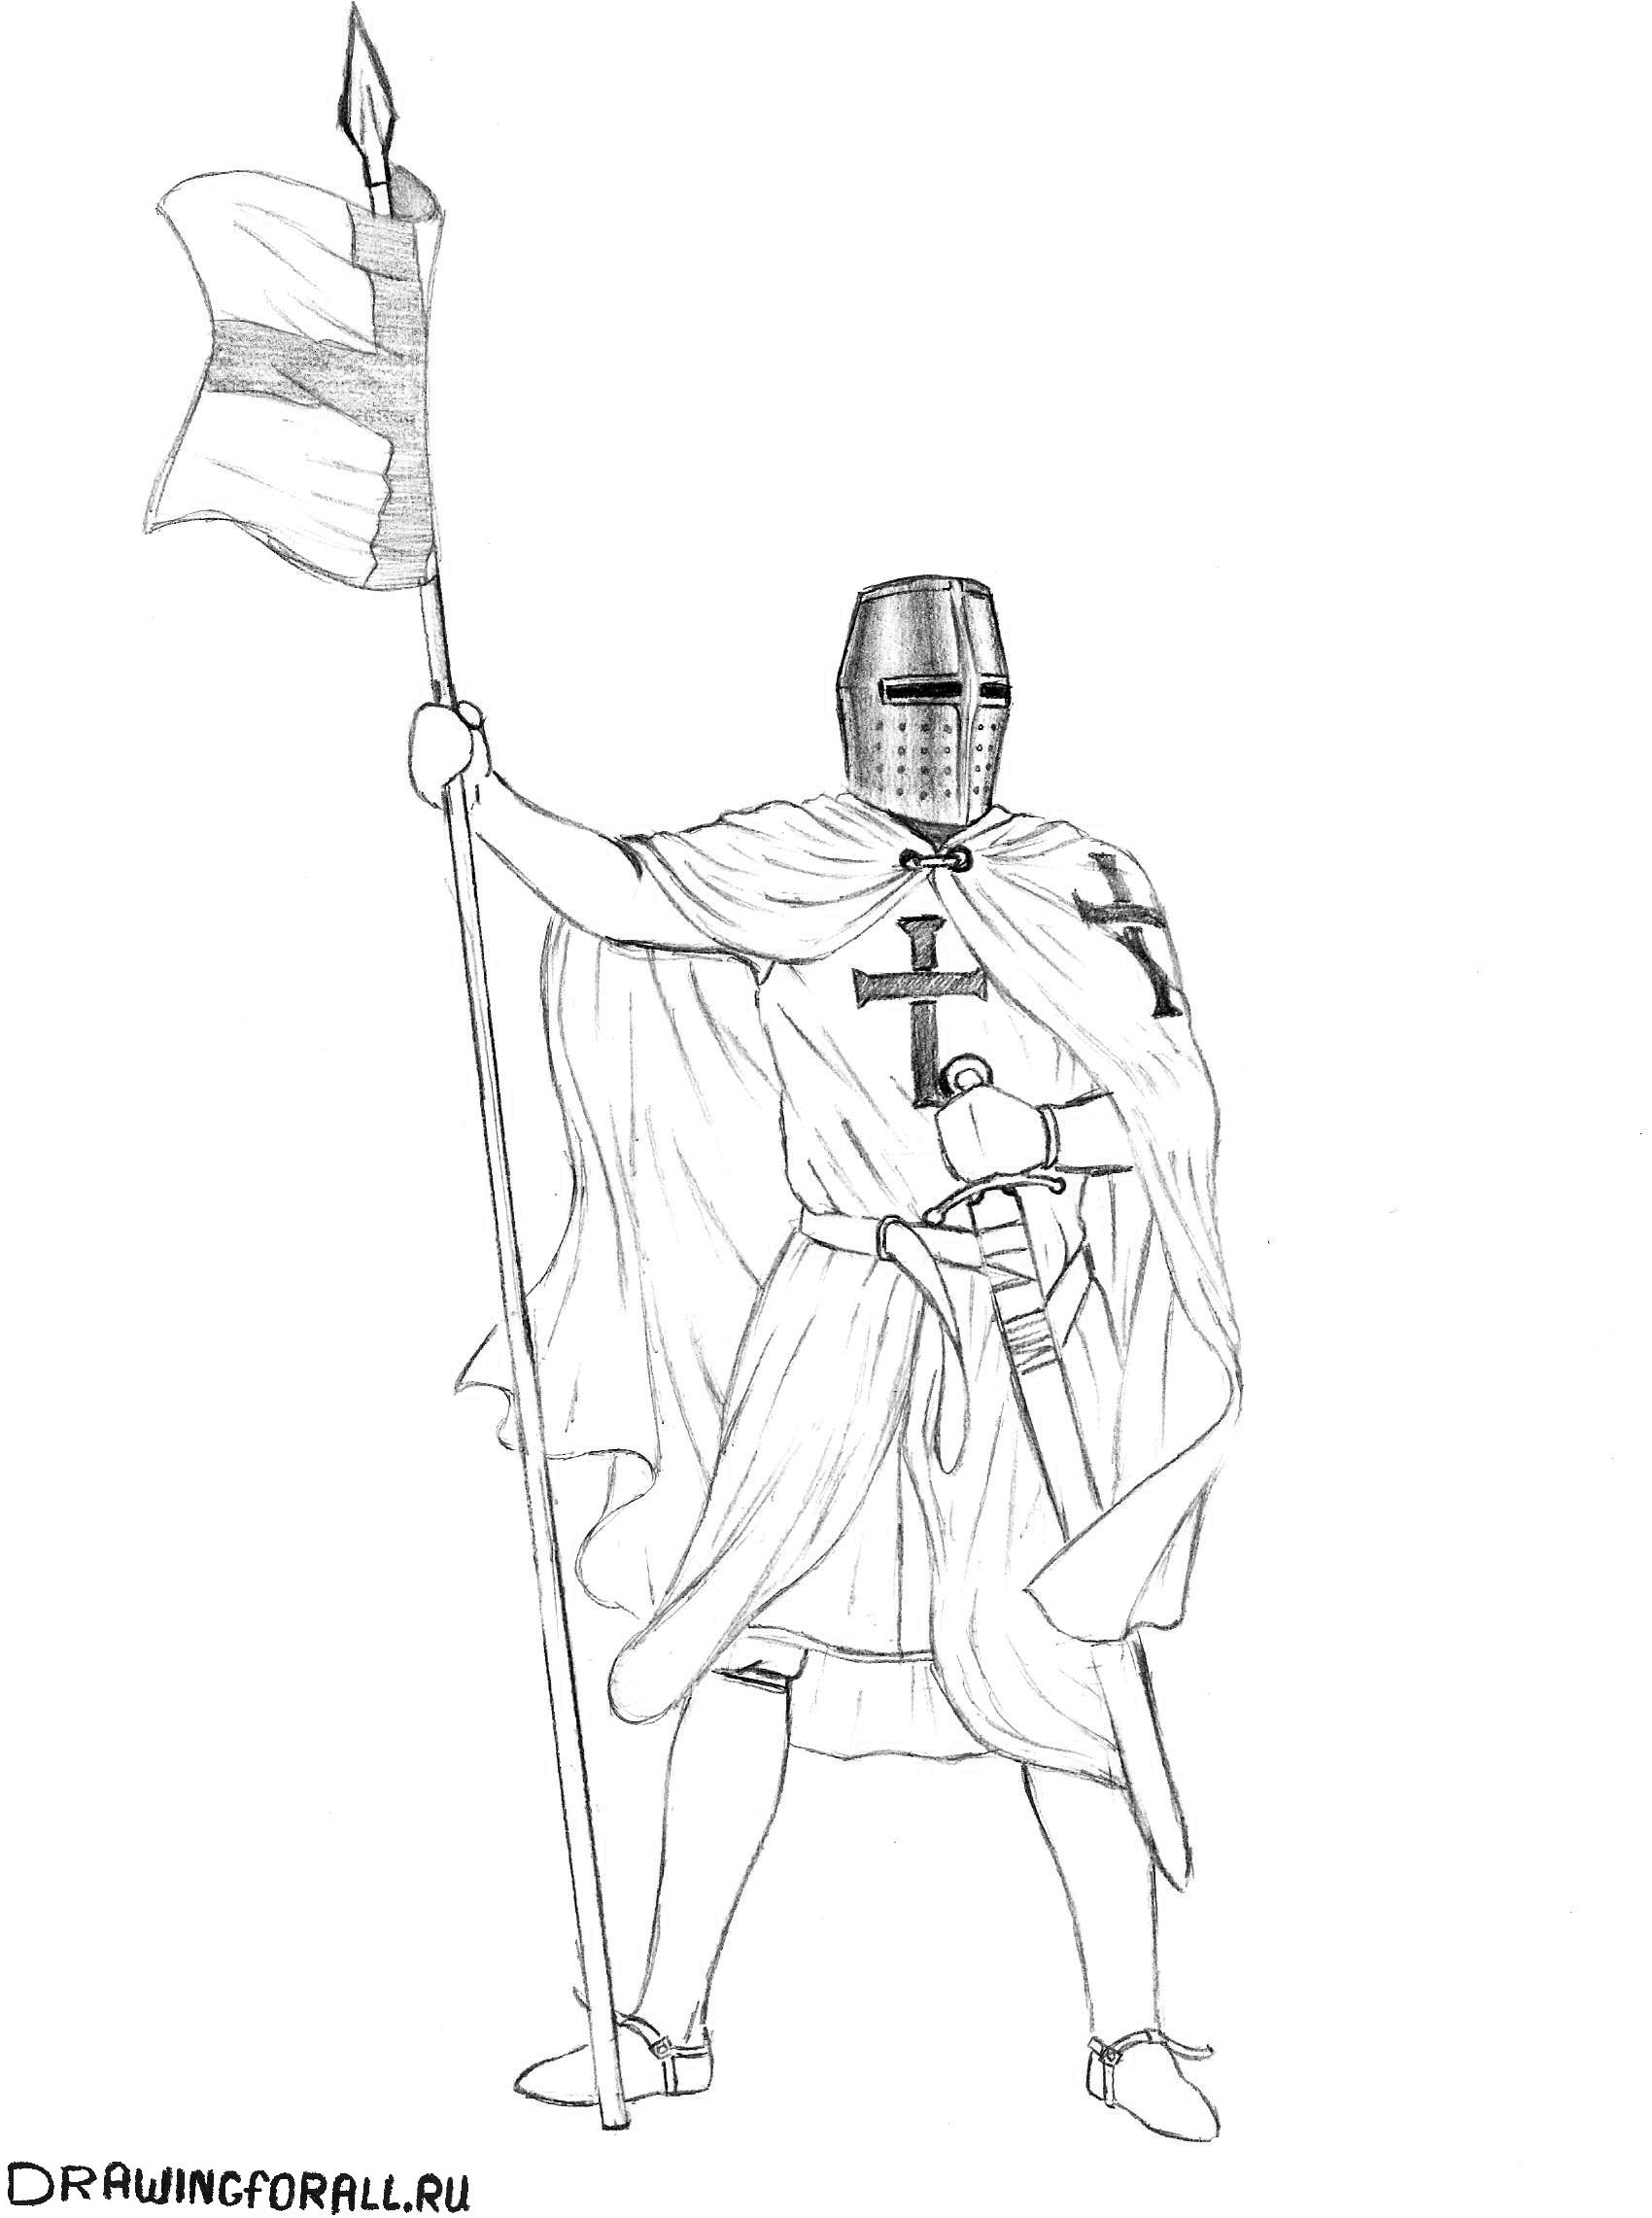
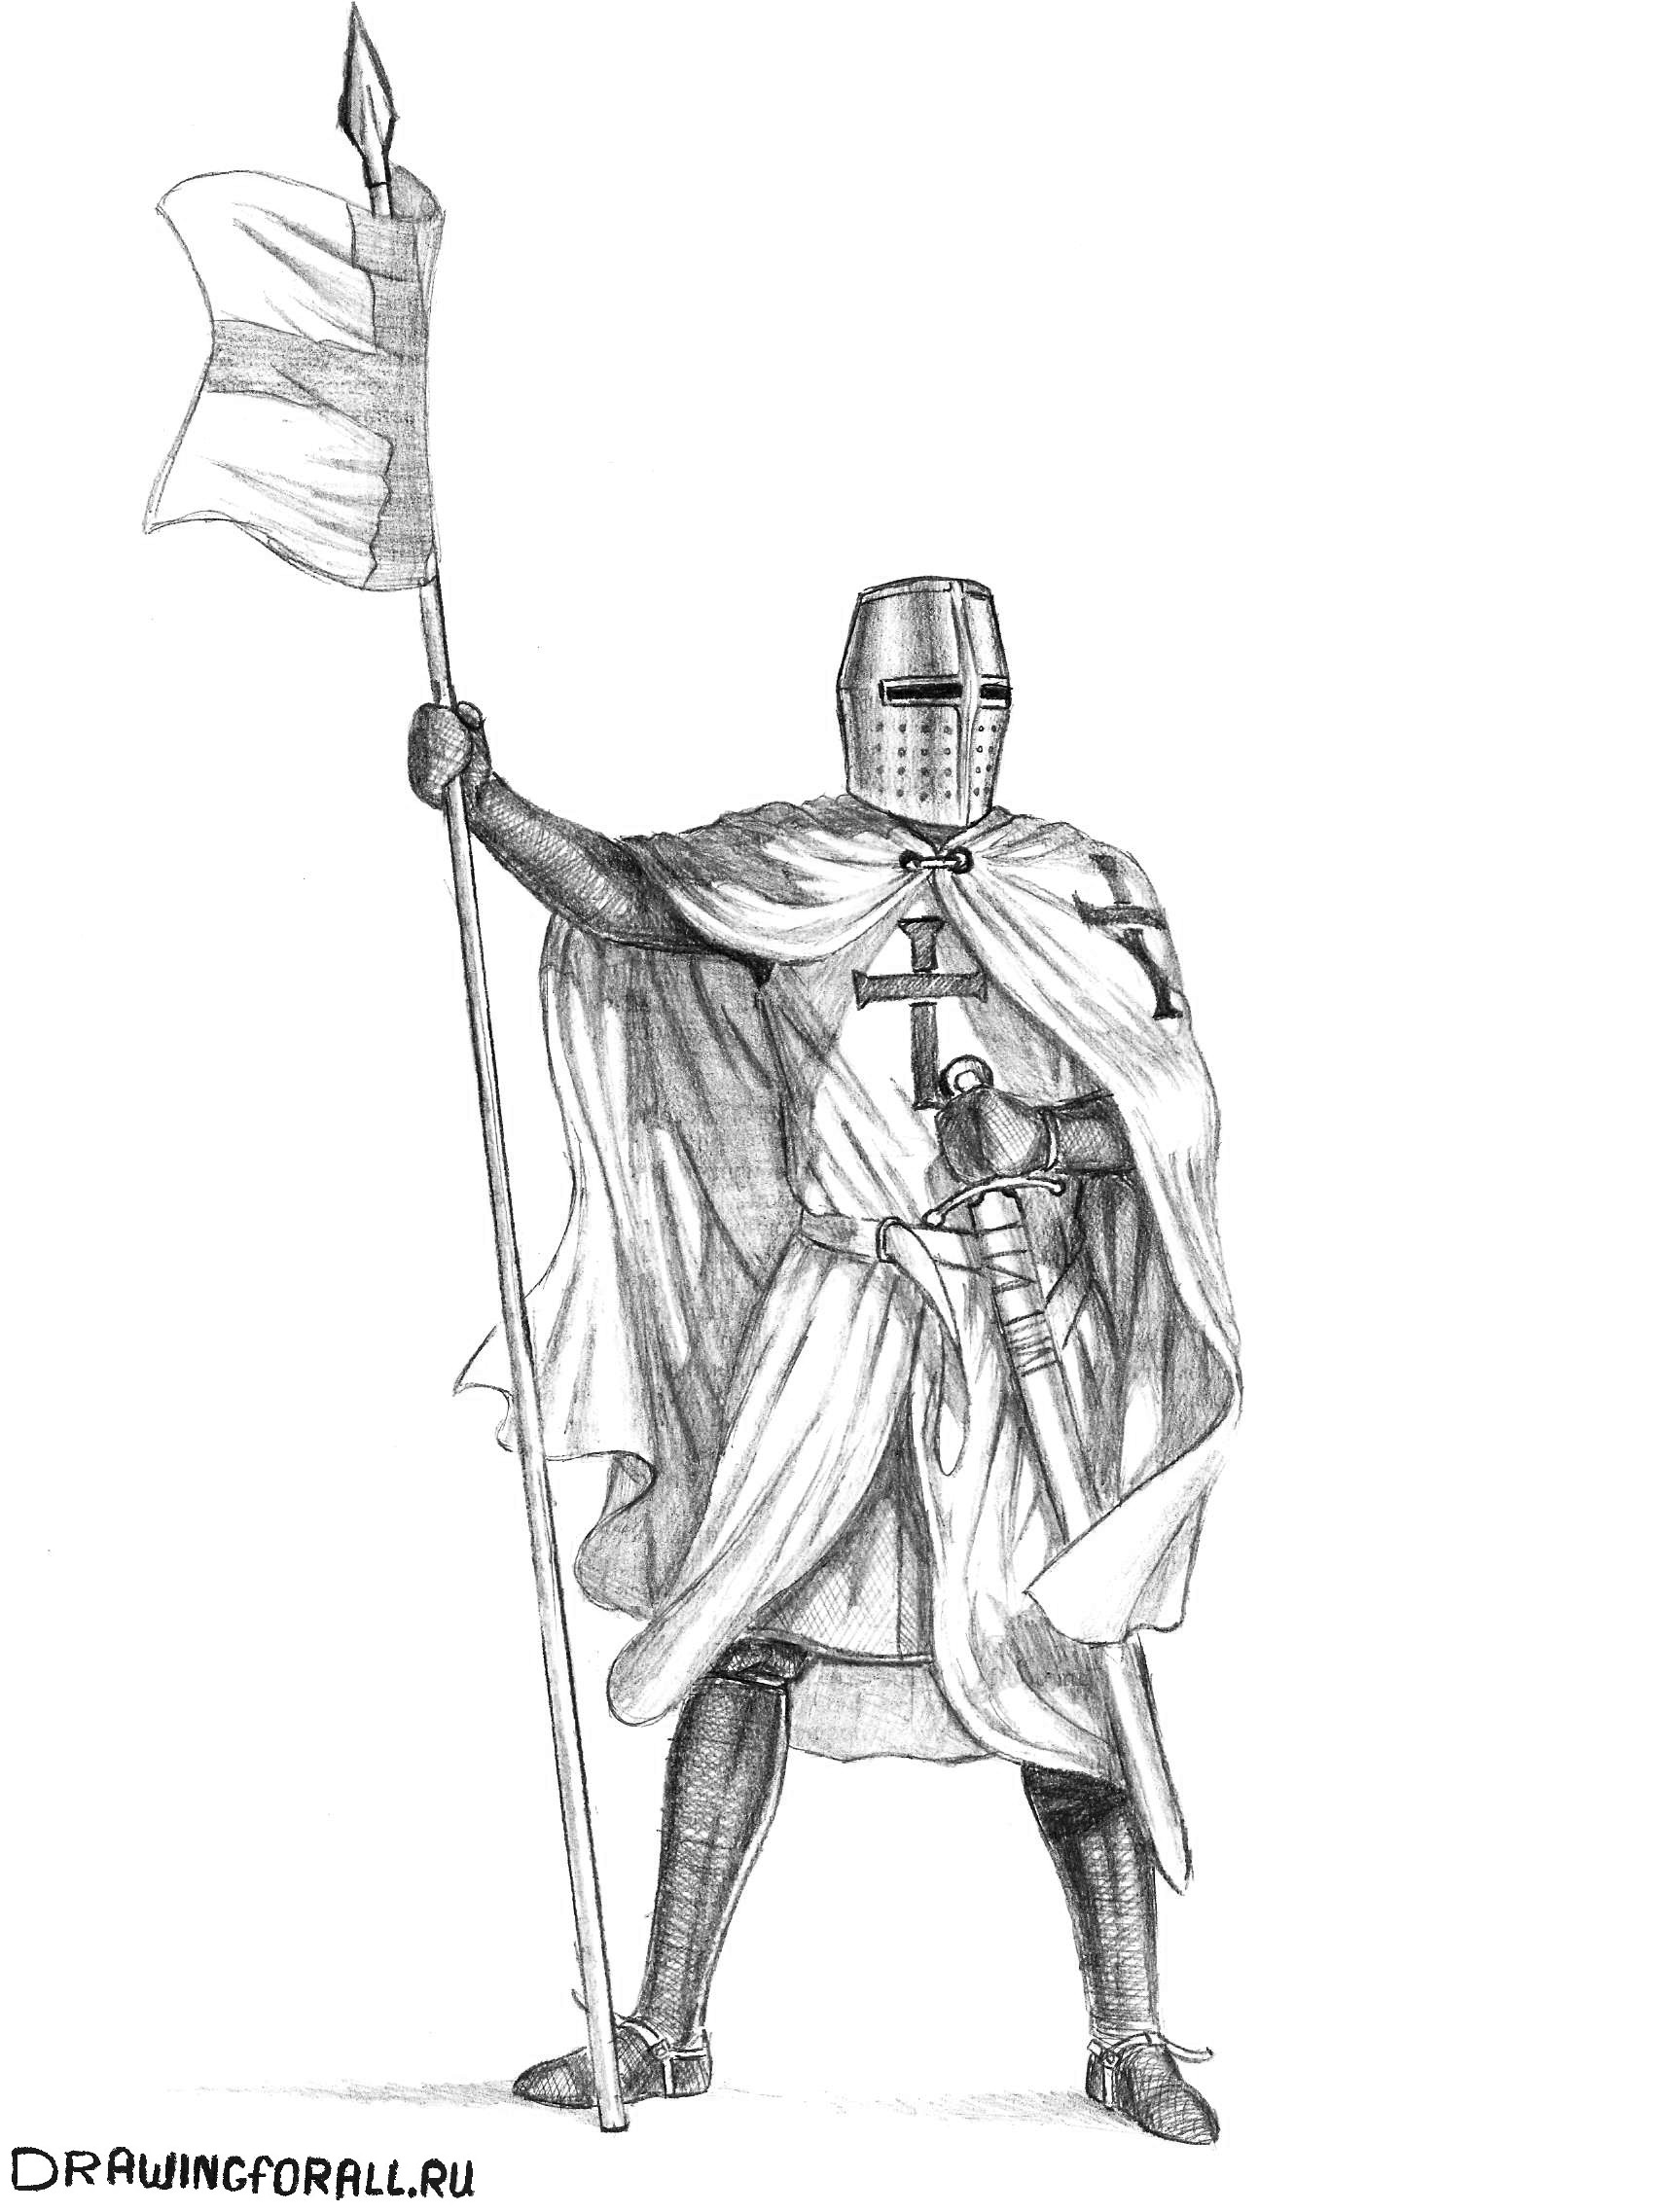
The greatest chances of becoming a real knight were among representatives of rich noble families, whose members became famous for their devoted service to the king, or for special military merits. History buffs will definitely notice the Templar cross on our knight - we chose it for a reason, because this particular order is one of the most recognizable in the entire existence of knighthood. So, we are starting a lesson on how to draw a knight step by step for beginners, with a pencil!
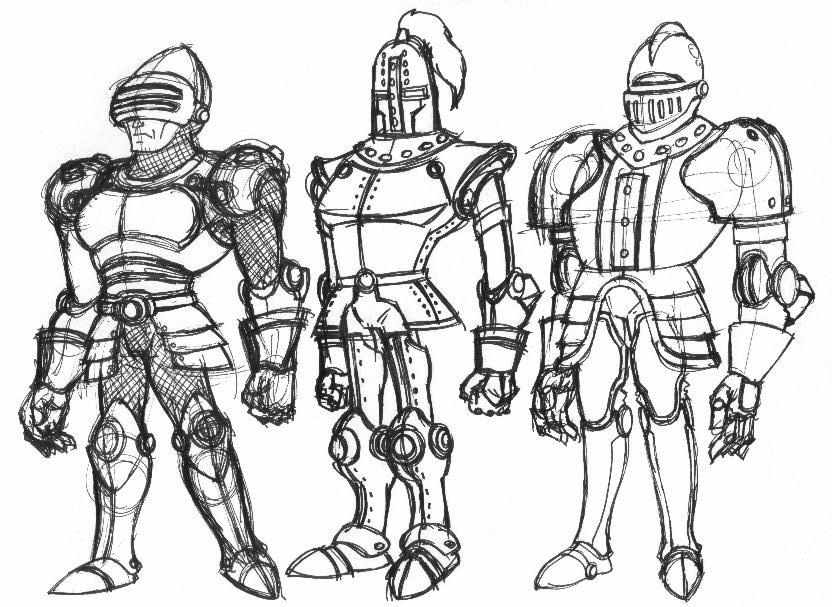
To begin with, we want to demonstrate many different examples of drawing knights, and then we will tell you in detail how to draw one of them.
For convenience, you can use the content
The easiest way to draw a knight
Knights from an old drawing book :)
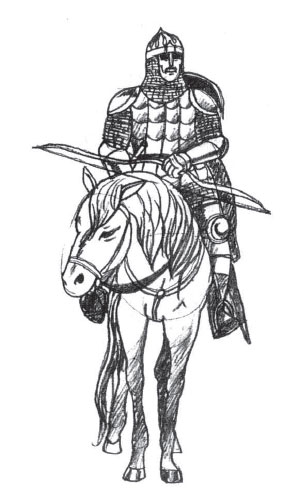
Rider on a horse
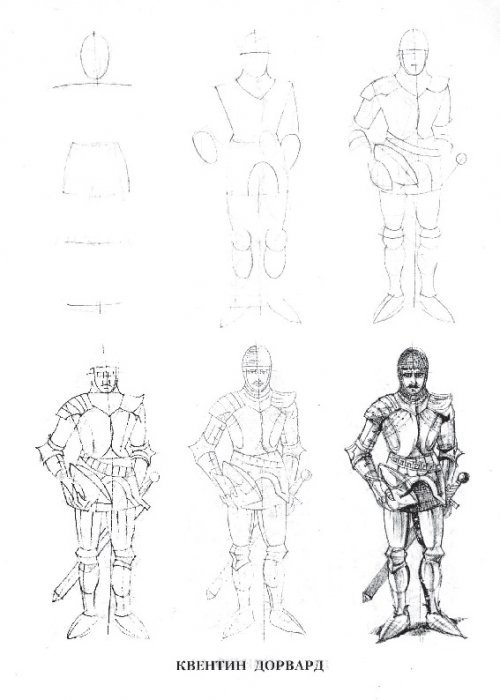
Quentin Dorward
Knight with shield
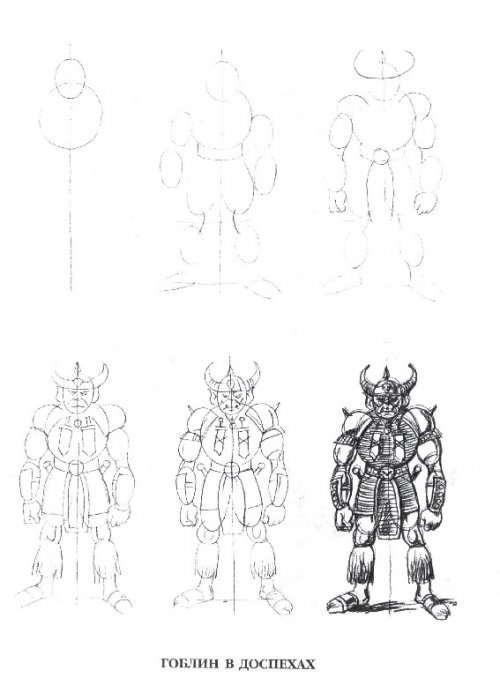
Goblin
Sixth drawing option
Russian warrior on horseback

And one more option

Now let’s draw it step by step
If you have already read the examples above, then it’s time to move on to a more detailed discussion of “How to draw a knight?” 
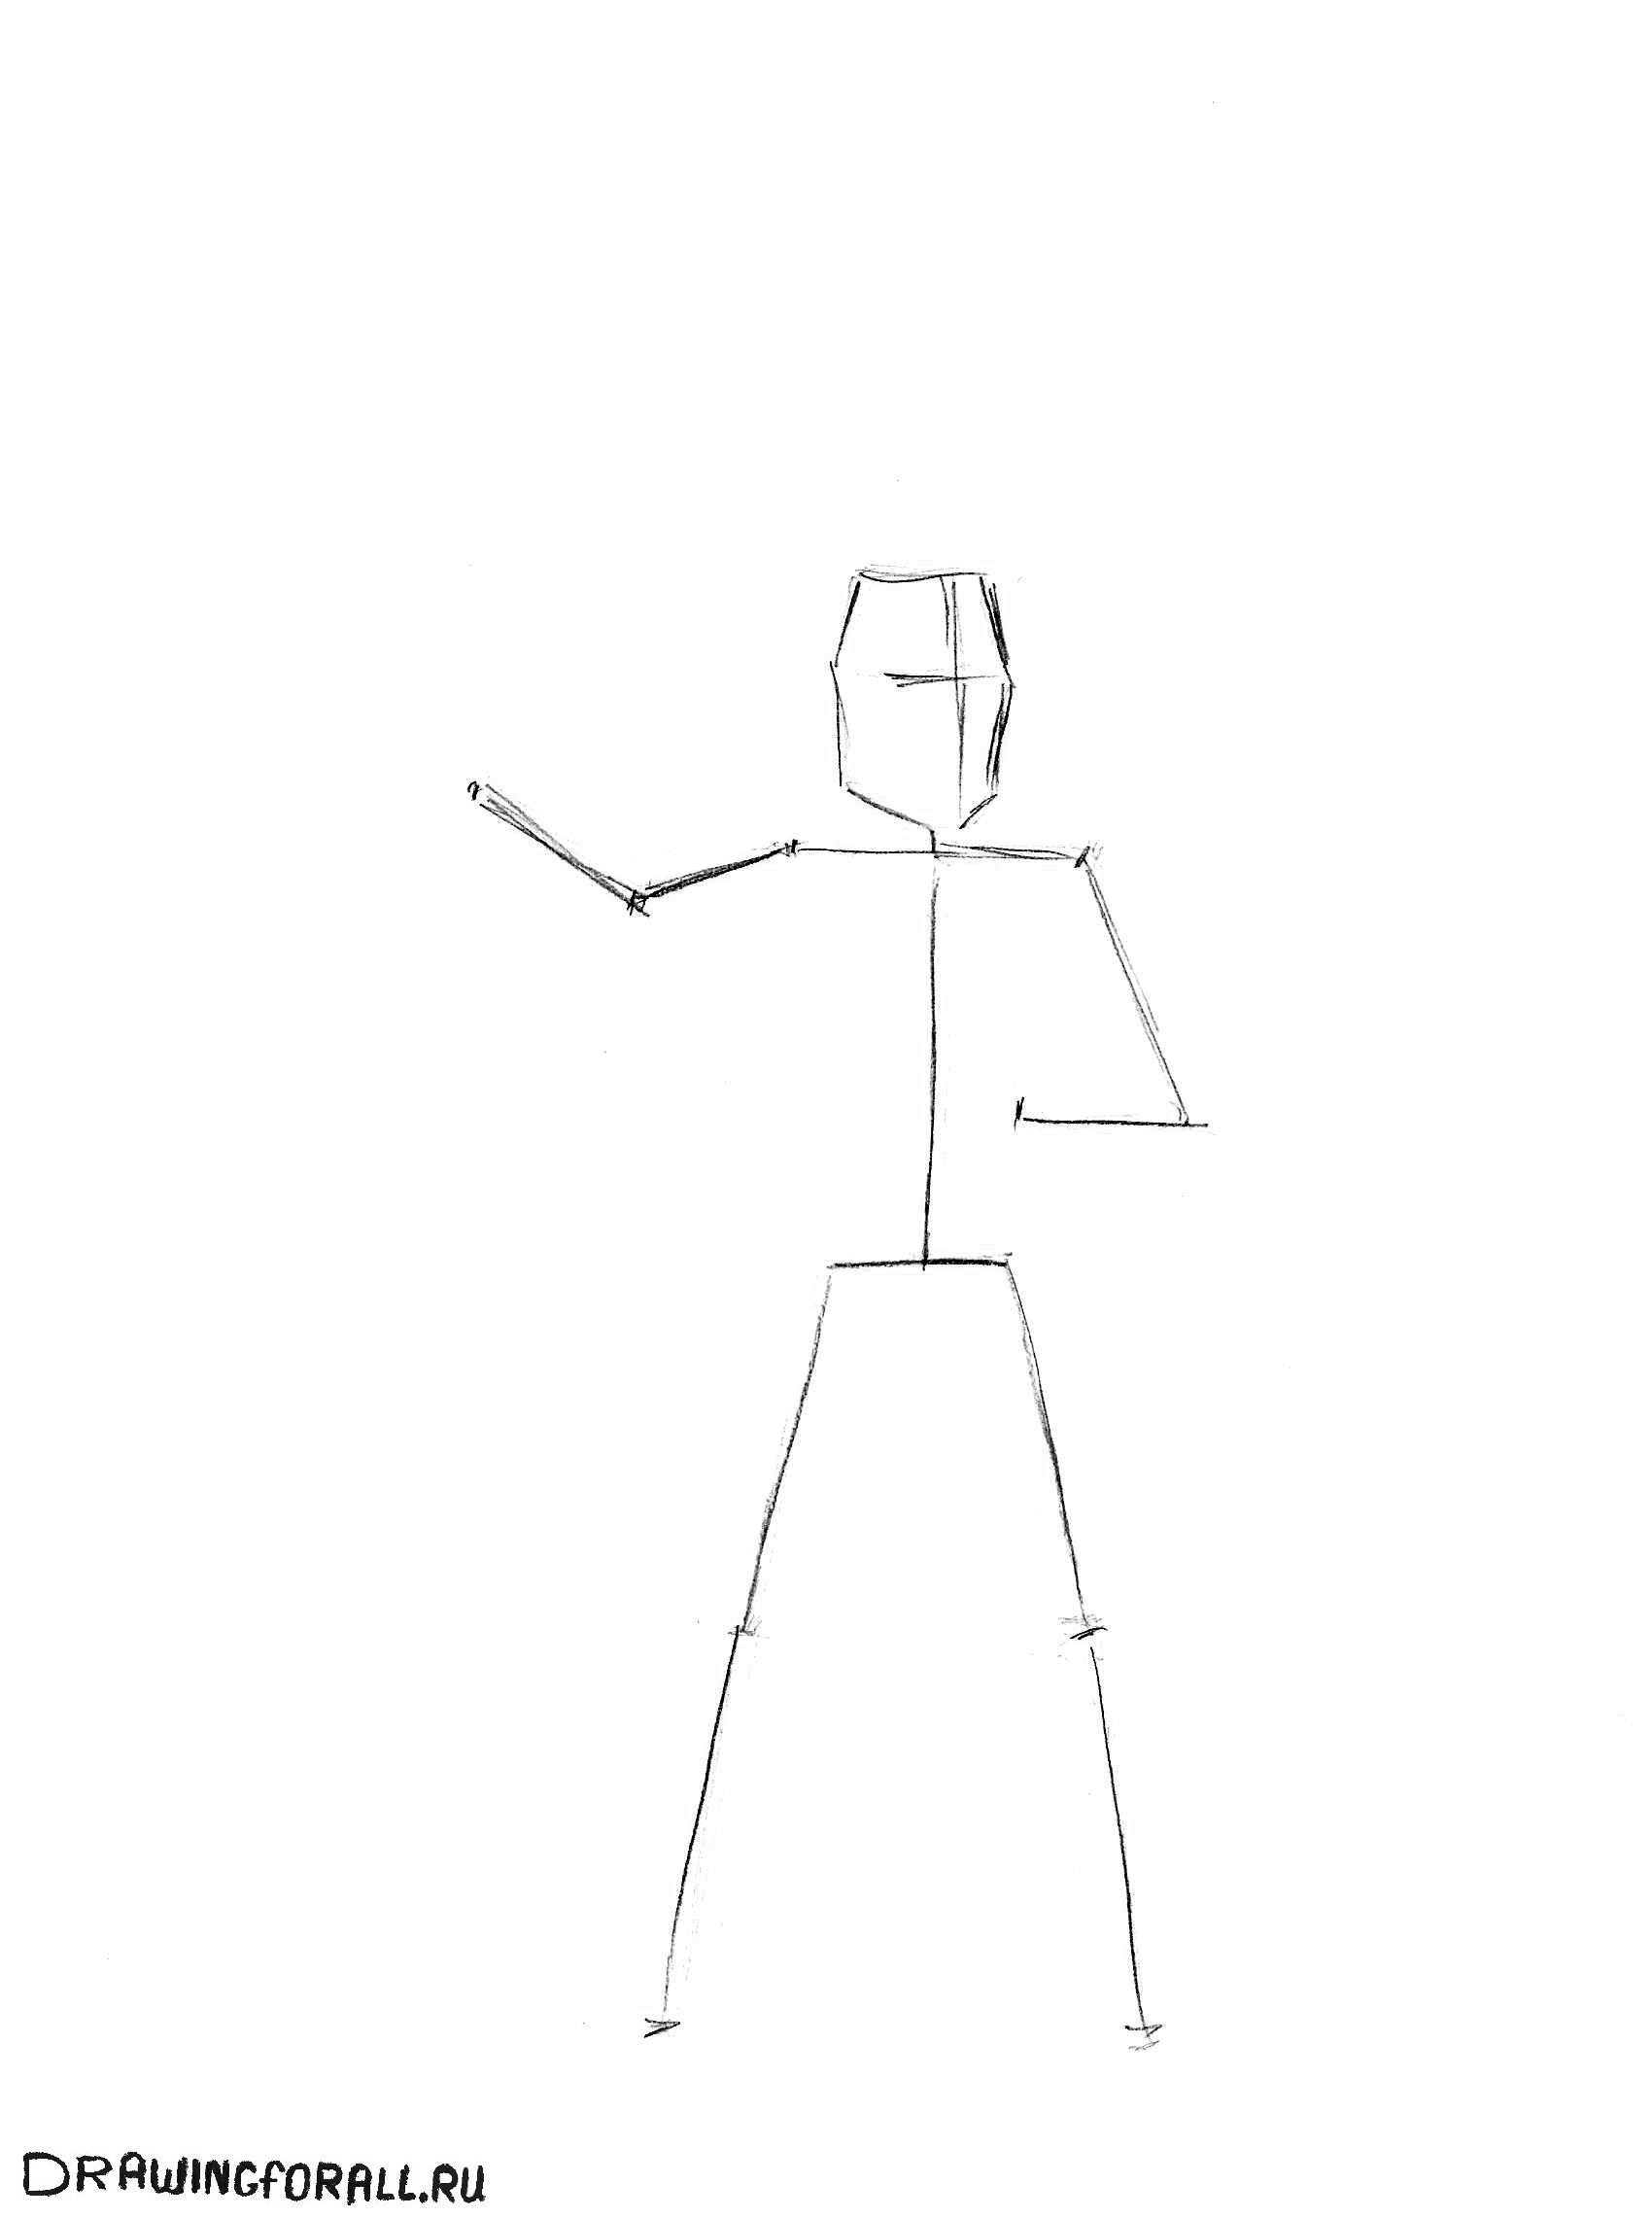
Stage 1
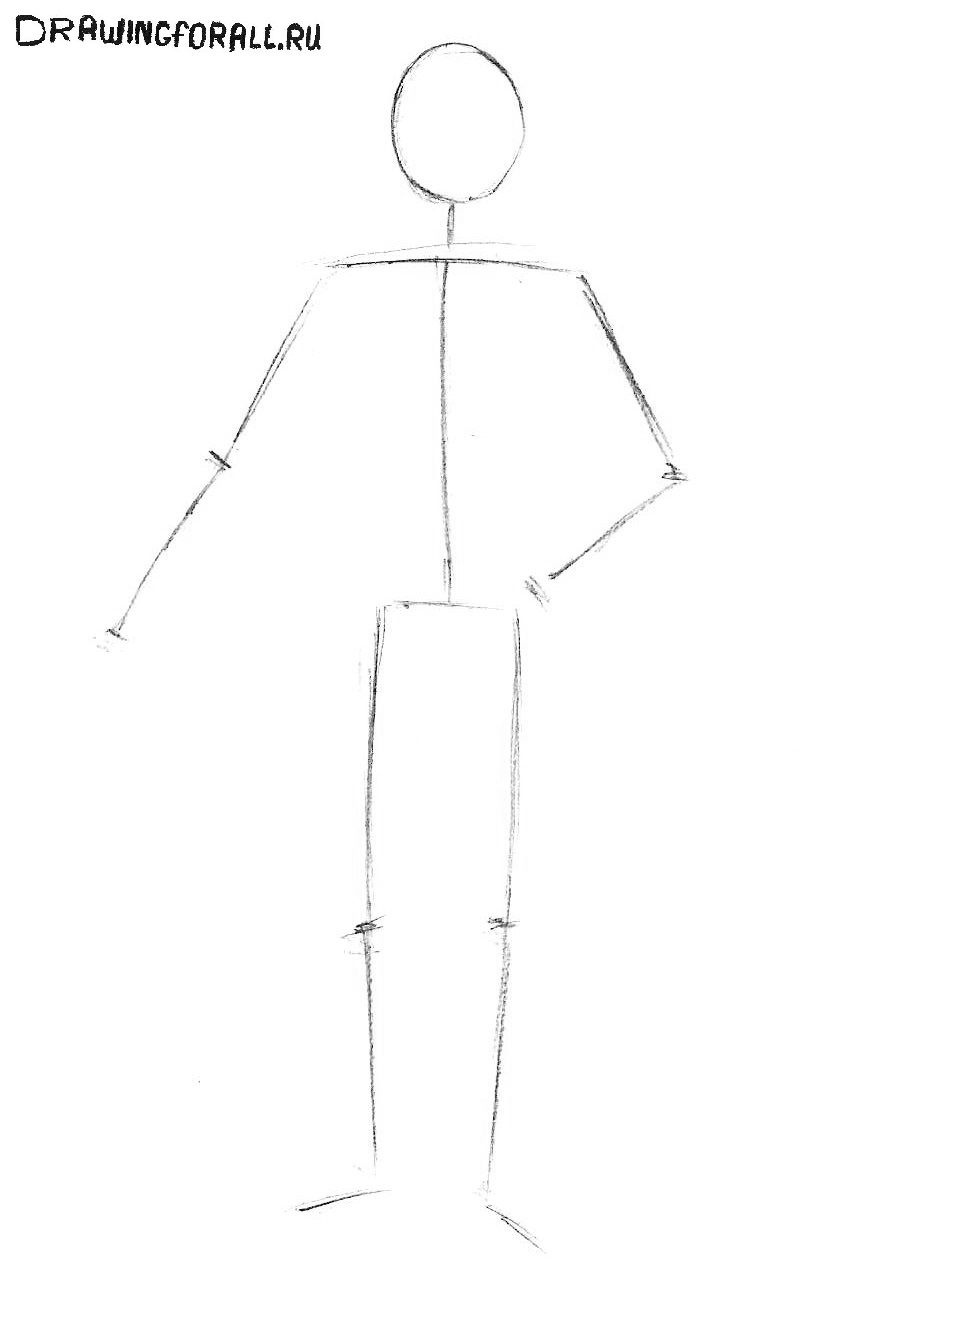
You start with a stickman - a special man made of sticks and circles, which is drawn to indicate the pose and basic proportions. A little about the proportions of the human body - the length of the body should be equal to seven heads. The size of the foot is approximately equal to the height of one head, the distance from the top of the head to the hips is usually equated to three heads. By the way, the height human head in all artistic manuals it is the main unit of measurement of all body proportions.
True, we digress from the stickman. Be sure to pay attention to the proportions, especially the head. It should appear much larger than a human head, since the knight’s head is wearing a voluminous and massive helmet. The warrior's pose itself is quite simple, it does not involve any sharp actions or lunges - one arm is bent (the angle is slightly sharper than a straight line), the hand is located on the handle of the sword, and the second holds a spear with a flag and bends very slightly.
With legs everything is very simple. They bend at the knees slightly and are in a completely natural position of a person who stands straight and does not strain his legs to give them straight position. It is important not to forget about two important lines - facial symmetry and eye symmetry, outline them and move on. 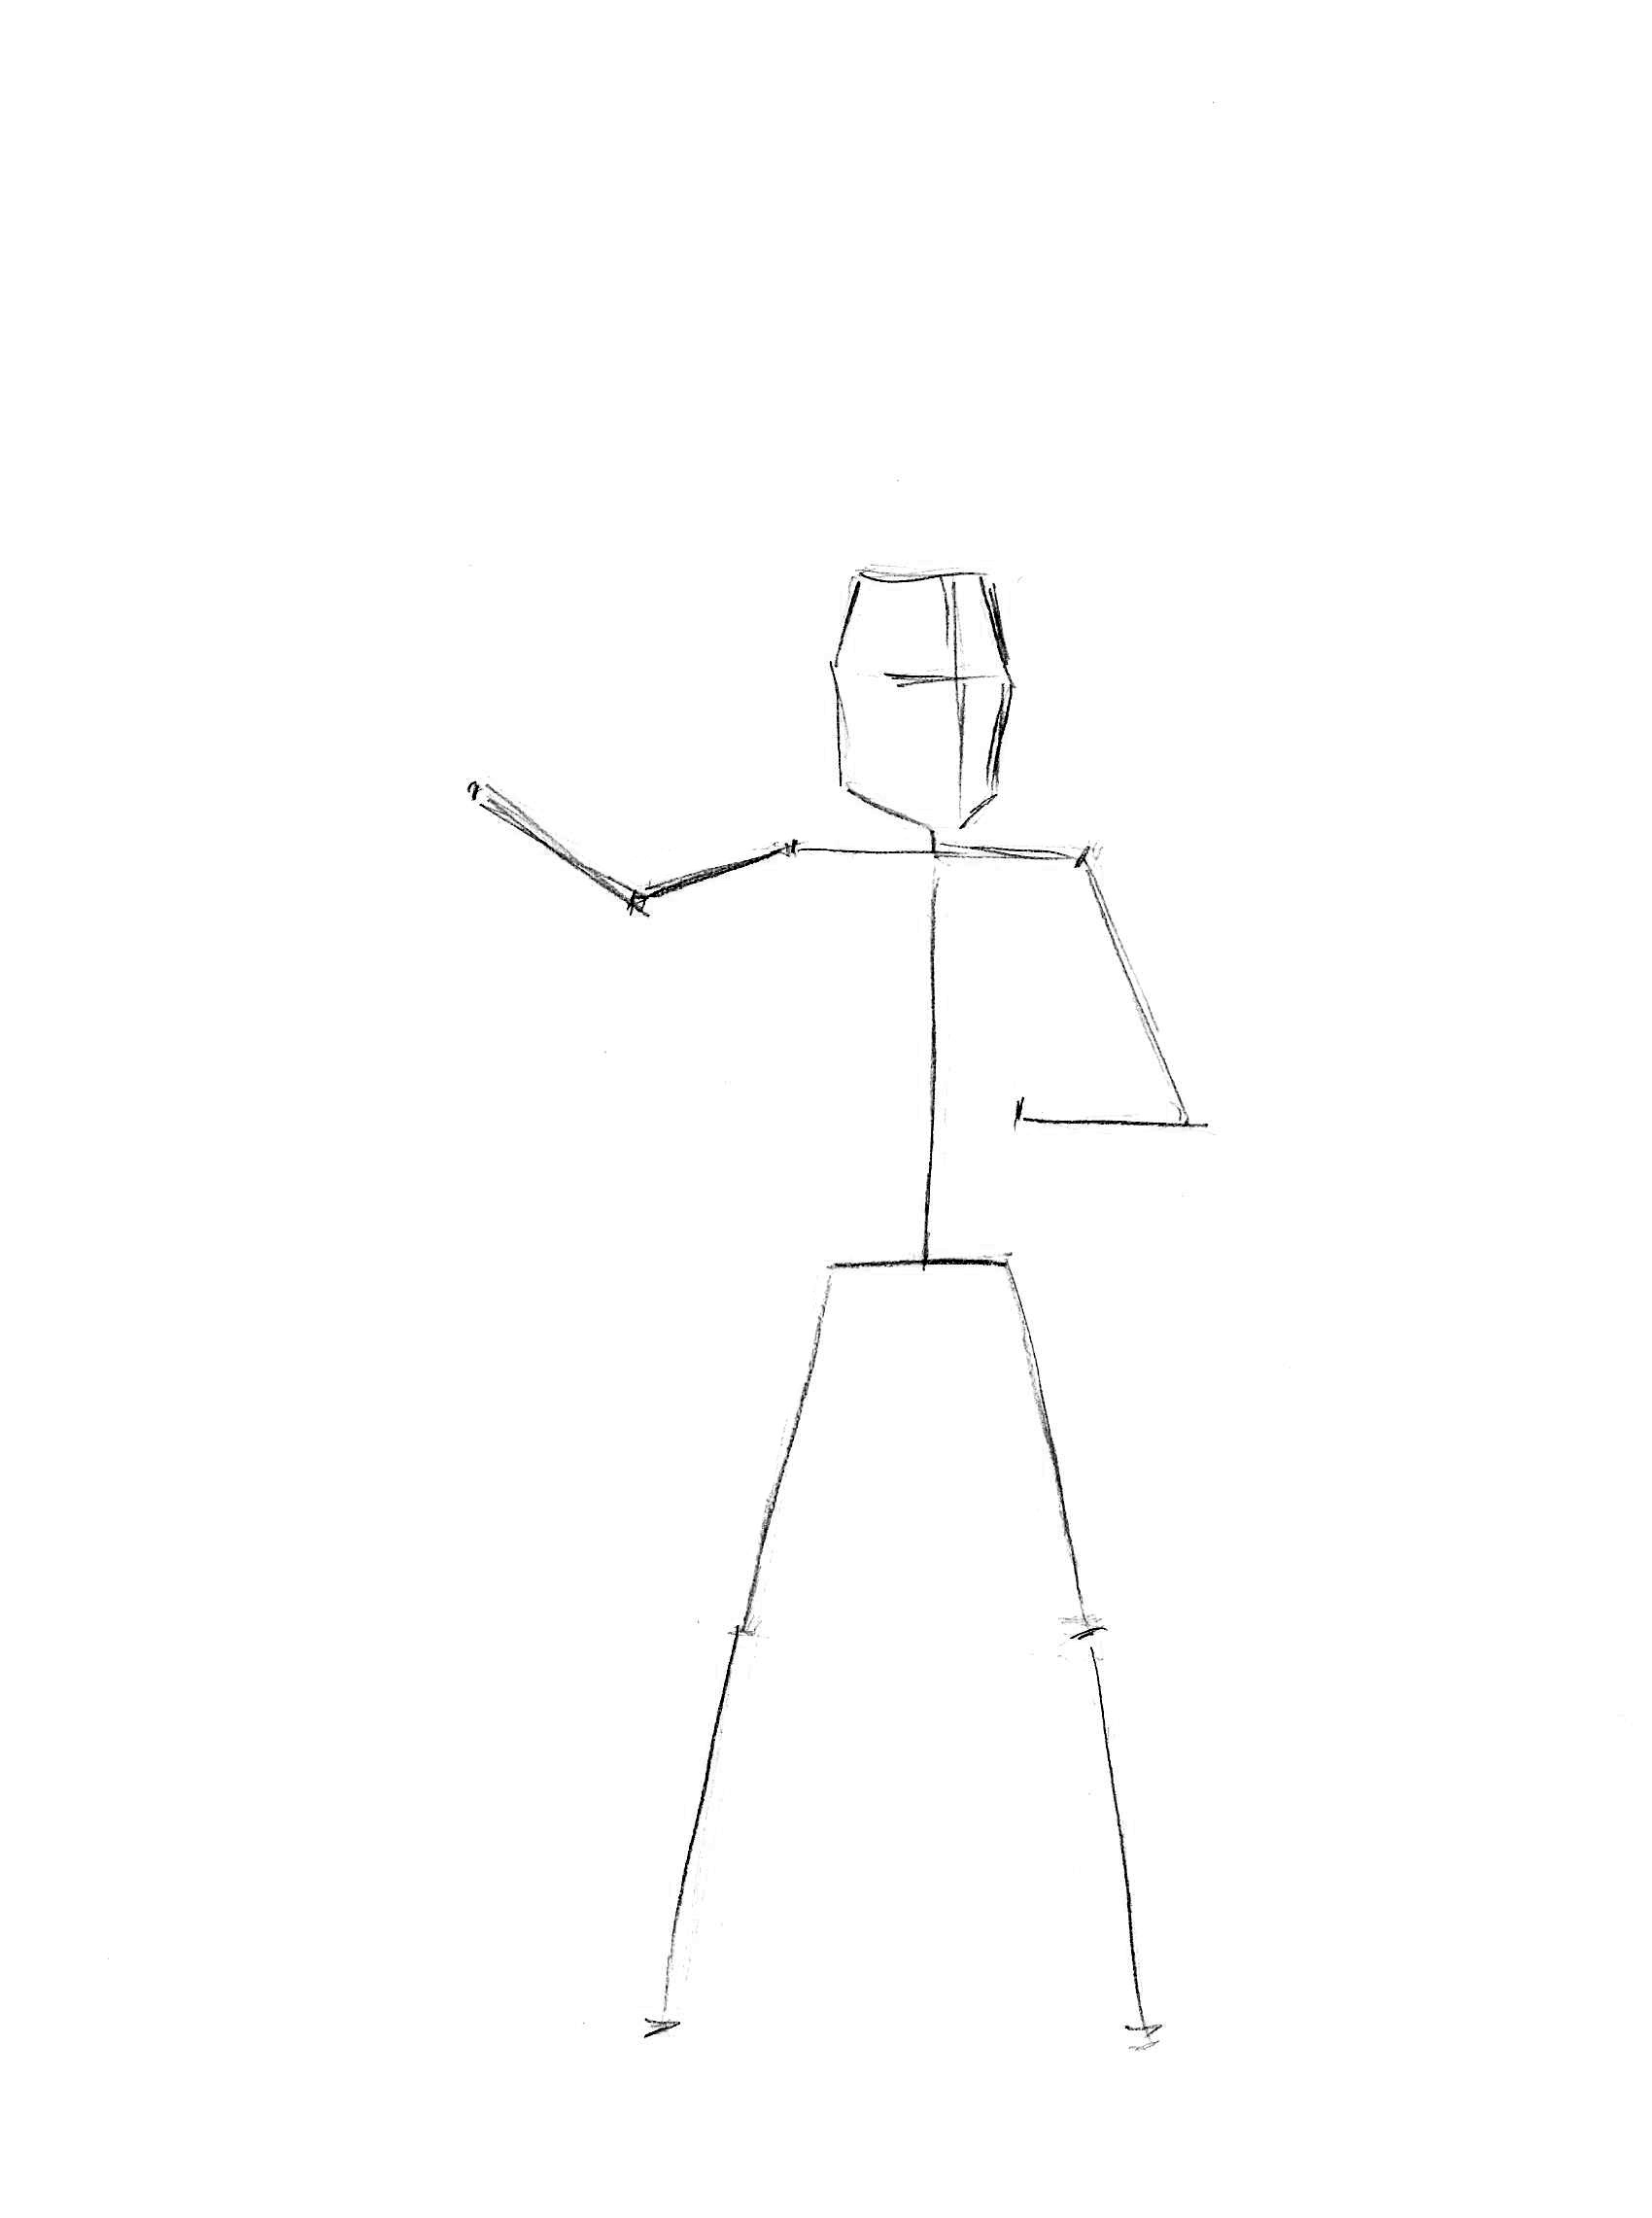
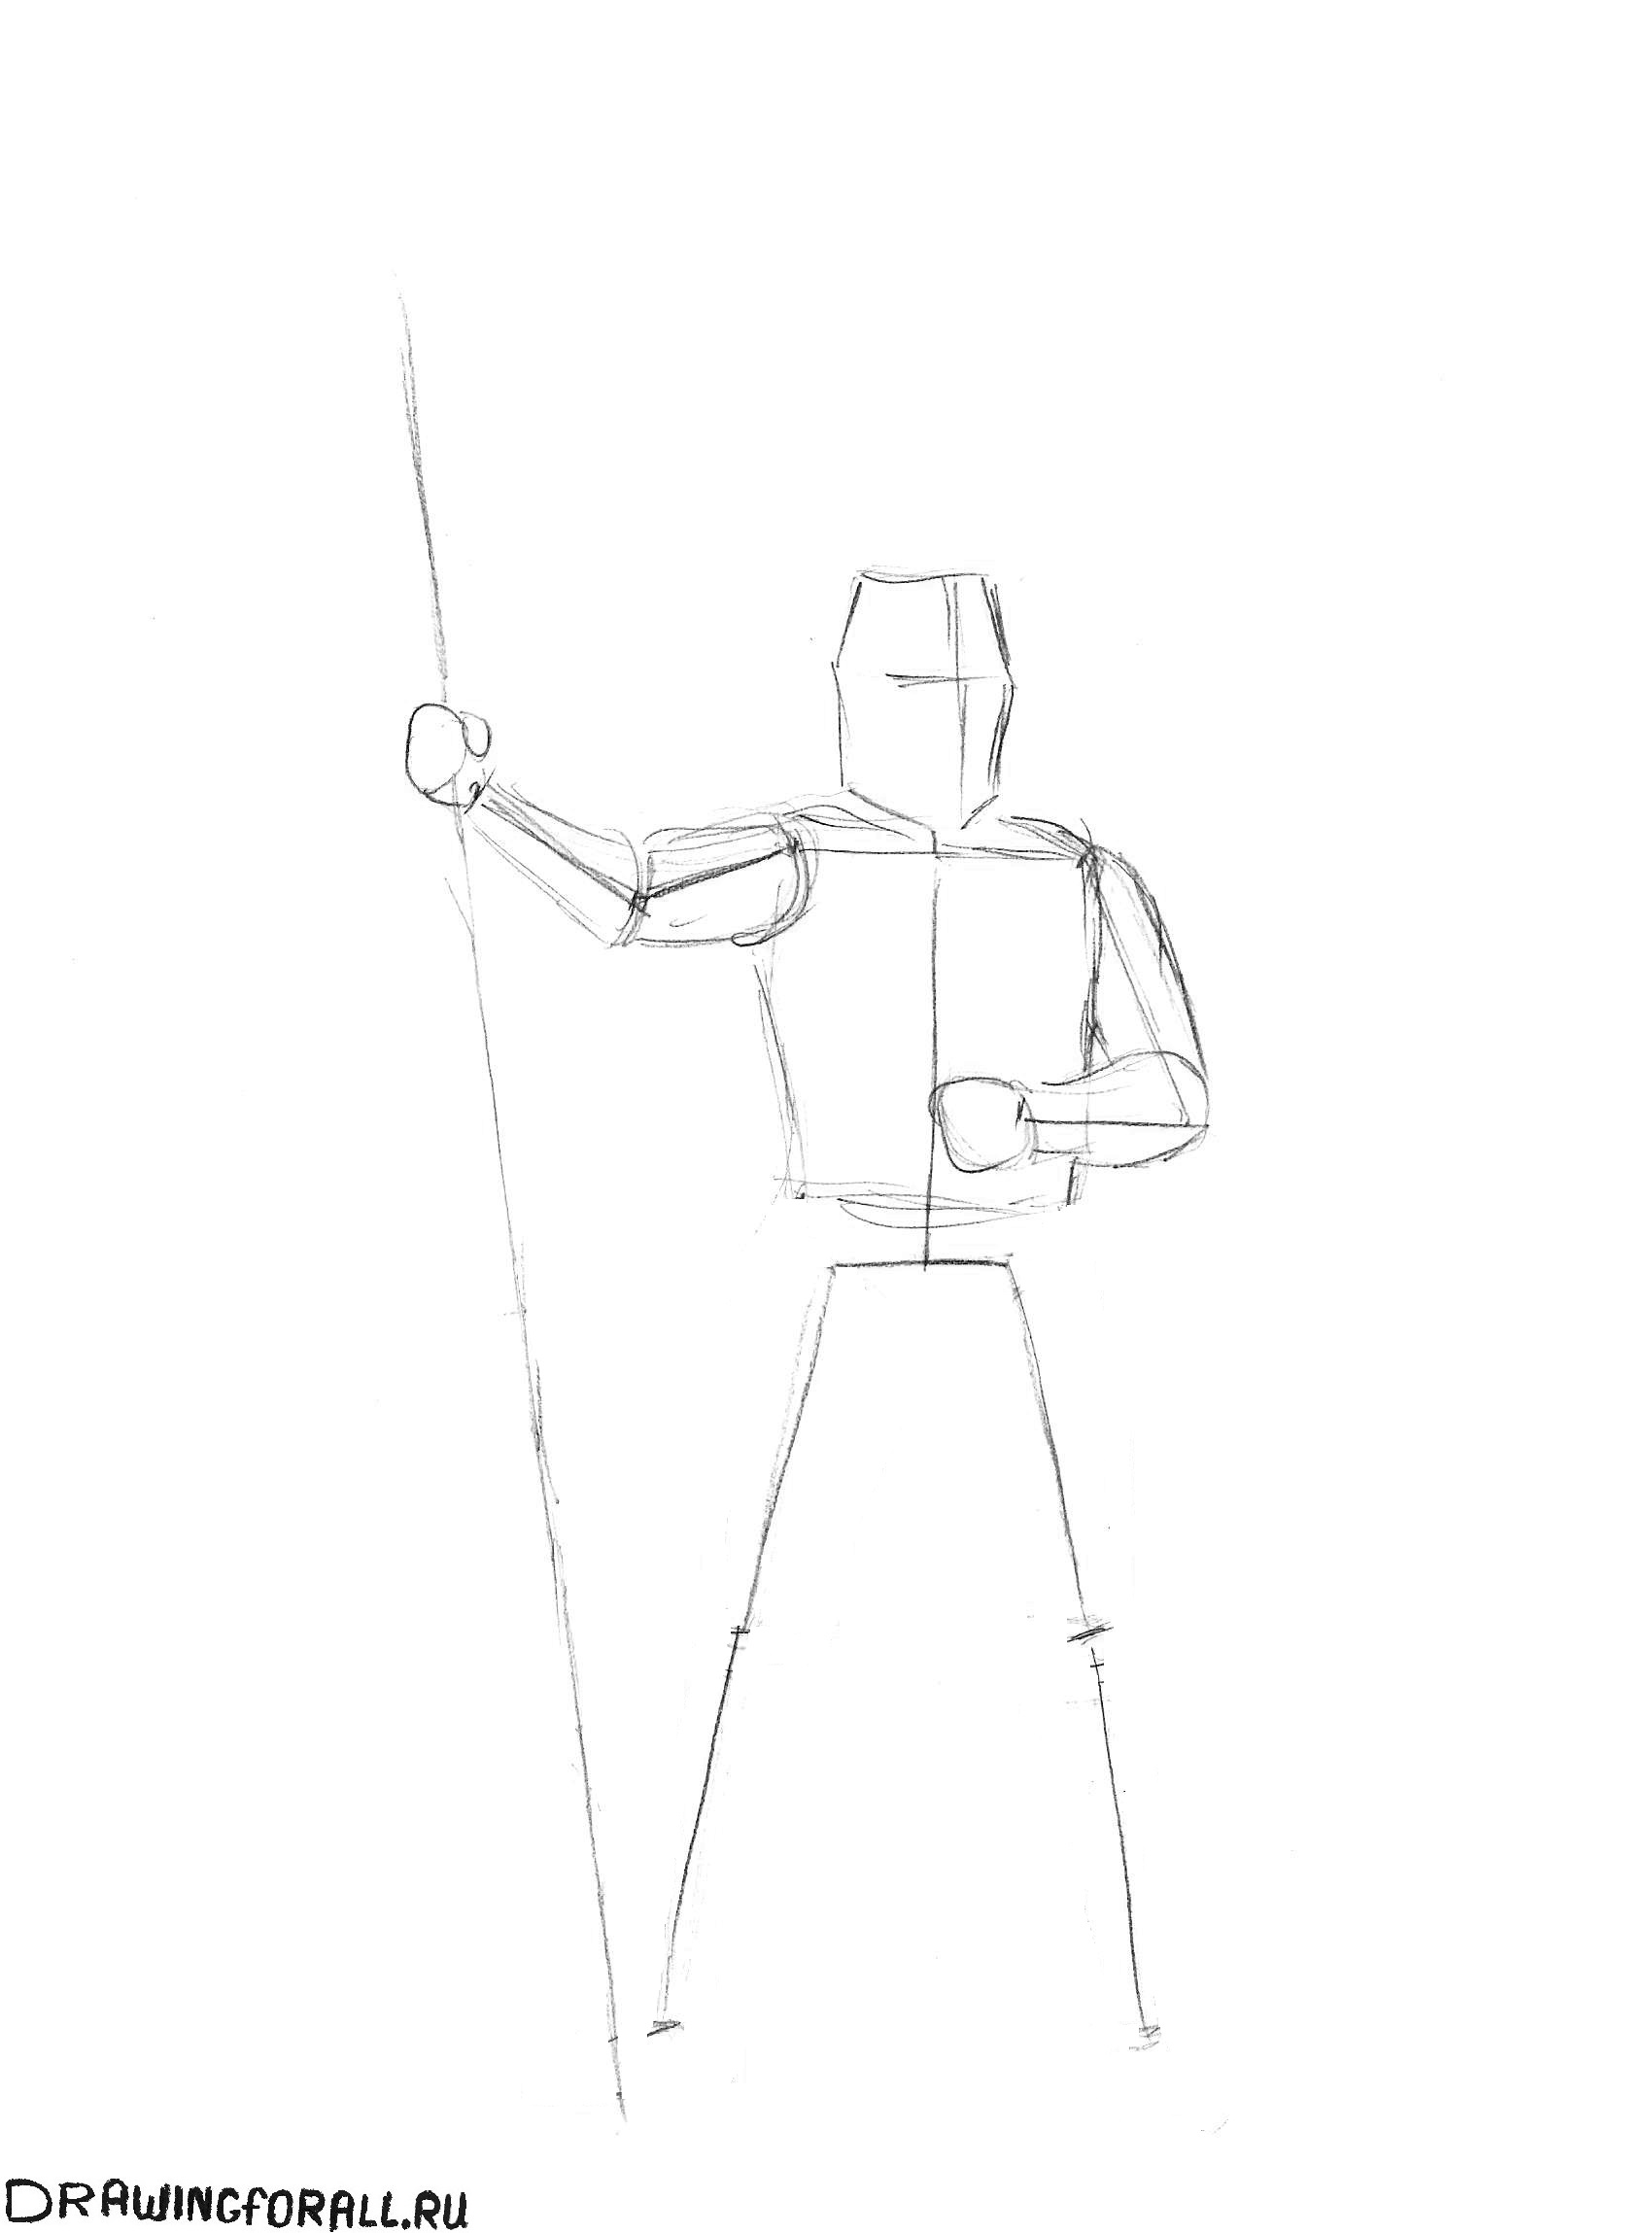
Stage 2
At this stage, you will add volume to the arms and upper torso, following the lines of the stickman as a guide. Outline body parts in the form of modified cylinders. This will help you in the future to accurately draw all parts of the knight’s body. In general, in further steps you will draw only the shape of the armor, since, in fact, they hide the entire Templar from head to toe. 
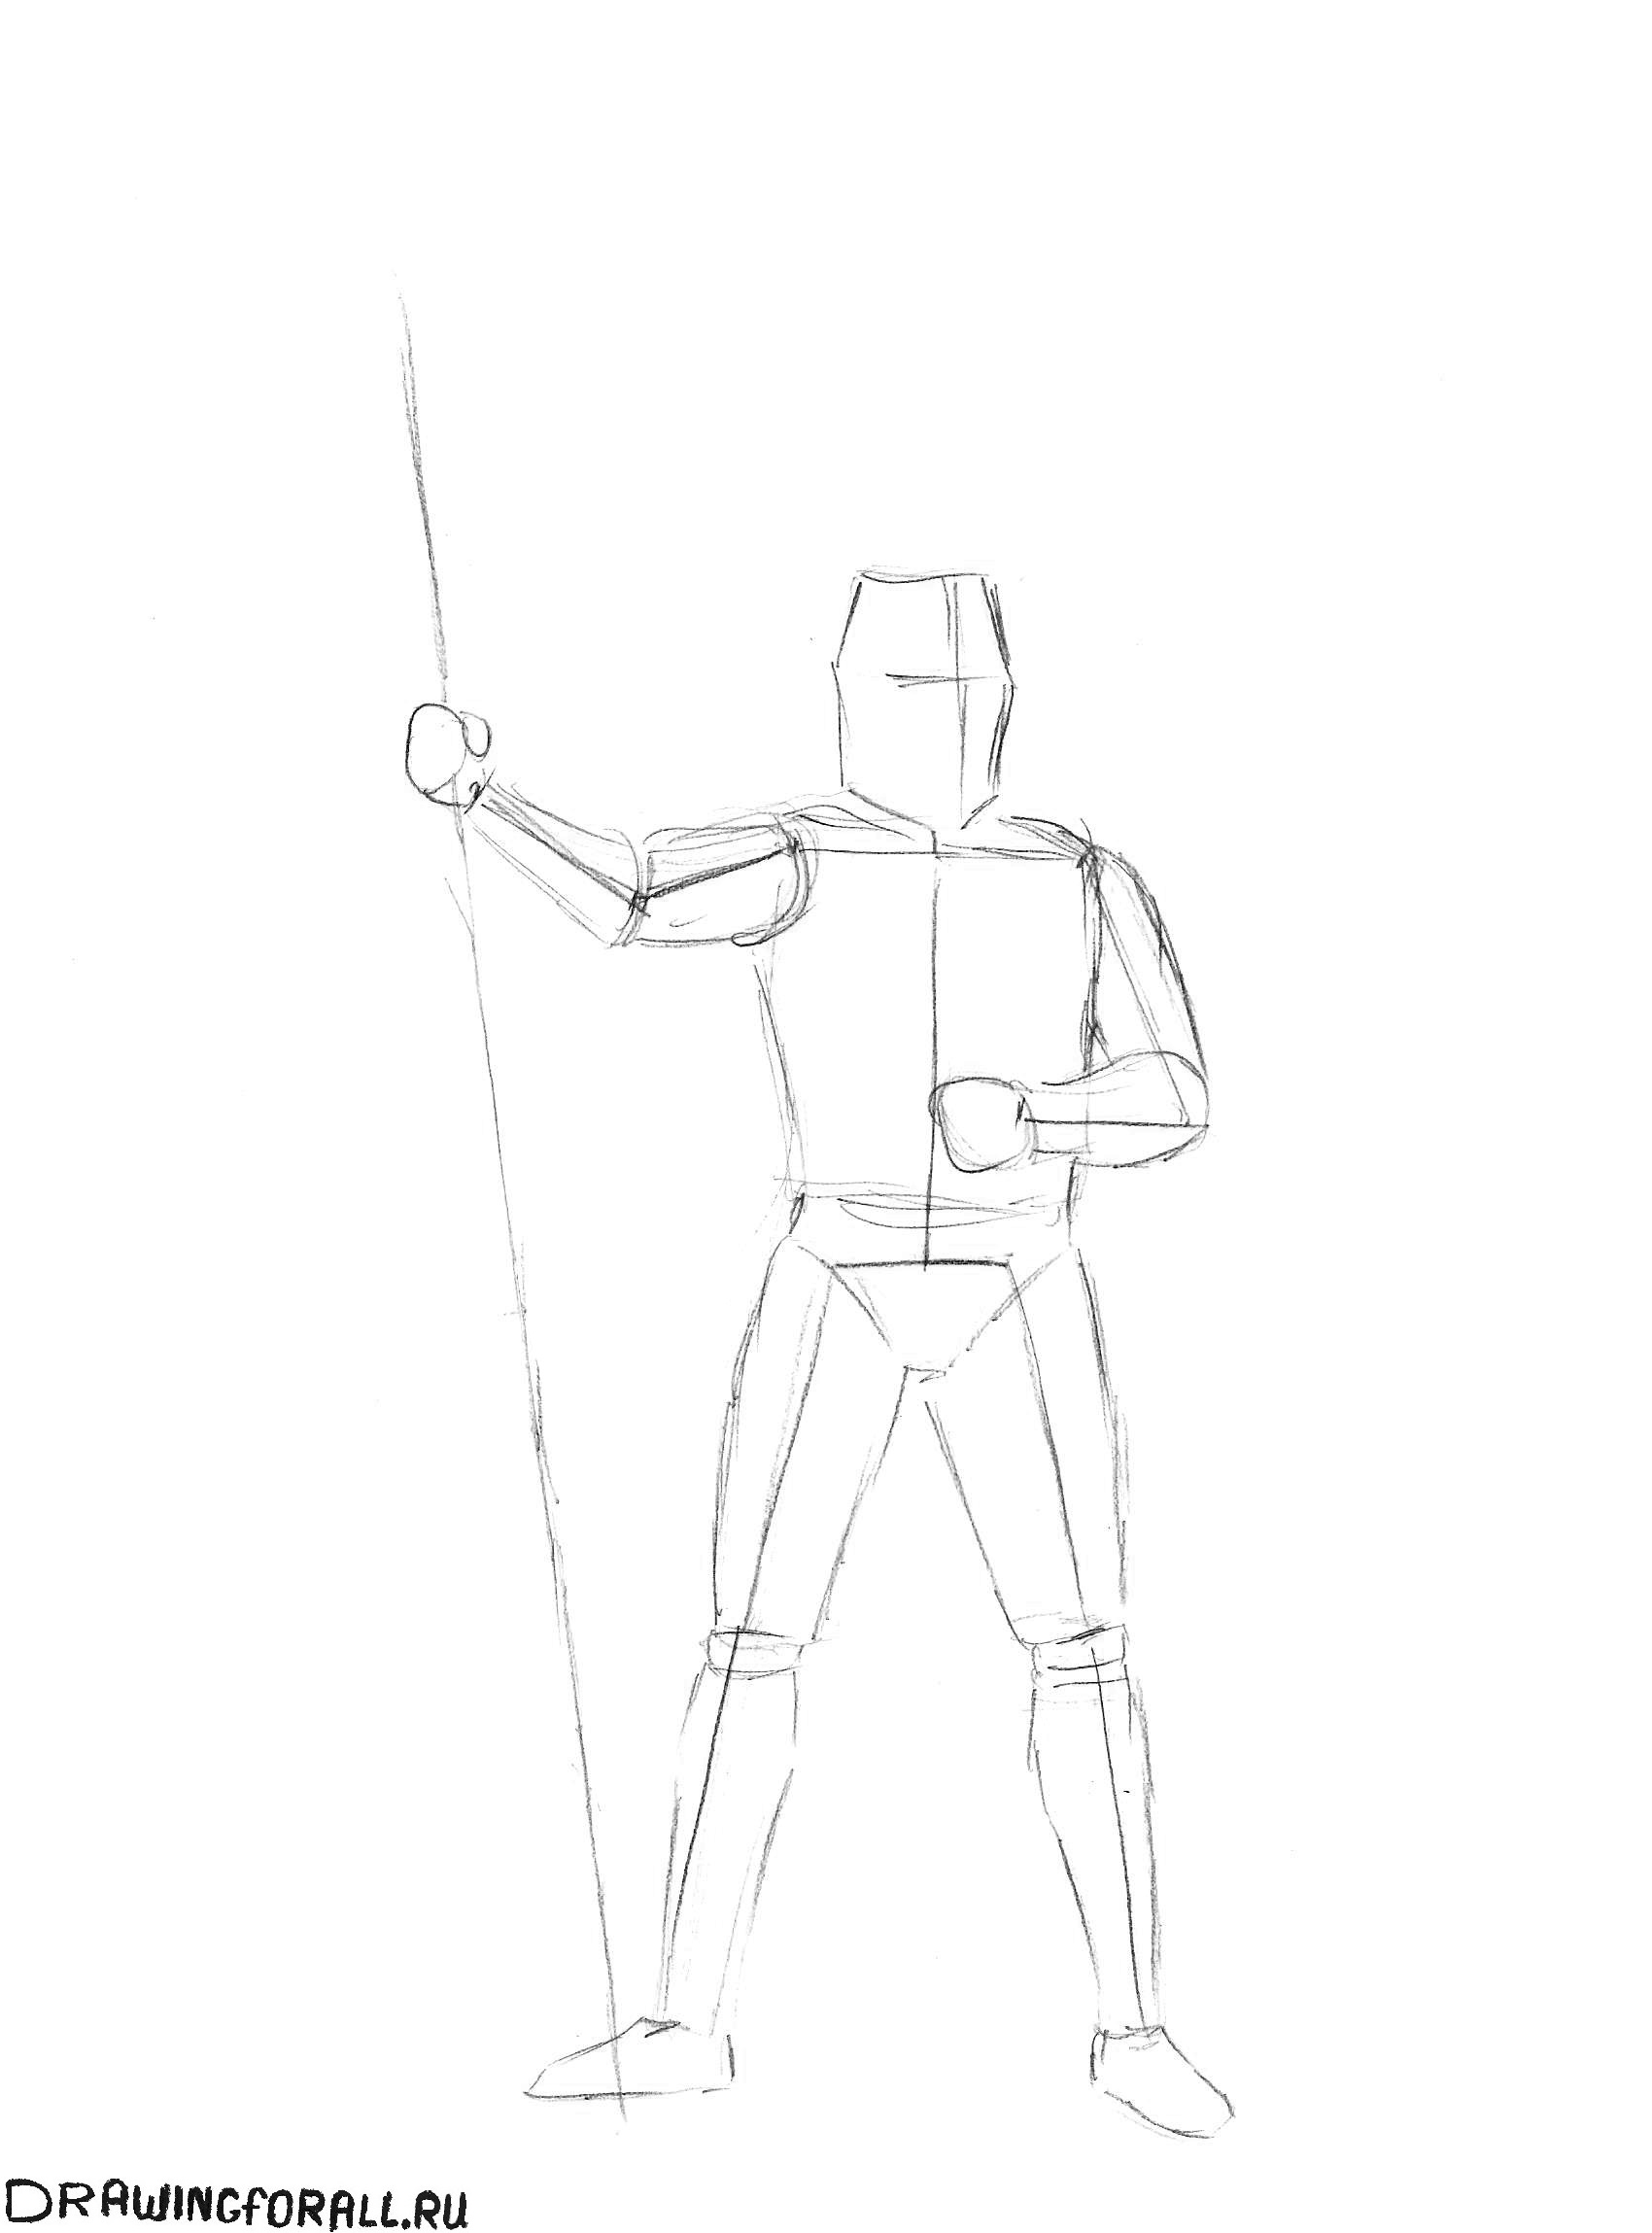
Stage 3
Repeat the actions of the previous stage, but regarding the legs and belt of the knight - make them voluminous. The waist area is essentially a triangle, and the thighs of the legs look like cylinders. Don't forget to also mark the knees with flat ovals, then draw the calves, feet and move on to the next stage. 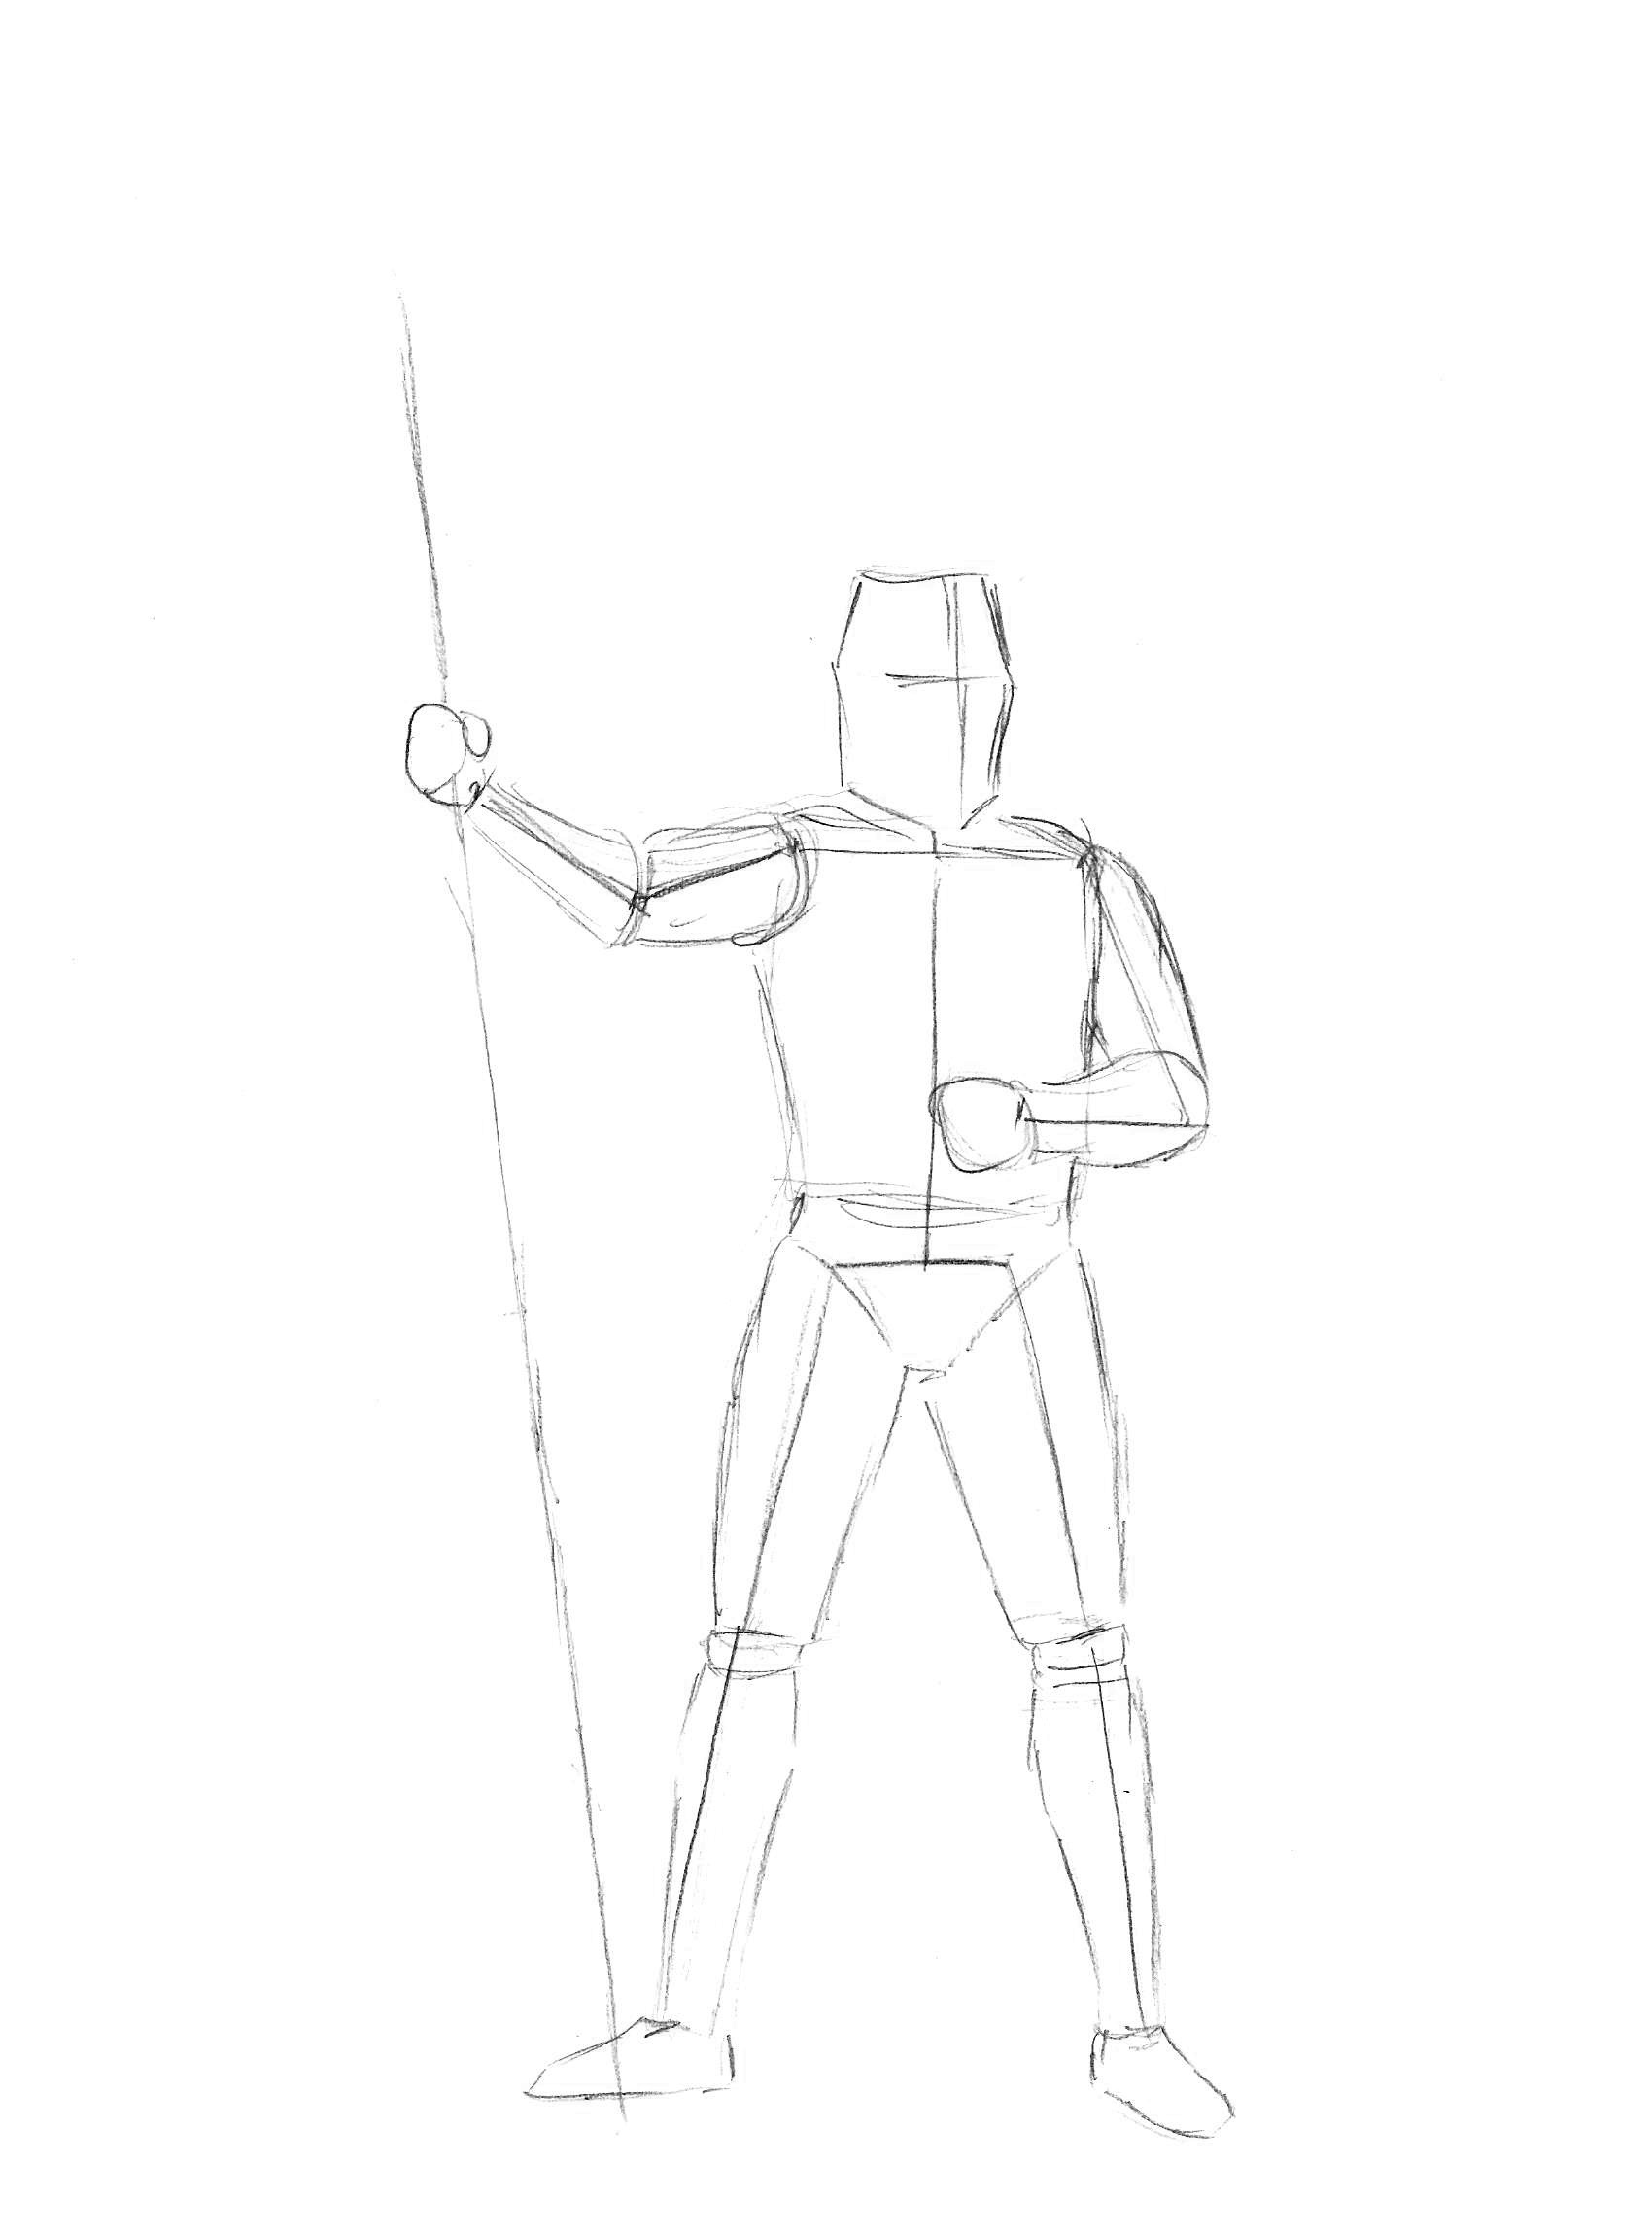
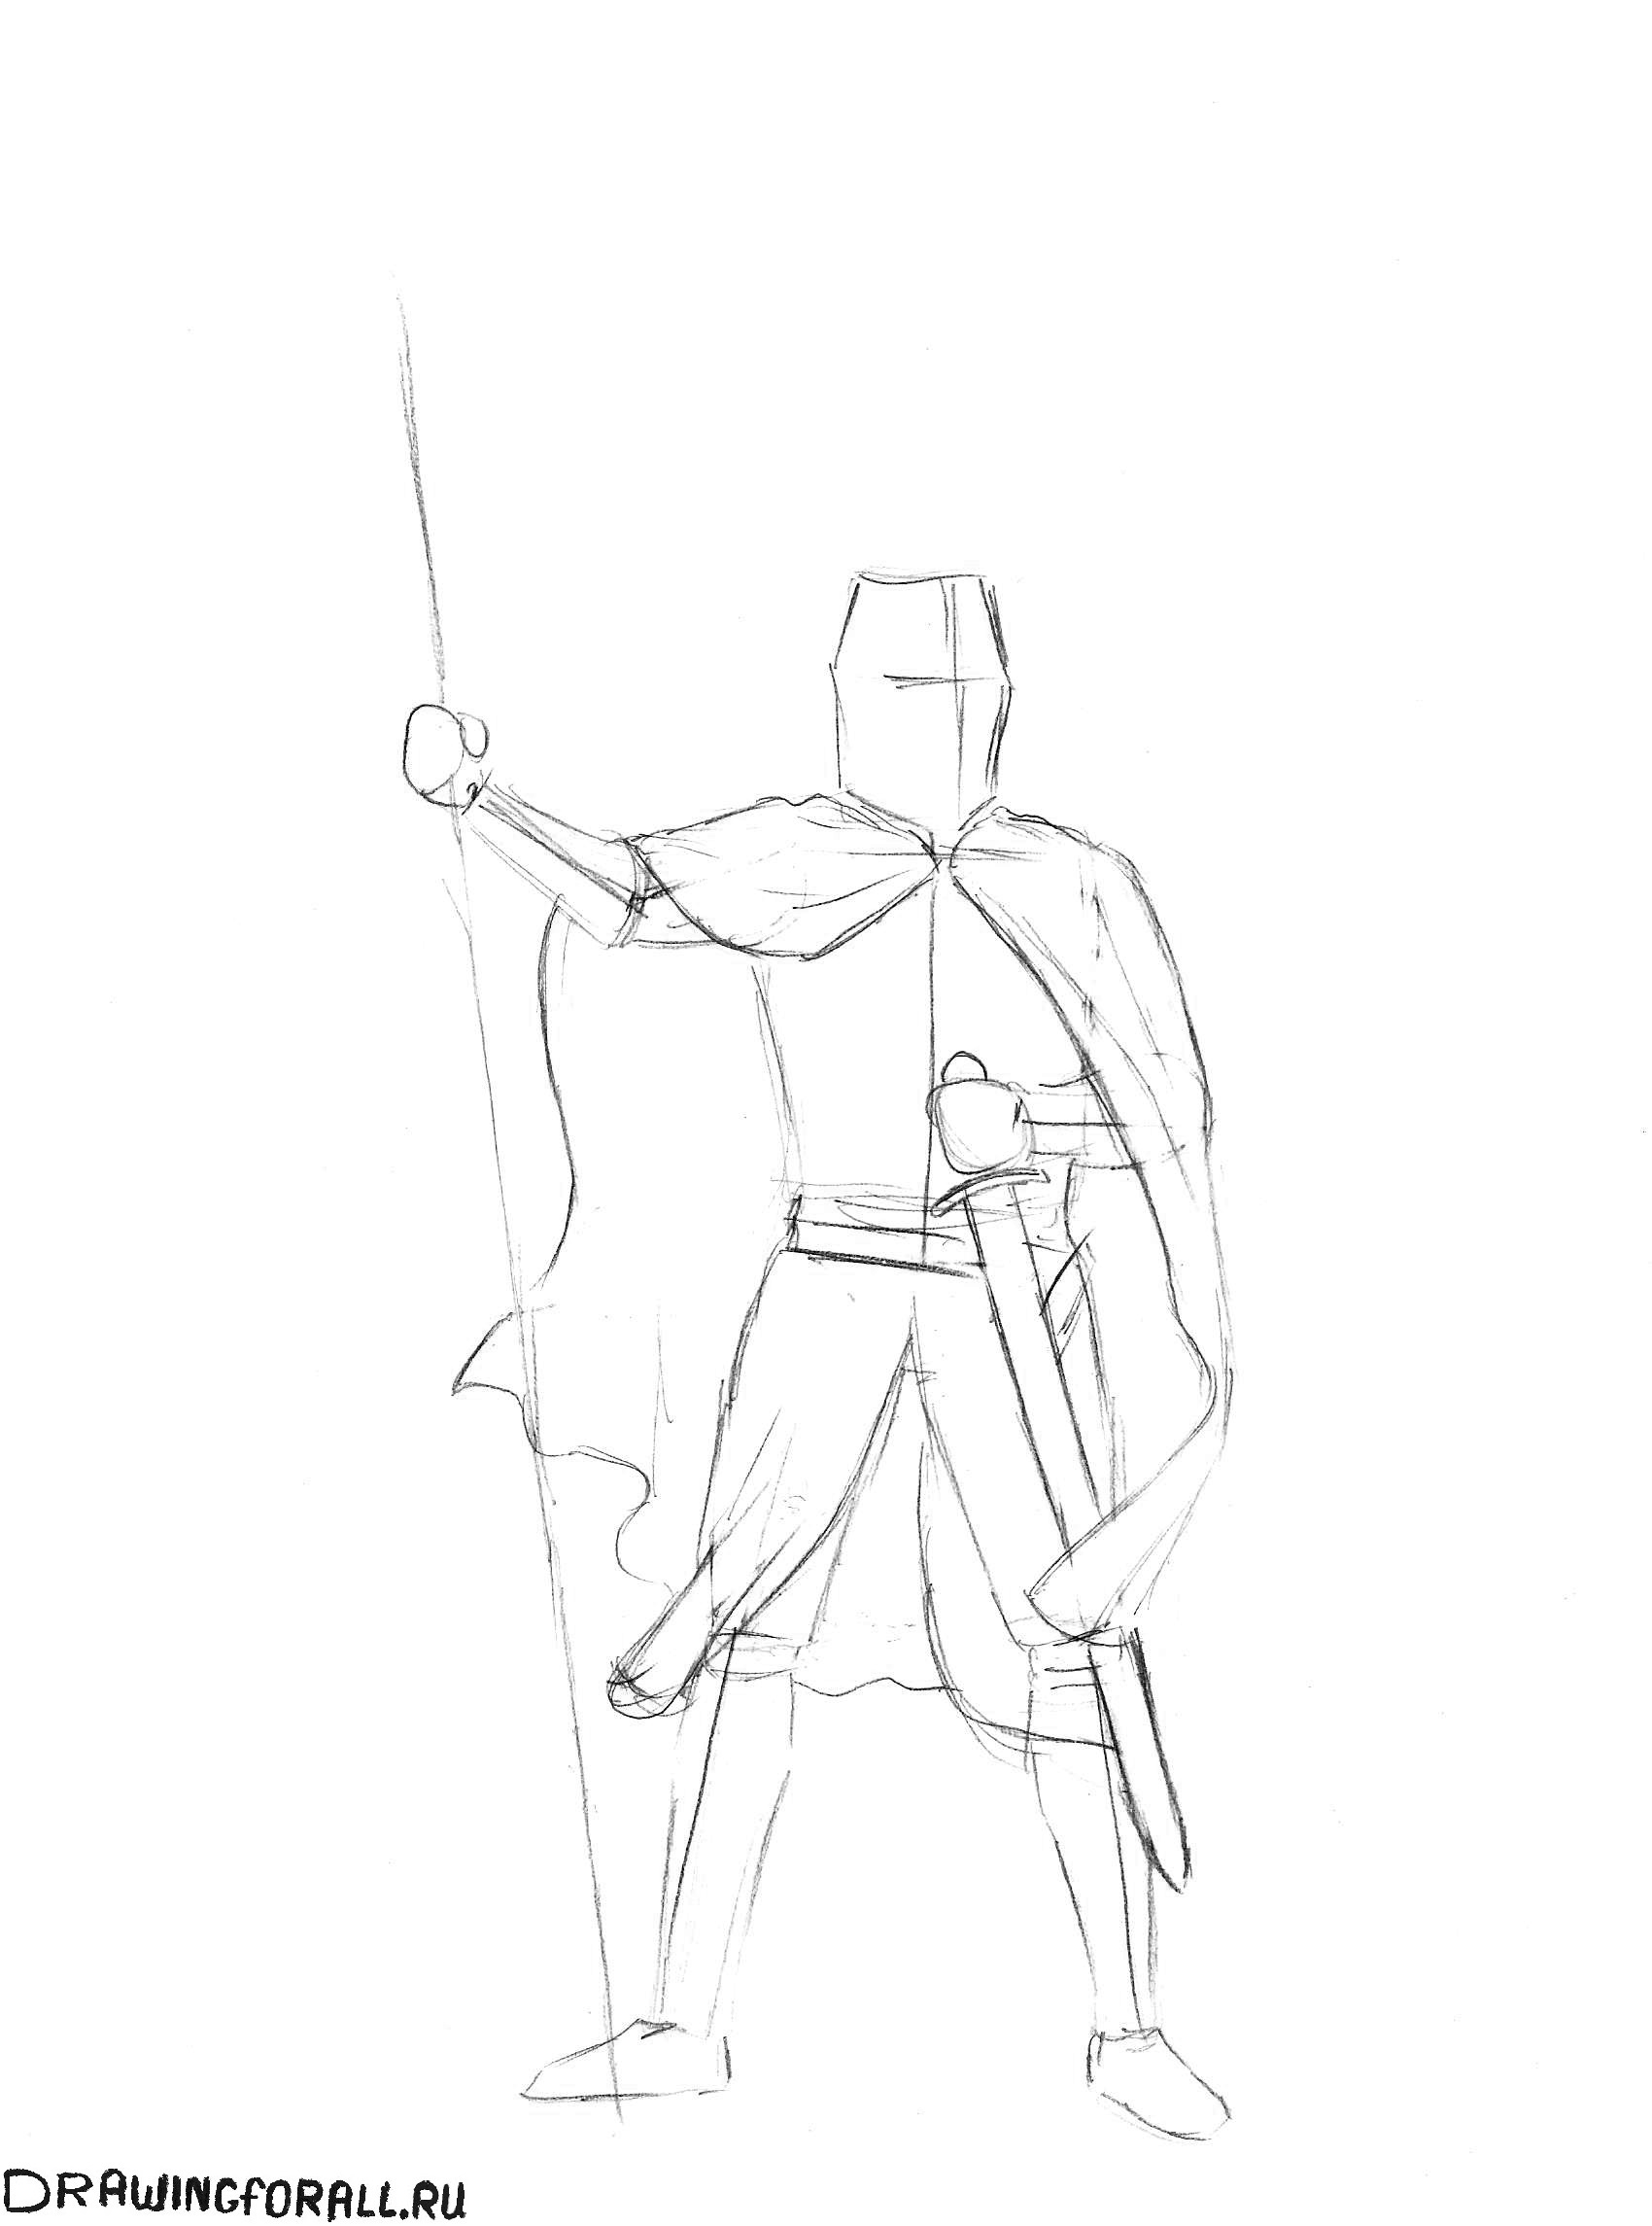
Stage 4
Now work on the fabric. We are talking about the knight's mantle, as well as the elements of the robe that are on the belt and cover his legs to the knees. First, give the mantle some general silhouette, and then draw the folds. Do this using natural and smooth lines.
Remember that you are depicting in the picture a kind of light wind that blows the knight’s robes. Don’t forget to also mark the folded part of the mantle that covers the folded part. left hand. A little more work with fabric - draw a surcoat (a piece of clothing covering the legs and torso). Also at this stage, you throw on a sword, the handle of which is actually completely covered by the warrior’s hand in a mitten. 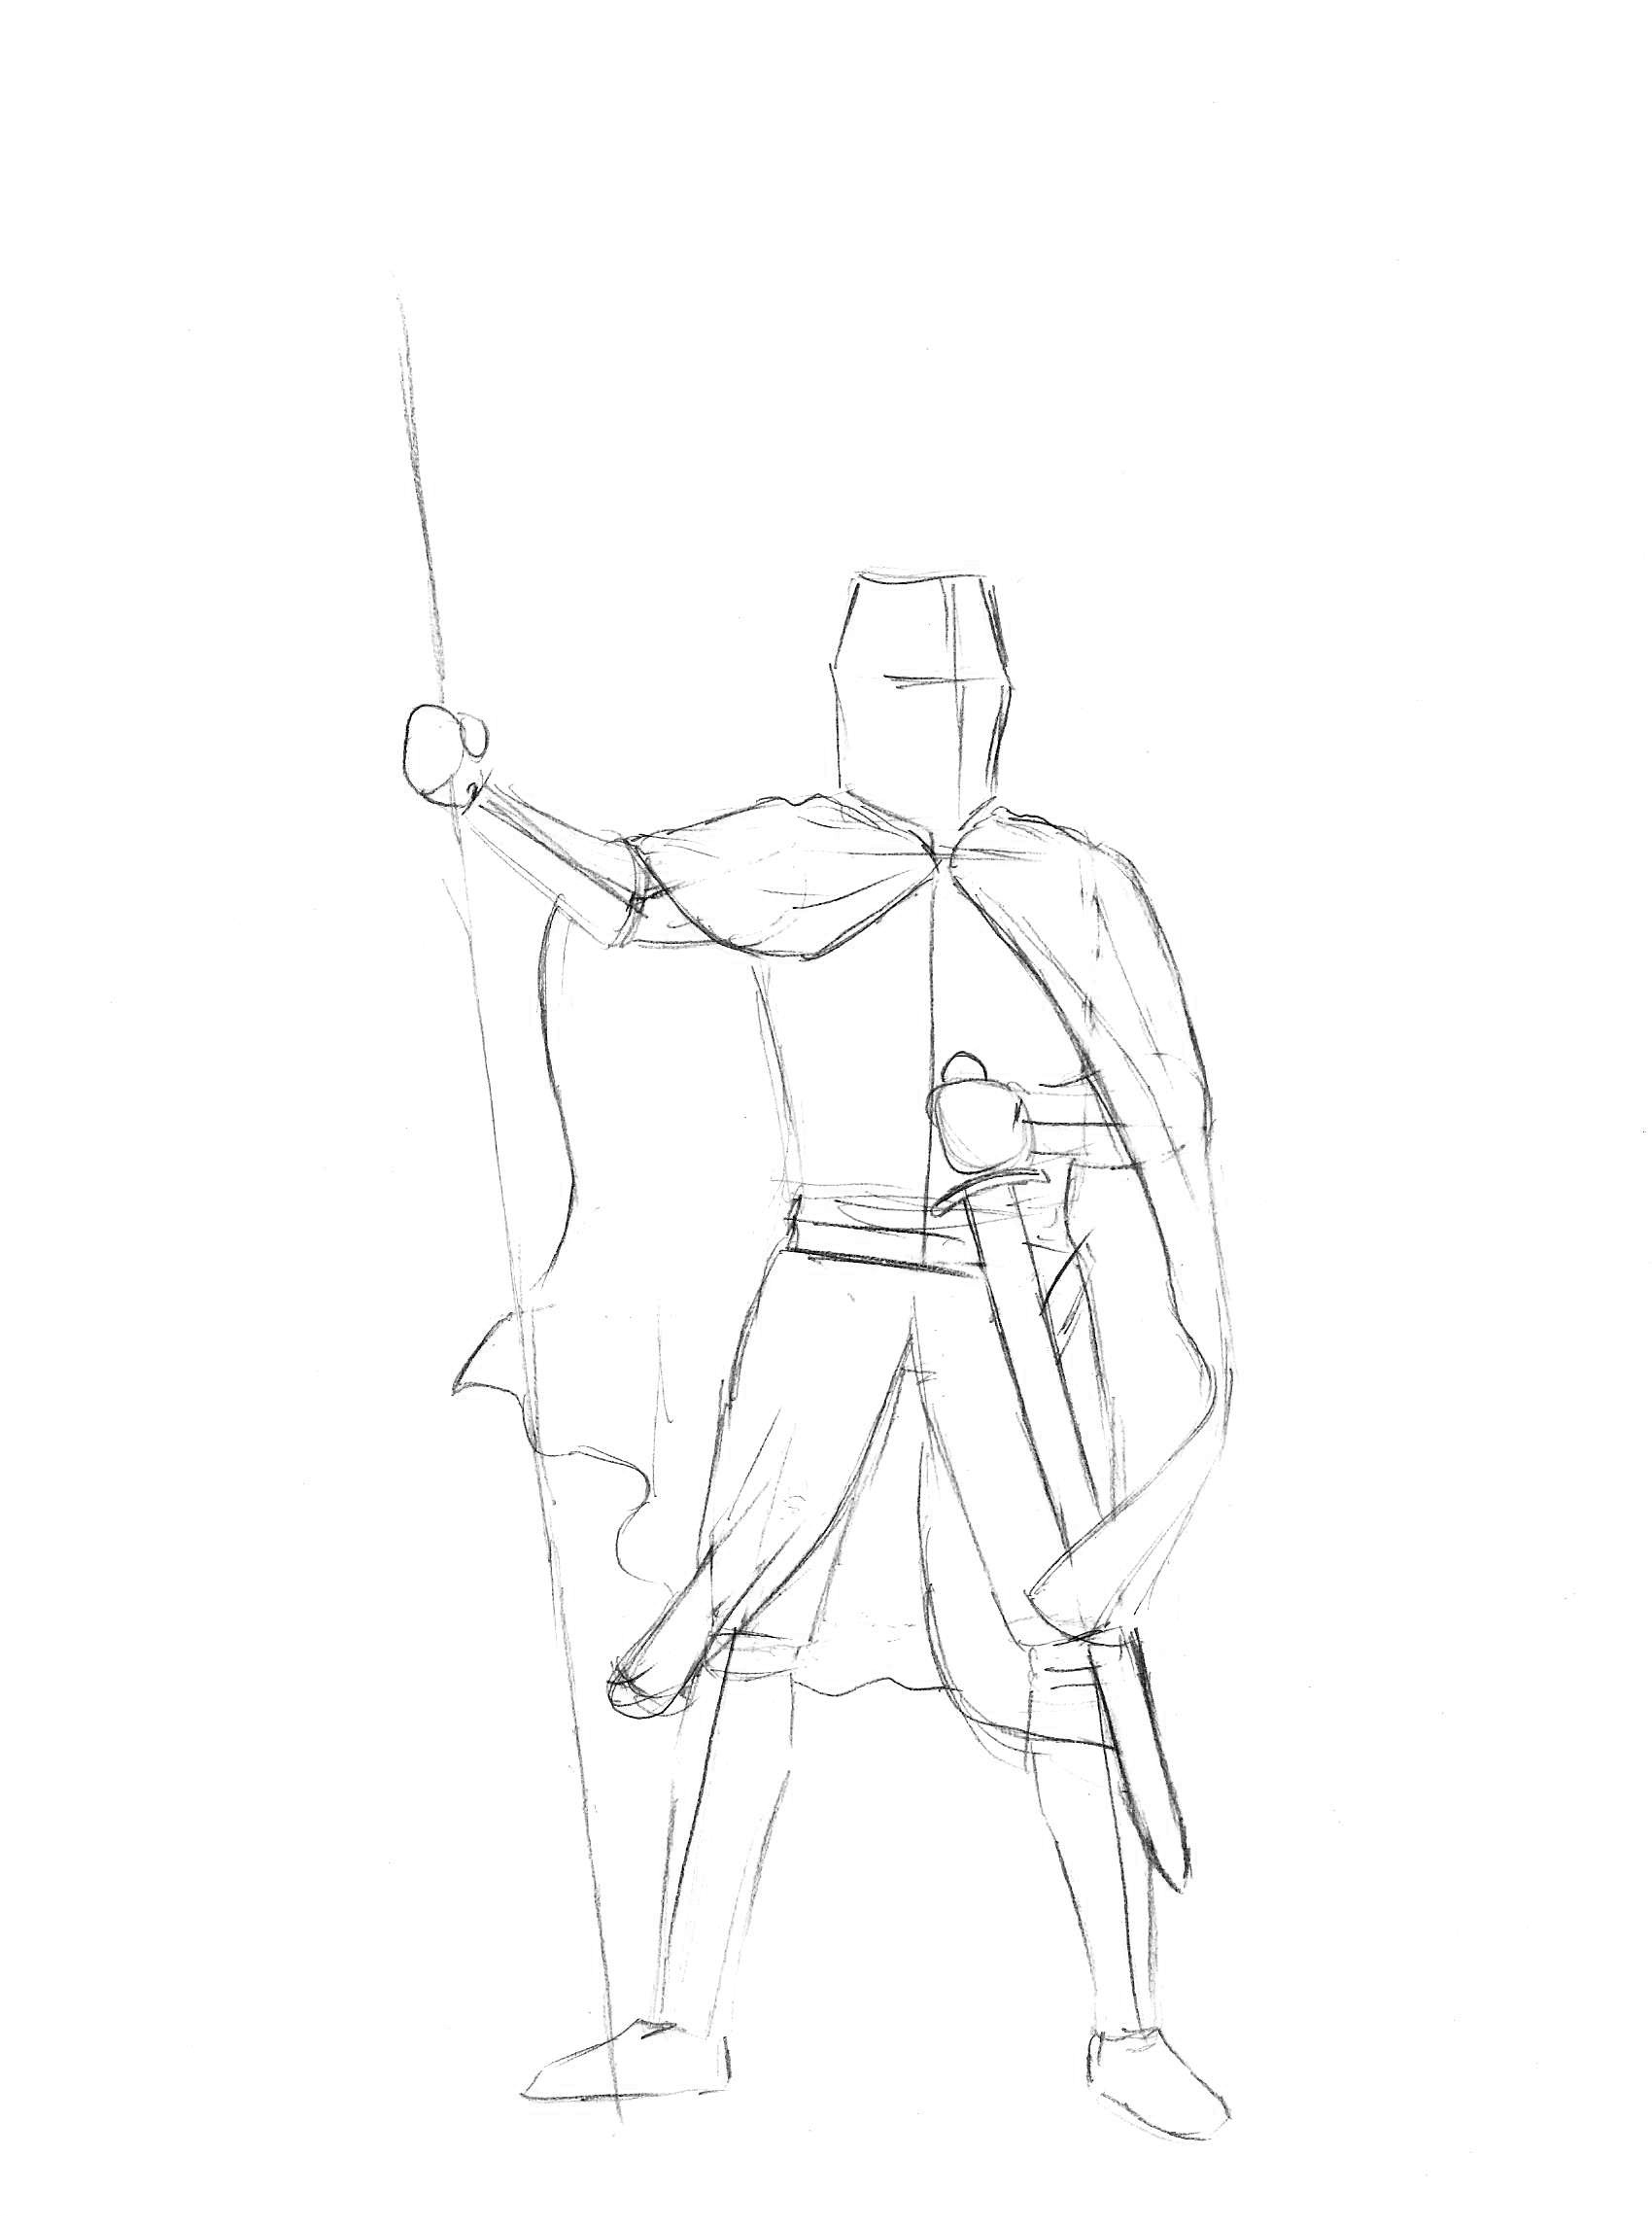
Stage 5
You have a ready-made silhouette of a warrior, and from this stage you can begin to draw it in detail from head to feet. First draw a horizontal seam at the very top. Next, give the shape of the helmet a finished look. Then, based on the two perpendicular lines from the first steps, draw the vertical seam, as well as the holes for the eyes that need to be painted.
You complete the stage by drawing small holes at the bottom of the helmet. Be sure to pay attention to their uniform size and orderly arrangement. 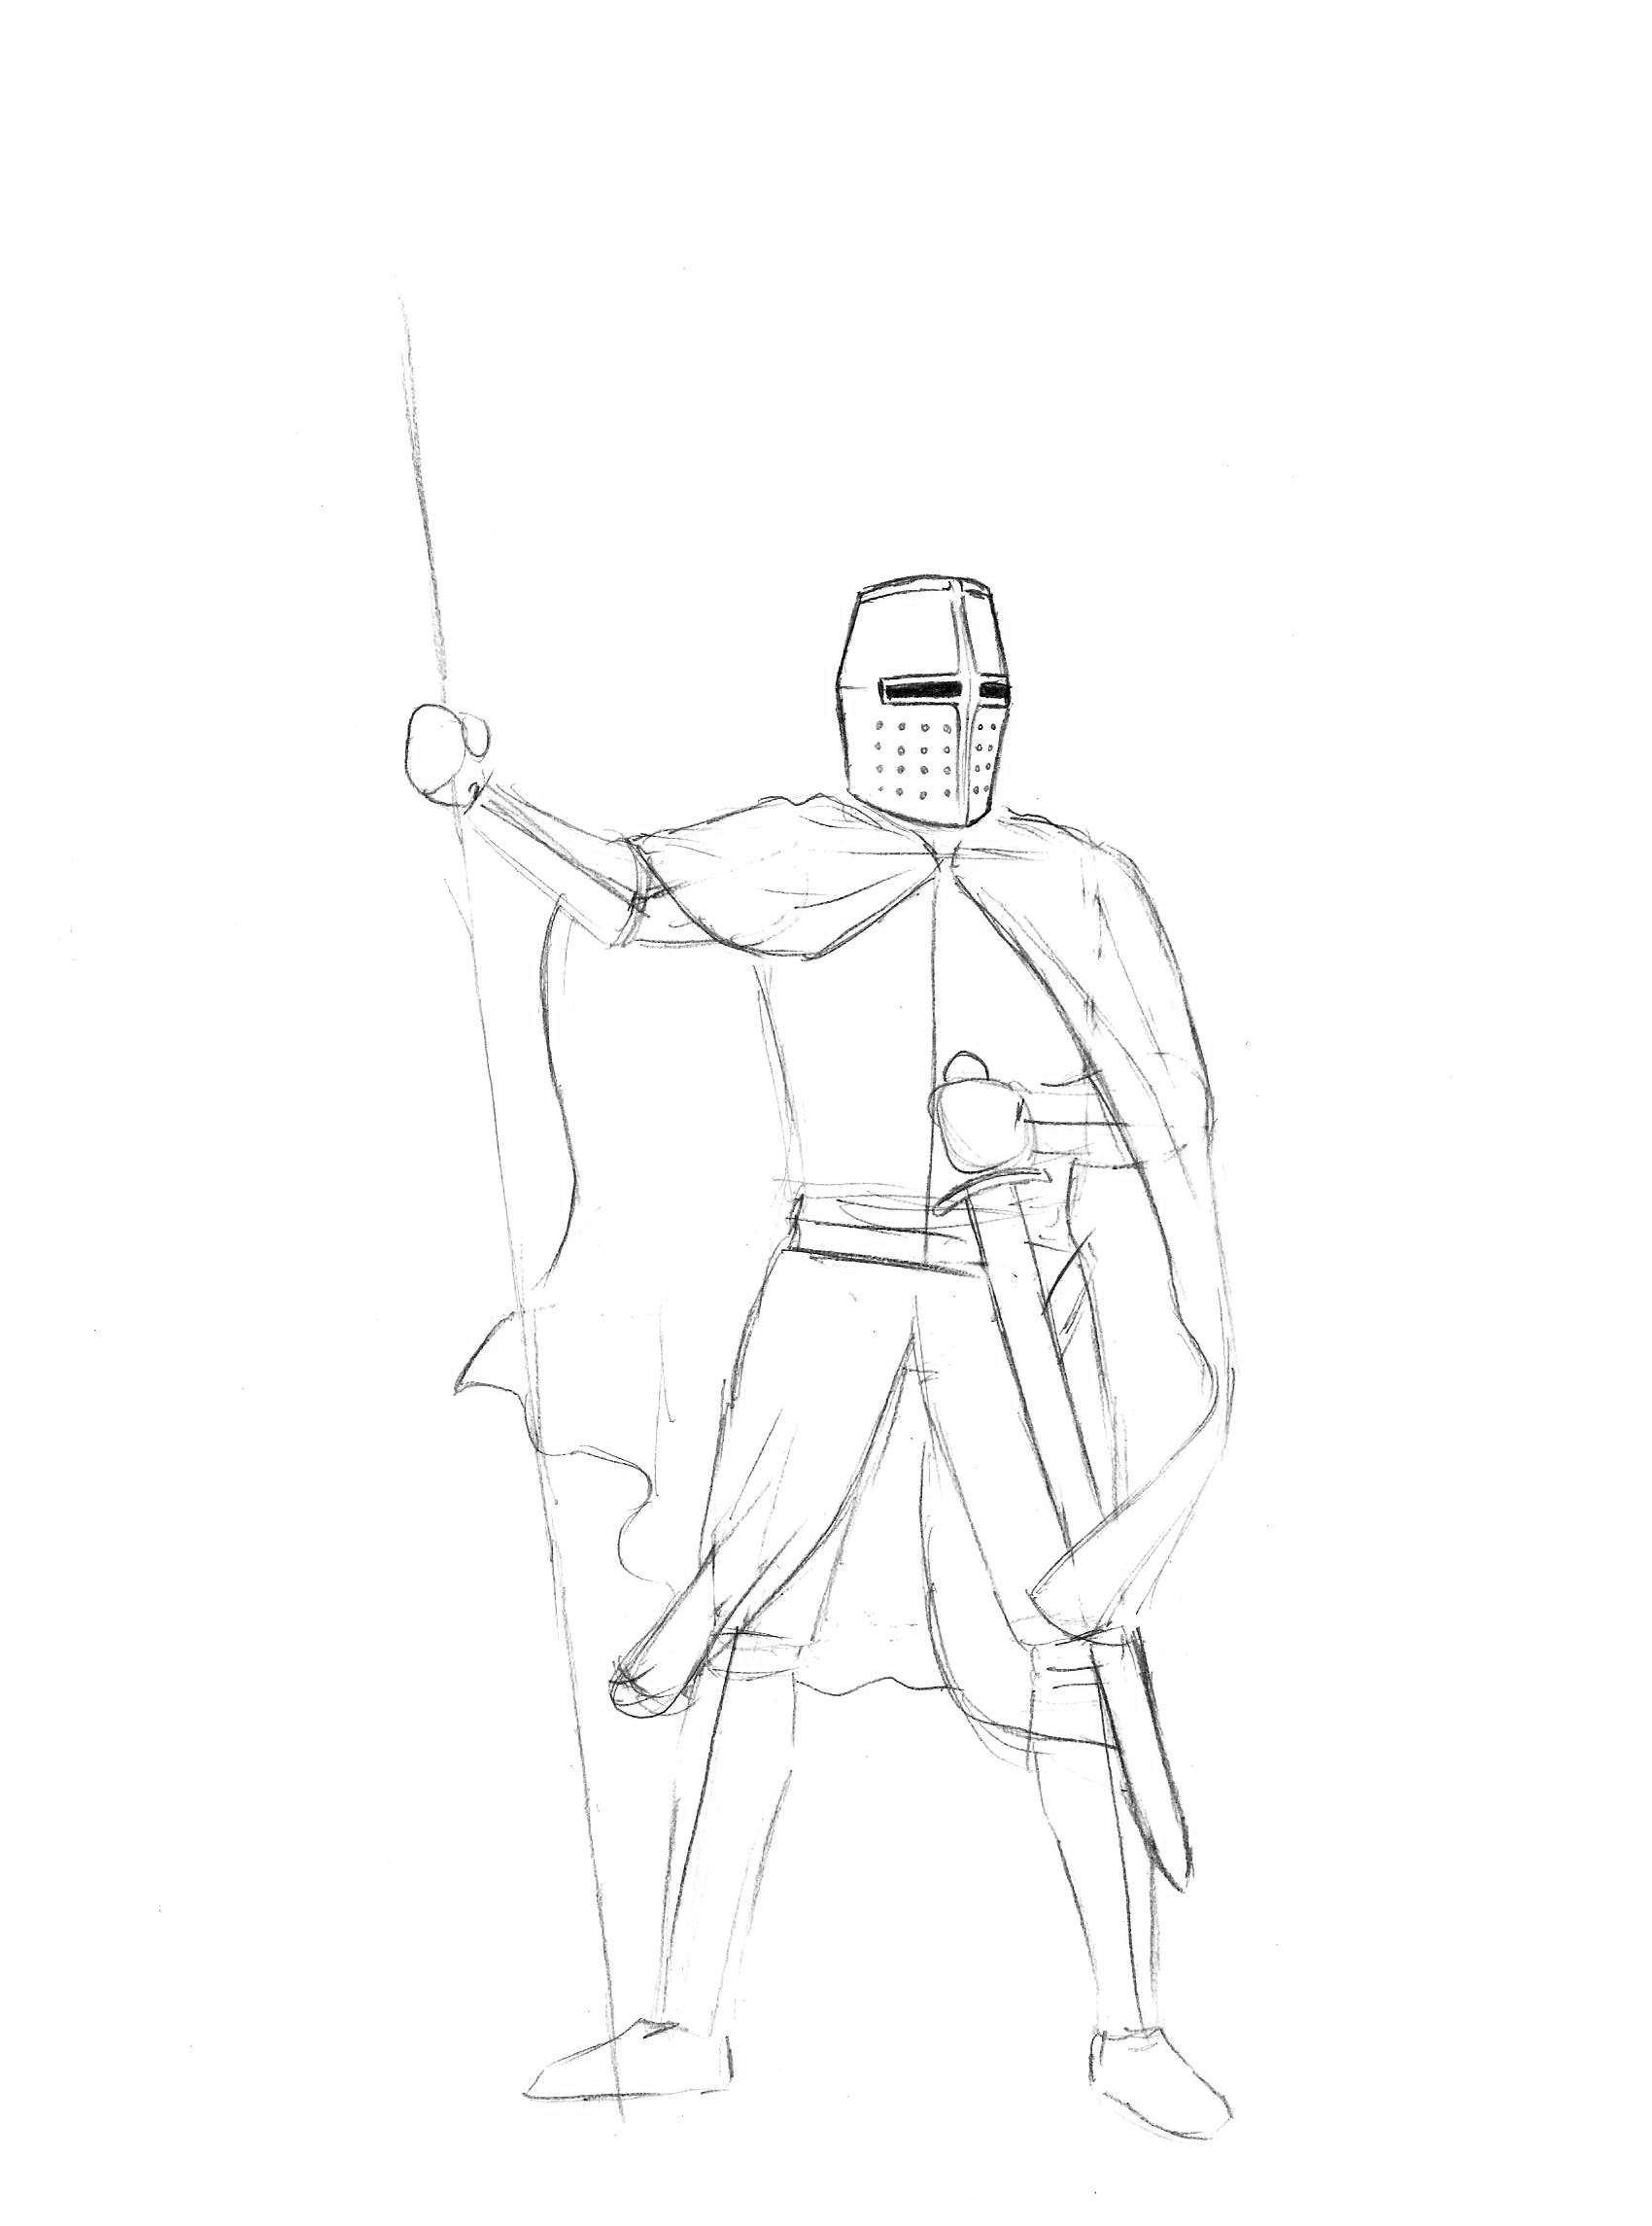
Stage 6
Great, now let's get into detail. top part torso and arms. First, erase the guide lines from the previous steps in the area of the right arm and chest. Draw a cord with two buckles slightly below the throat - this will be the clasp of the robe. Draw curving smooth lines from it. They indicate folds of fabric that are secured with a fastener.
On the left, the mantle will fall down, and therefore the lines should gradually move to a vertical position. But again, extremely smoothly. Notice how the cloak fits the warrior's left forearm and mark this with folds. Also at this stage, draw the spear - it consists of a thin shaft and a tip that looks like a somewhat elongated diamond. 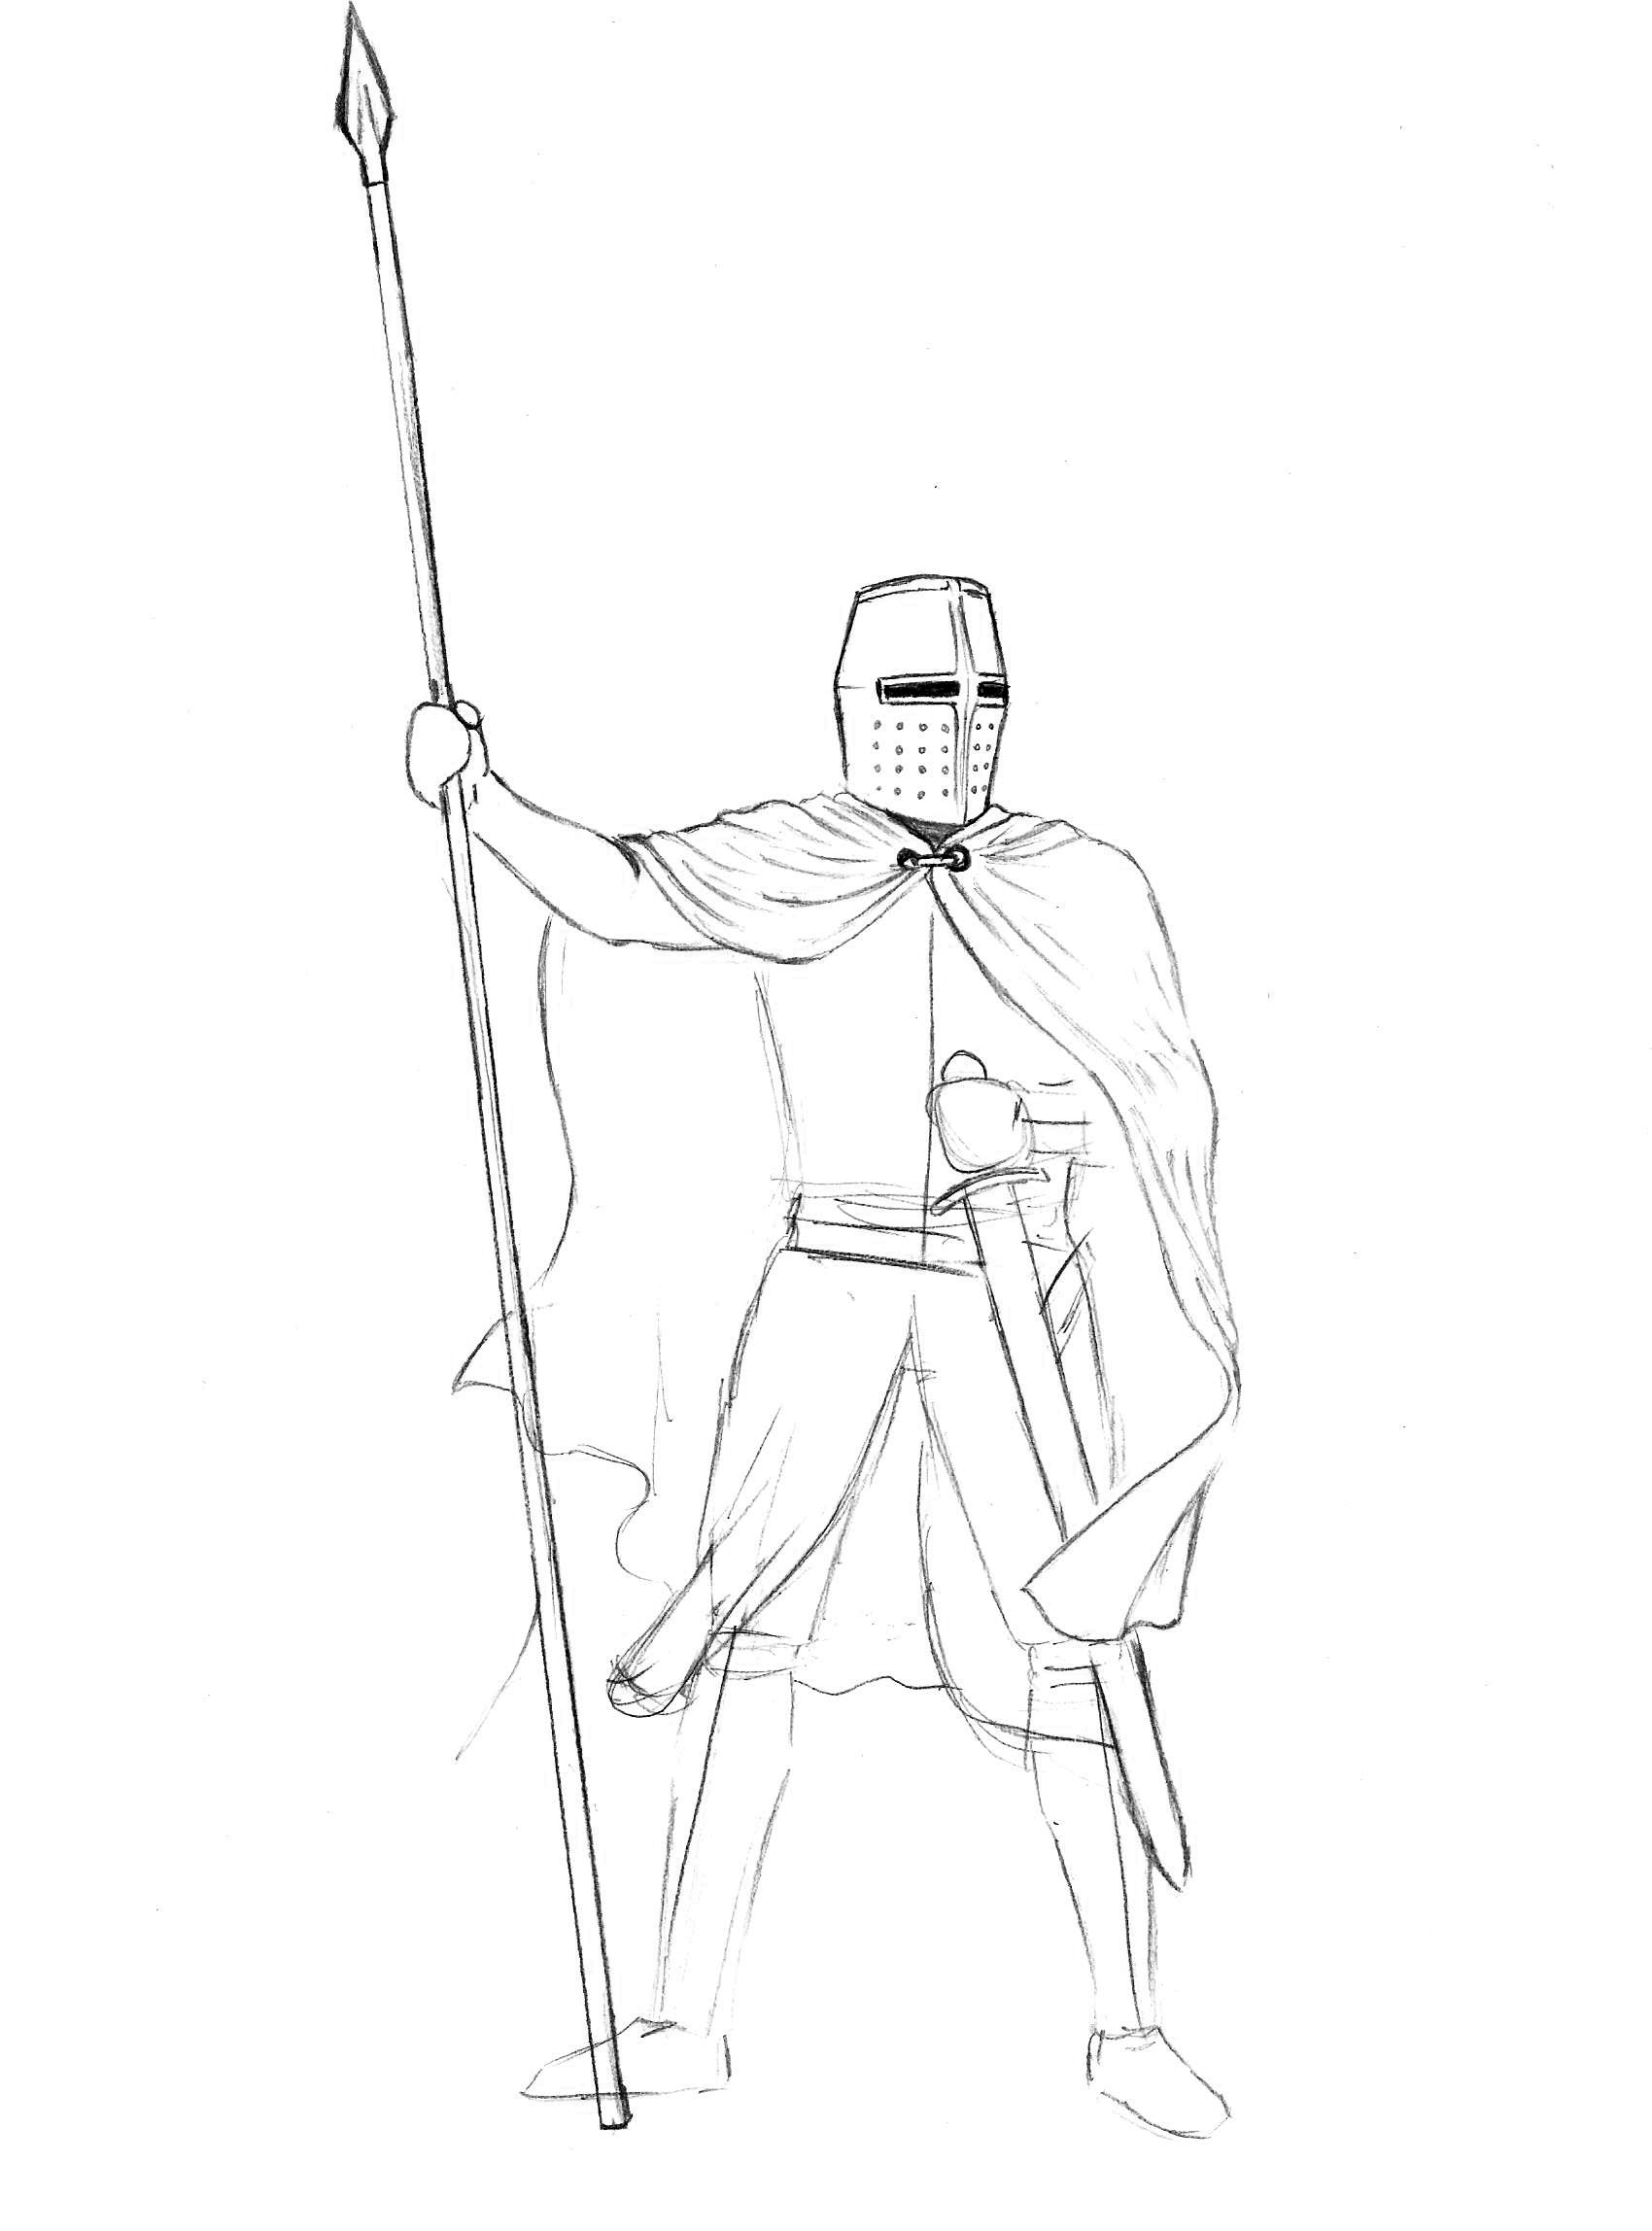
Stage 7
Erase all the auxiliary lines from the previous steps on the torso and draw a cross with flared ends in the center of the chest. On the fabric of the robe, mark several folds that should run diagonally, from the armpit to the stomach. The belt tightens the warrior's robe, and his right hand raised, so the folds will go from the waist up, as well as towards the right hand. Draw another cross on the left side of the cloak, but do not forget to take into account the folds in the fabric. Draw the belt, the sword sheath in the belt strips and the left gauntlet. 
Stage 8
We devote this step to the folds on the fabric of the mantle and the lower part of the robe, which covers the legs of our knight. So, first of all, we align the stripes and erase all the unnecessary auxiliary lines. The folds should indicate the position of the mantle, which hangs freely from the right shoulder, which means they should be vertical and relatively long.
Please note that only one fold bends strongly, which is located near the edge of the mantle; the rest look like smooth lines. In addition, at this stage you will need to erase the guide lines from the top of the legs and draw folds in the fabric in this area. Draw them with slightly curving lines in the direction from the waist to the knees. 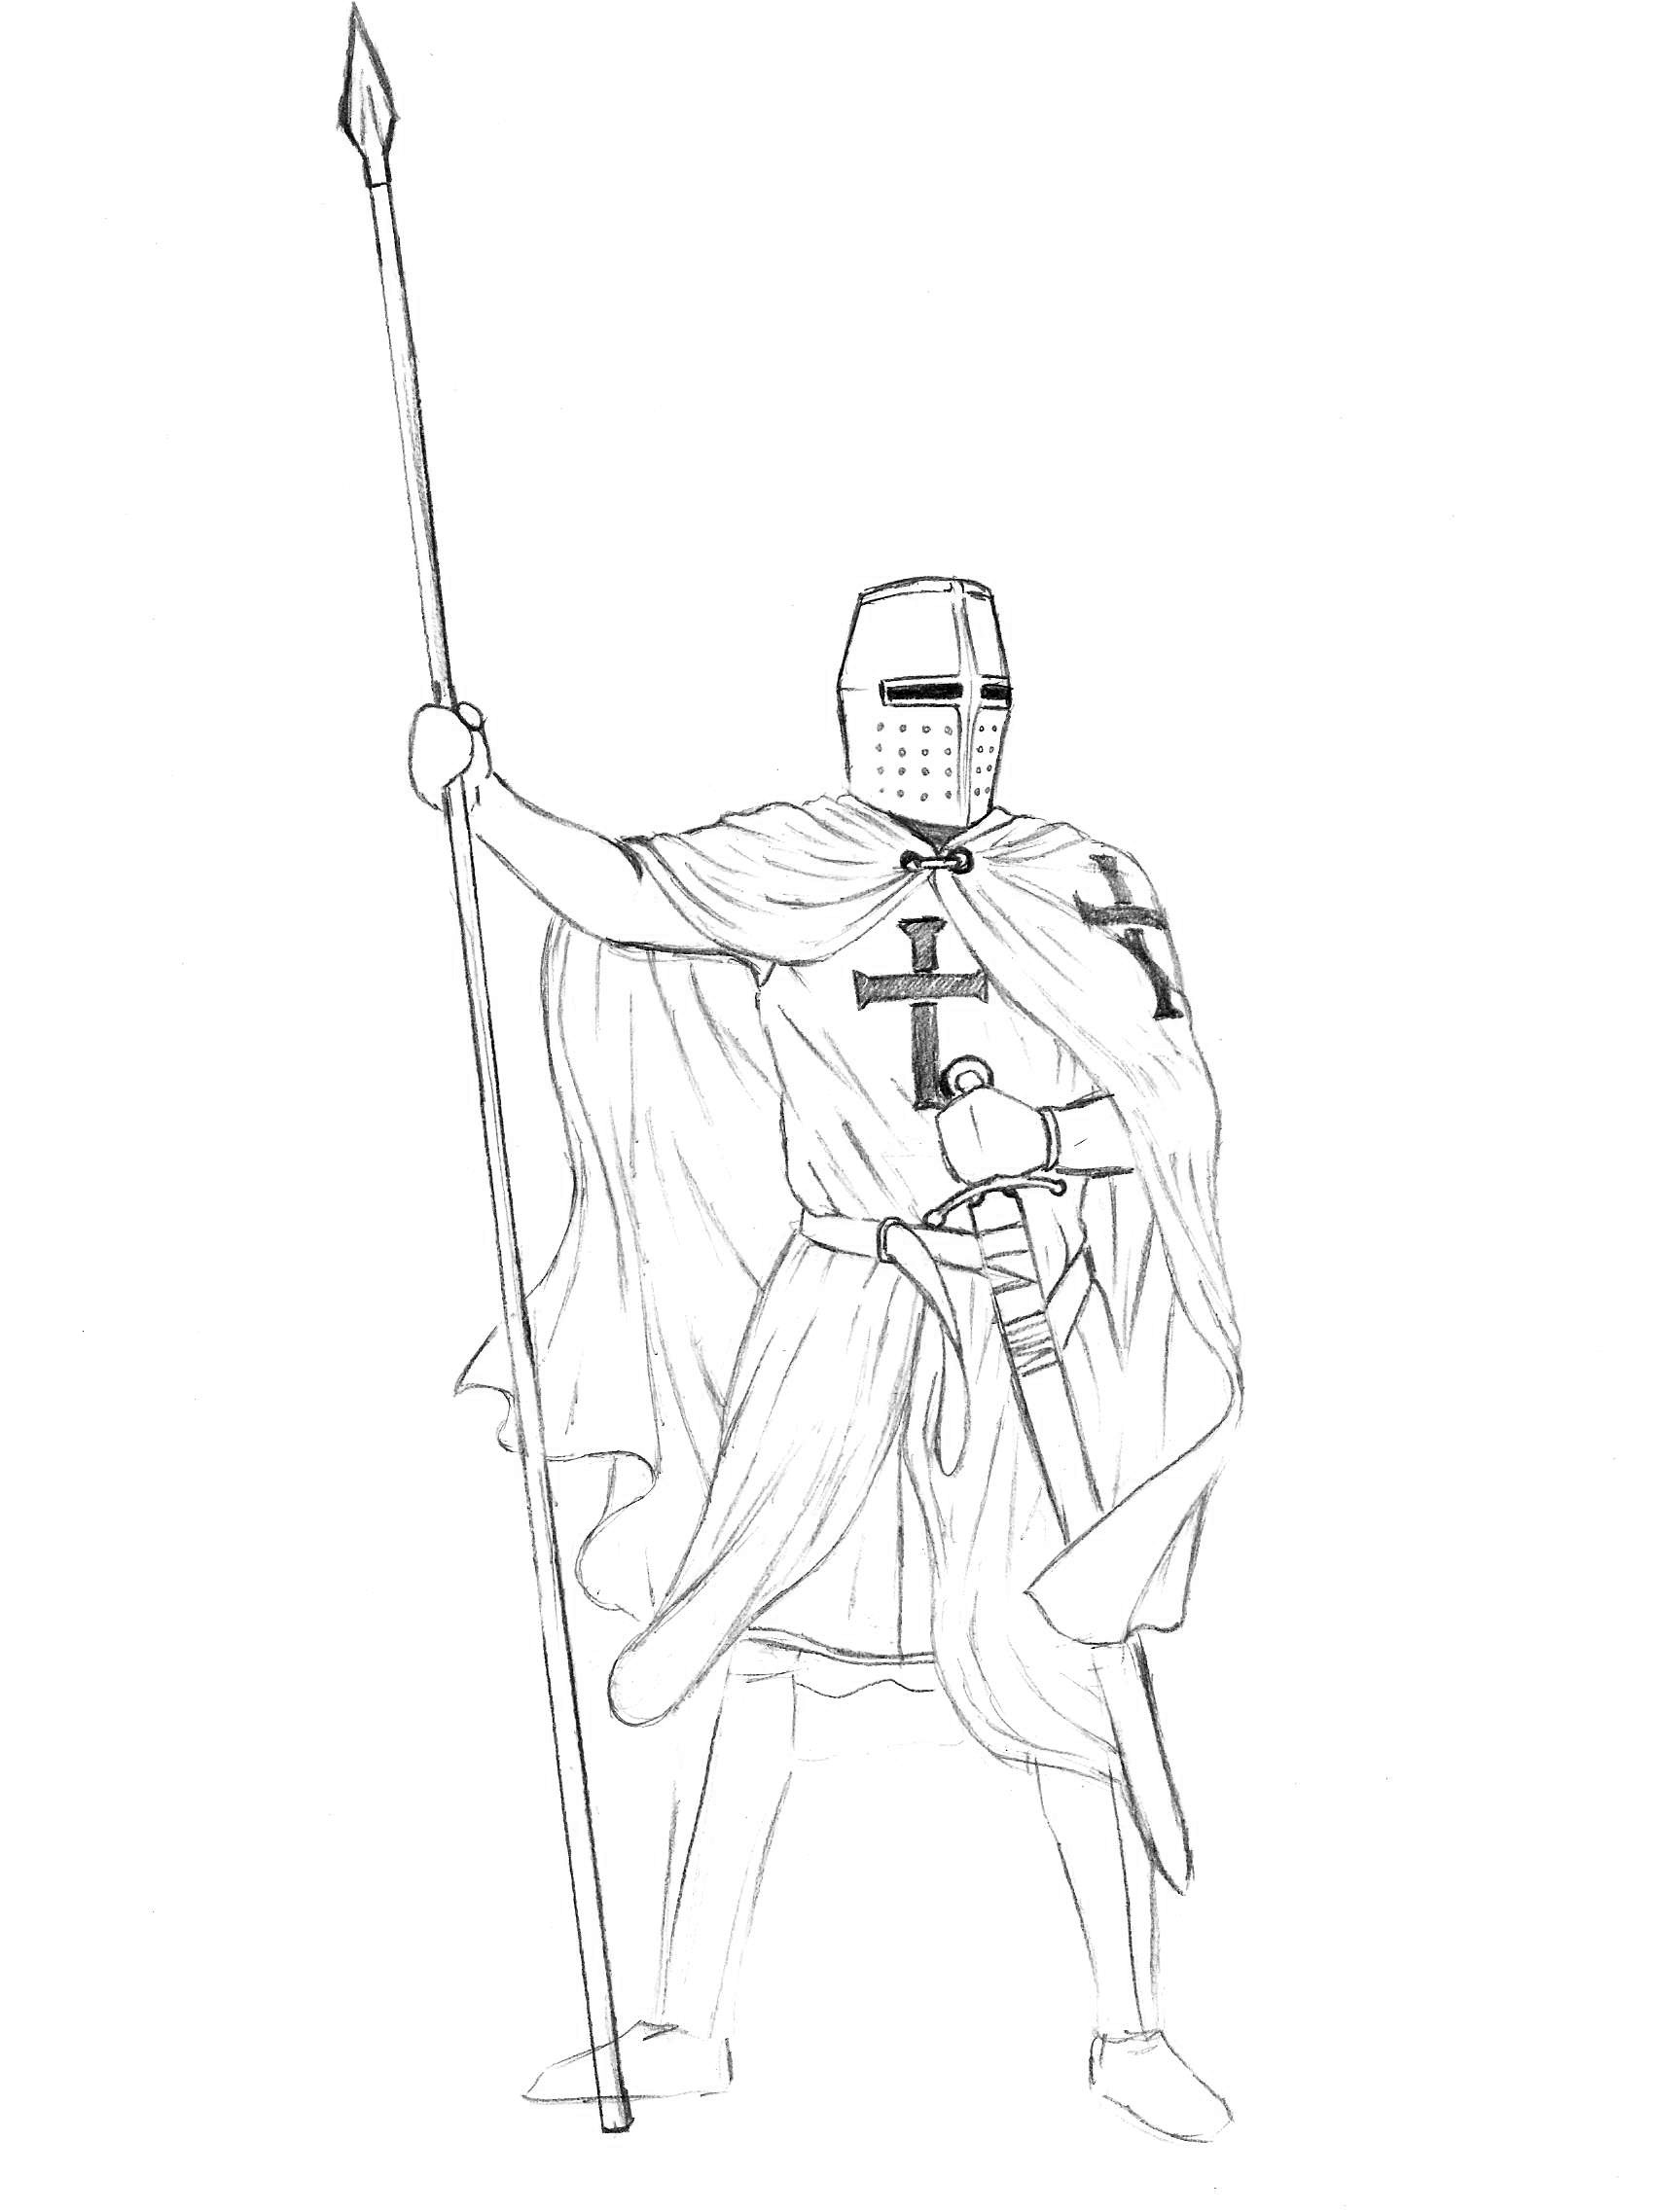
Stage 9
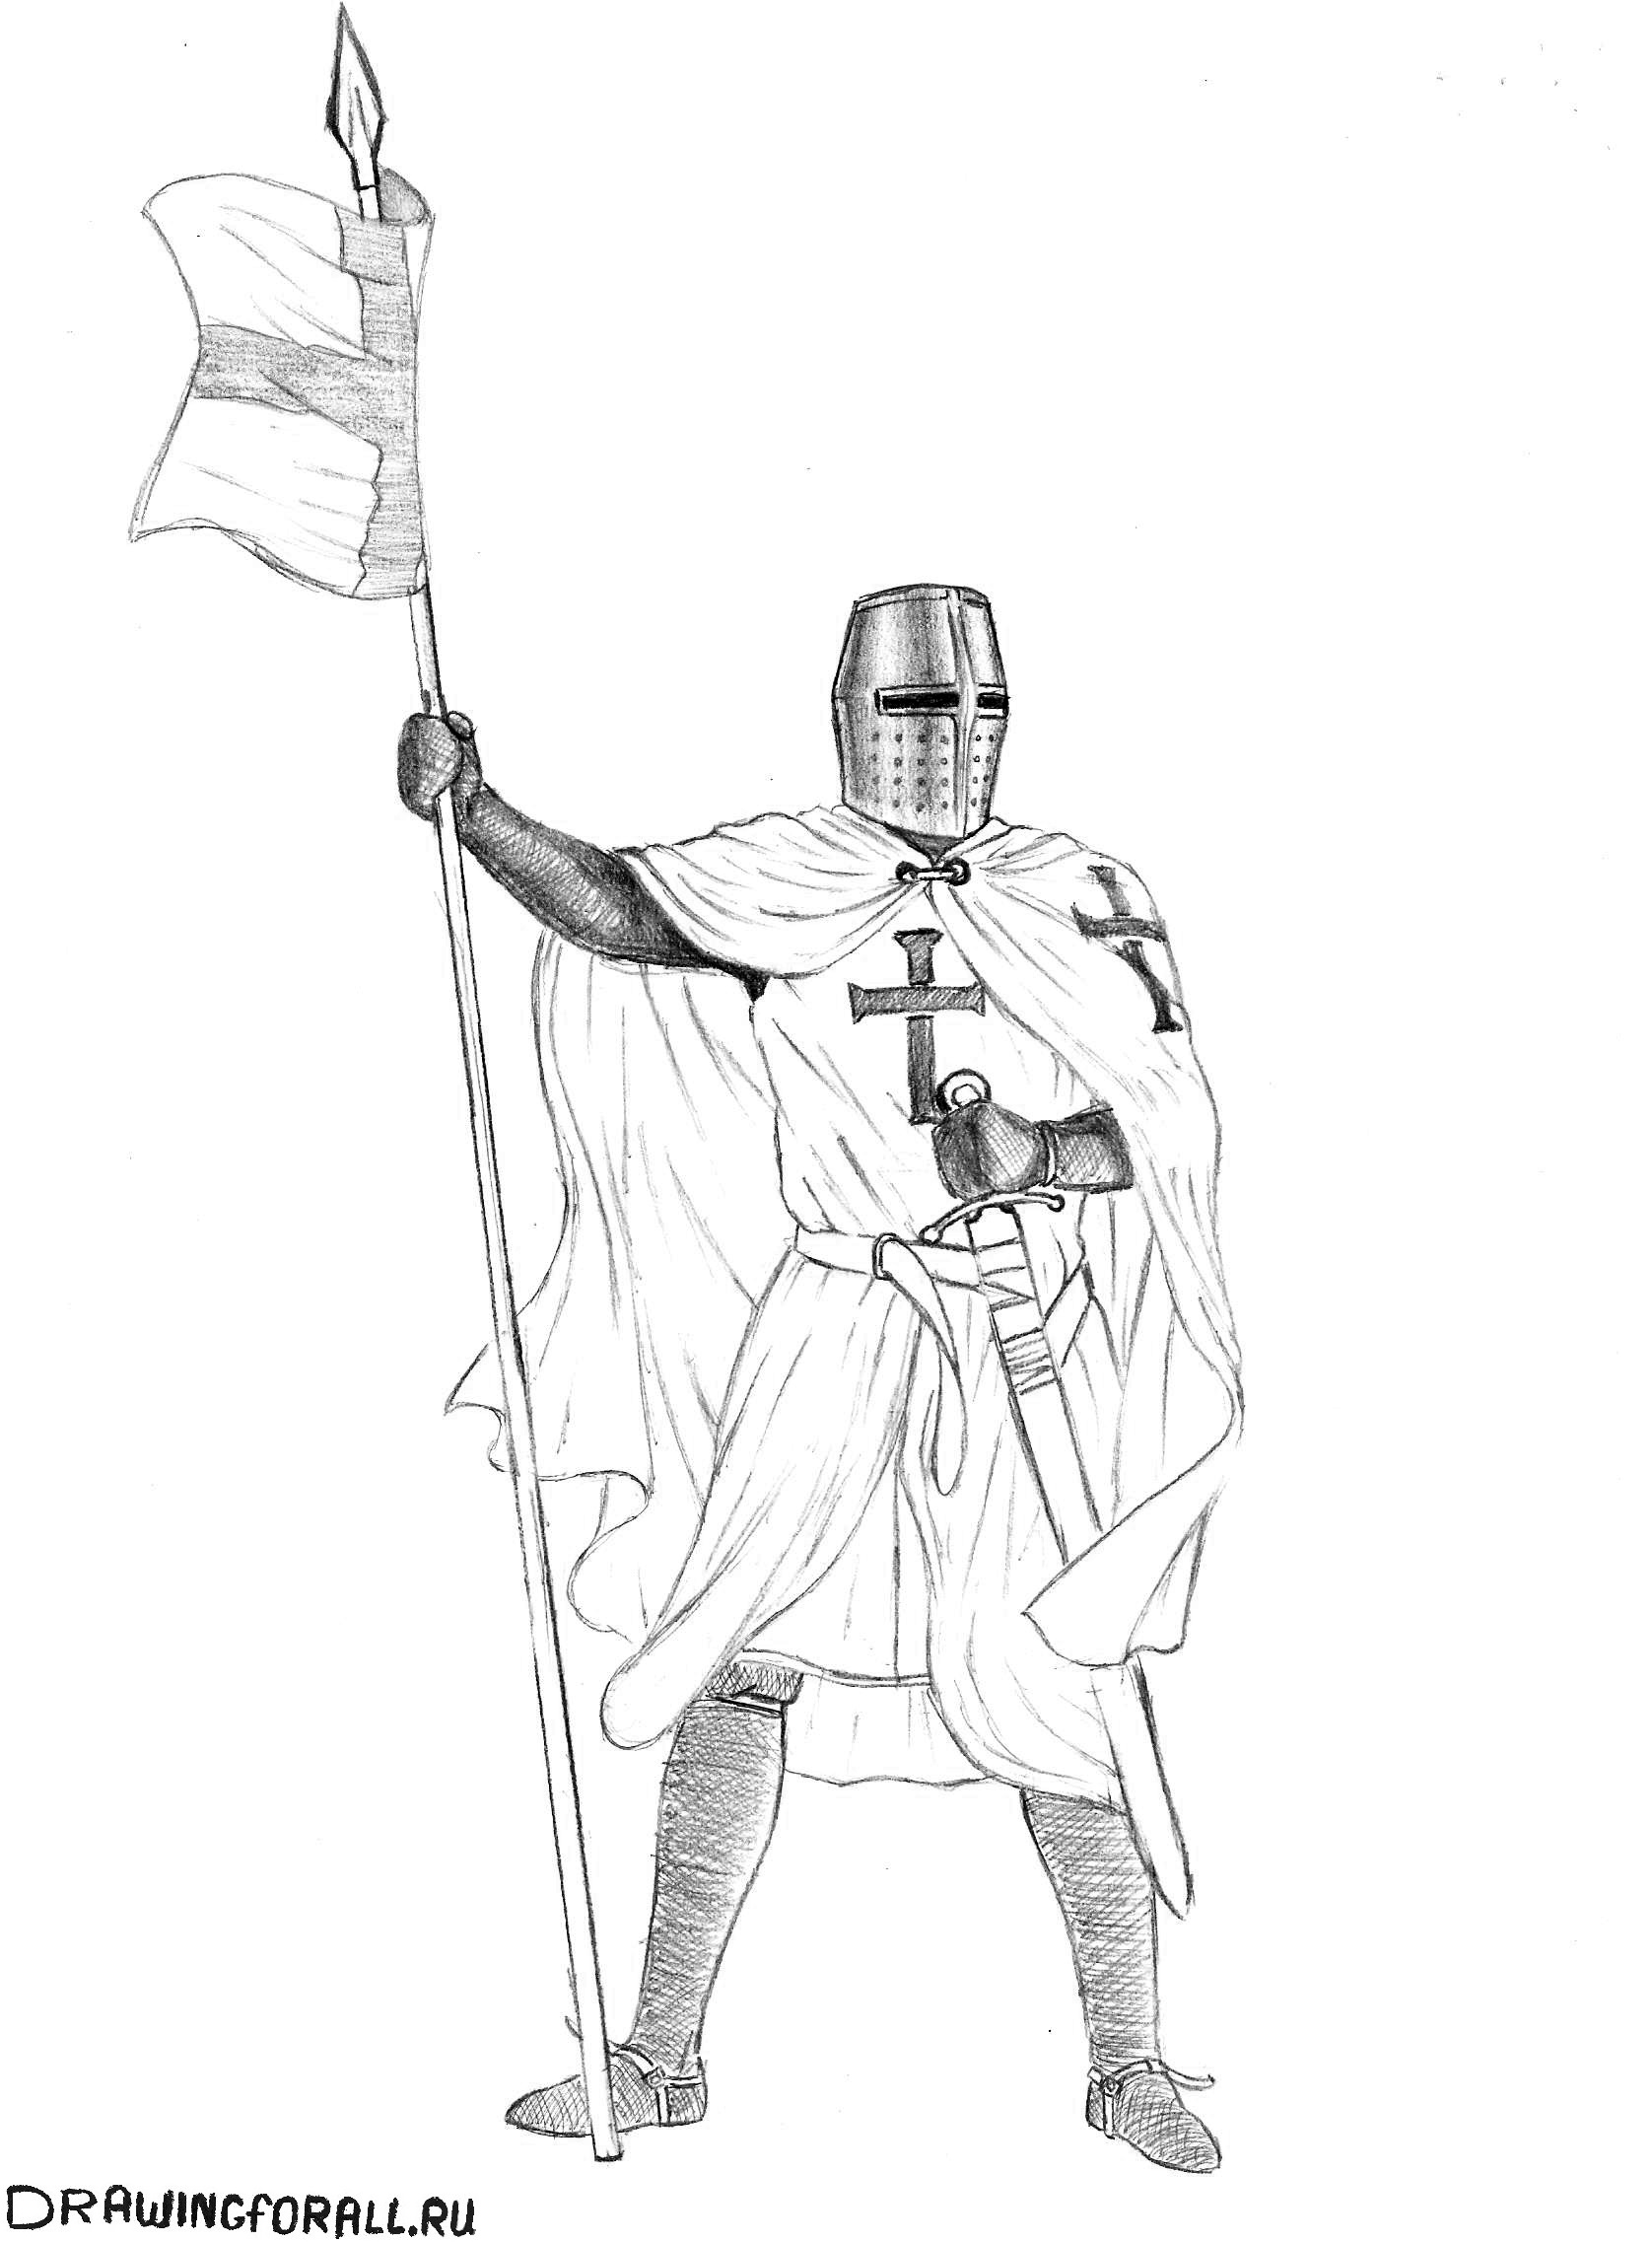
Now you need to draw the legs from the knees to the feet. Actually, here you just need to give the legs a finished look, draw a couple of lines on the knees and mark the spurs. The chain mail fits quite tightly on the legs, and therefore try to convey the entire shape of the legs as correctly as possible. Draw the lower part of the clothing, sagging from the back. All that remains is to draw a flag with a cross flying on the shaft of a spear. Don't forget about the folds that go from bottom to top. 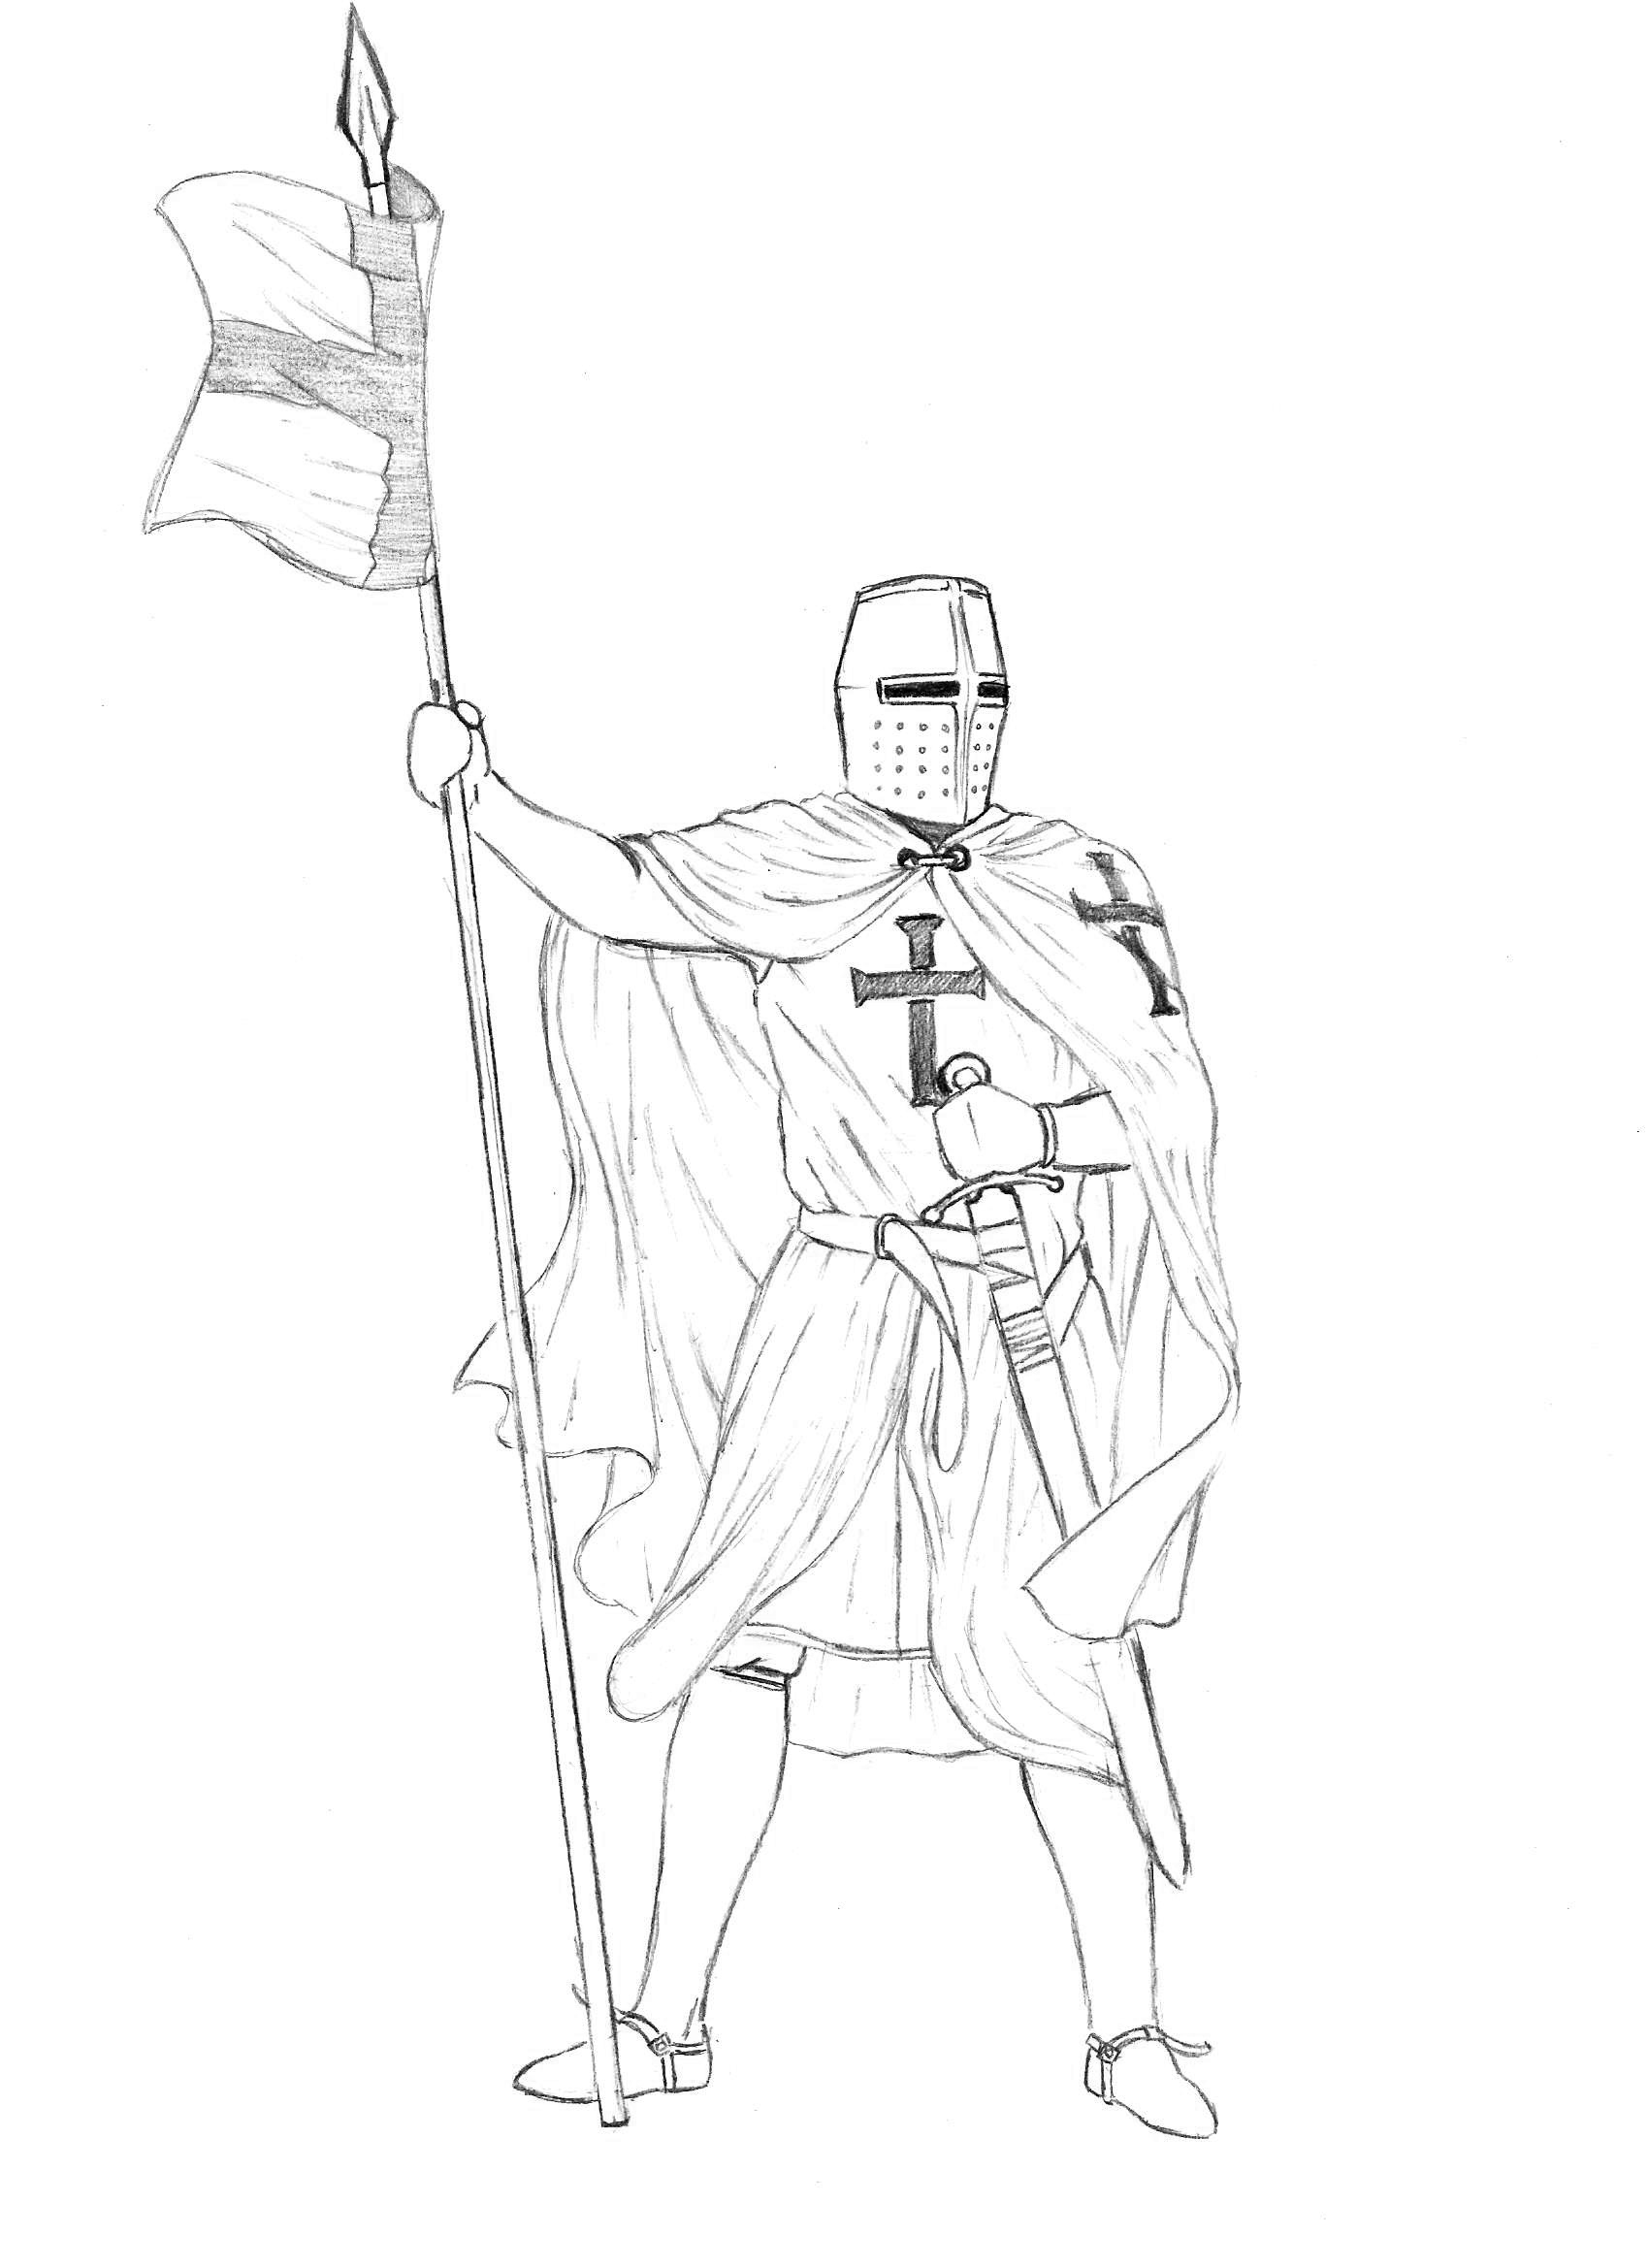
Stage 10
Actually, the knight is already ready, all that remains is to work with the shadows. You start, as always, with the head. In this case - from the helmet. First, shade the darkest areas with vertical strokes, while trying to outline the cylindrical shape of the helmet. Pay attention to the light stripe at the bottom of the helmet; it should be marked and left practically unpainted. Now use lighter strokes to indicate the transition from shaded areas to light ones. These transitions should be natural and smooth. 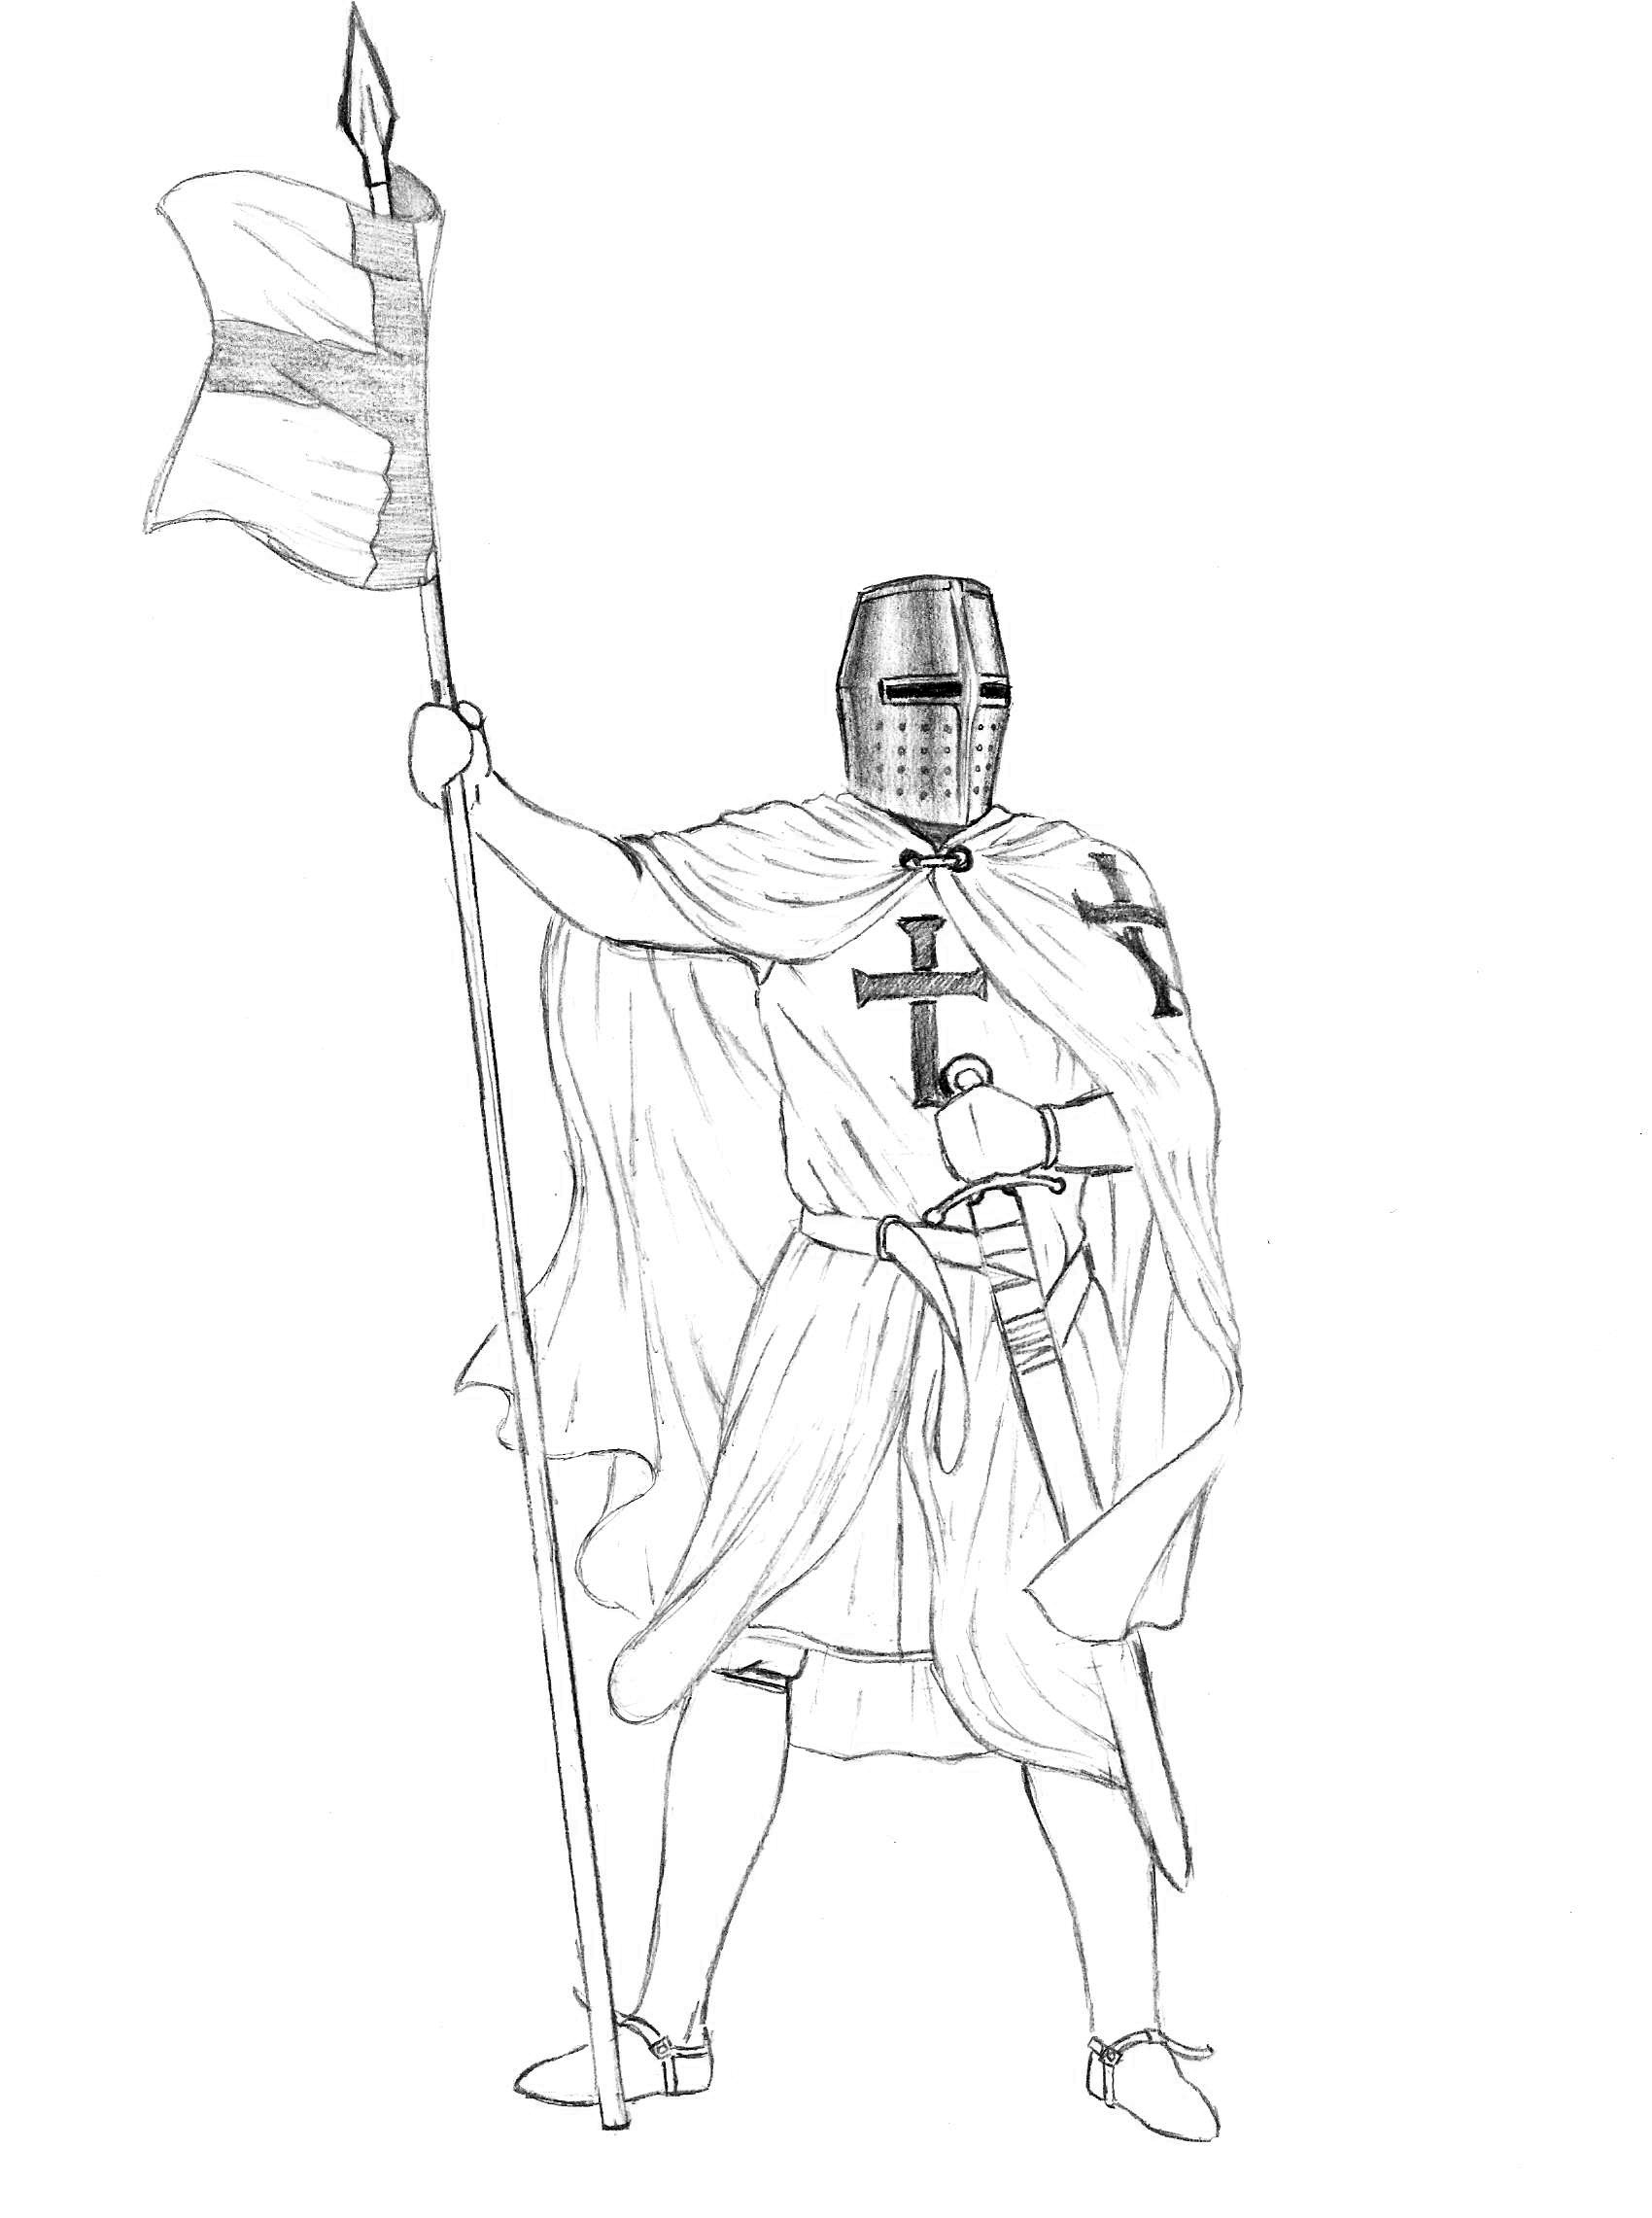
Stage 11
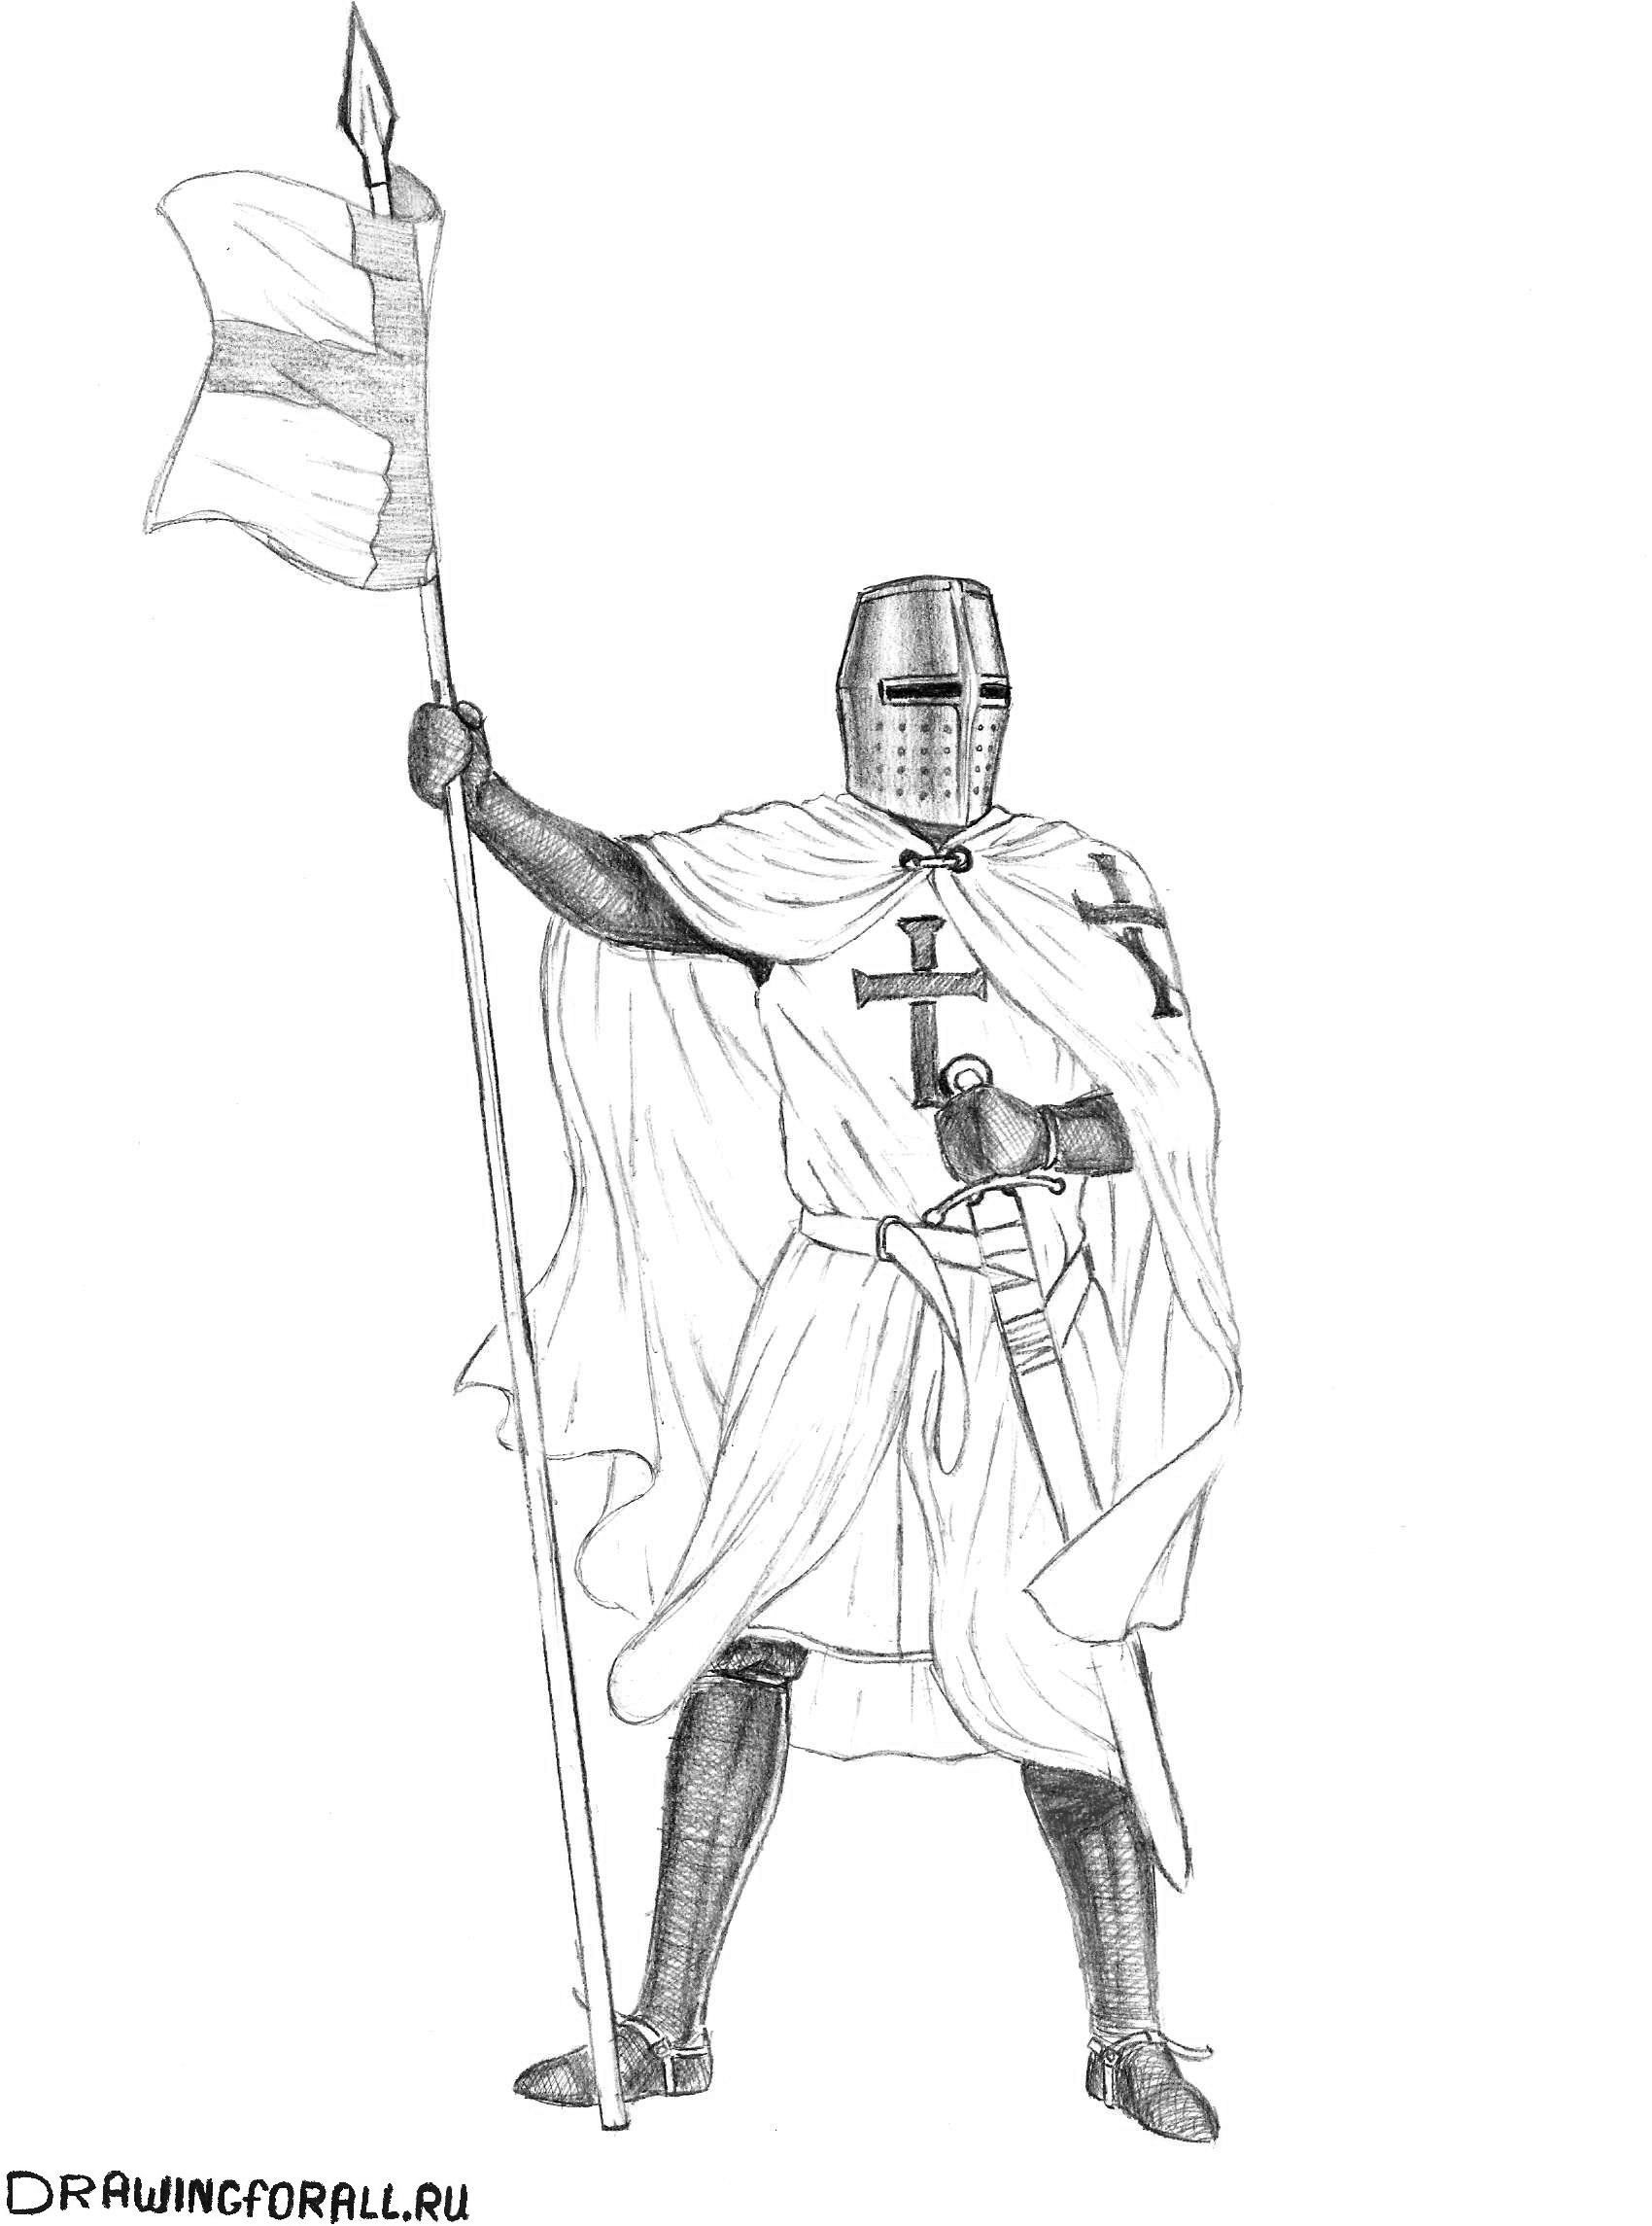
Continue painting the warrior and at this stage you will work on the limbs. It should be noted that the armor on the legs and arms must be drawn in exactly the same way. Look at your feet. This is what the first stage of shading should look like.
Cover the entire limb with very fine shading, in a criss-cross direction. After this, apply the darkest shadows and mark the transition from them to the light areas as you did with the helmet. Don't forget also about the shadows from the mantle on your arms. They should be especially thick. 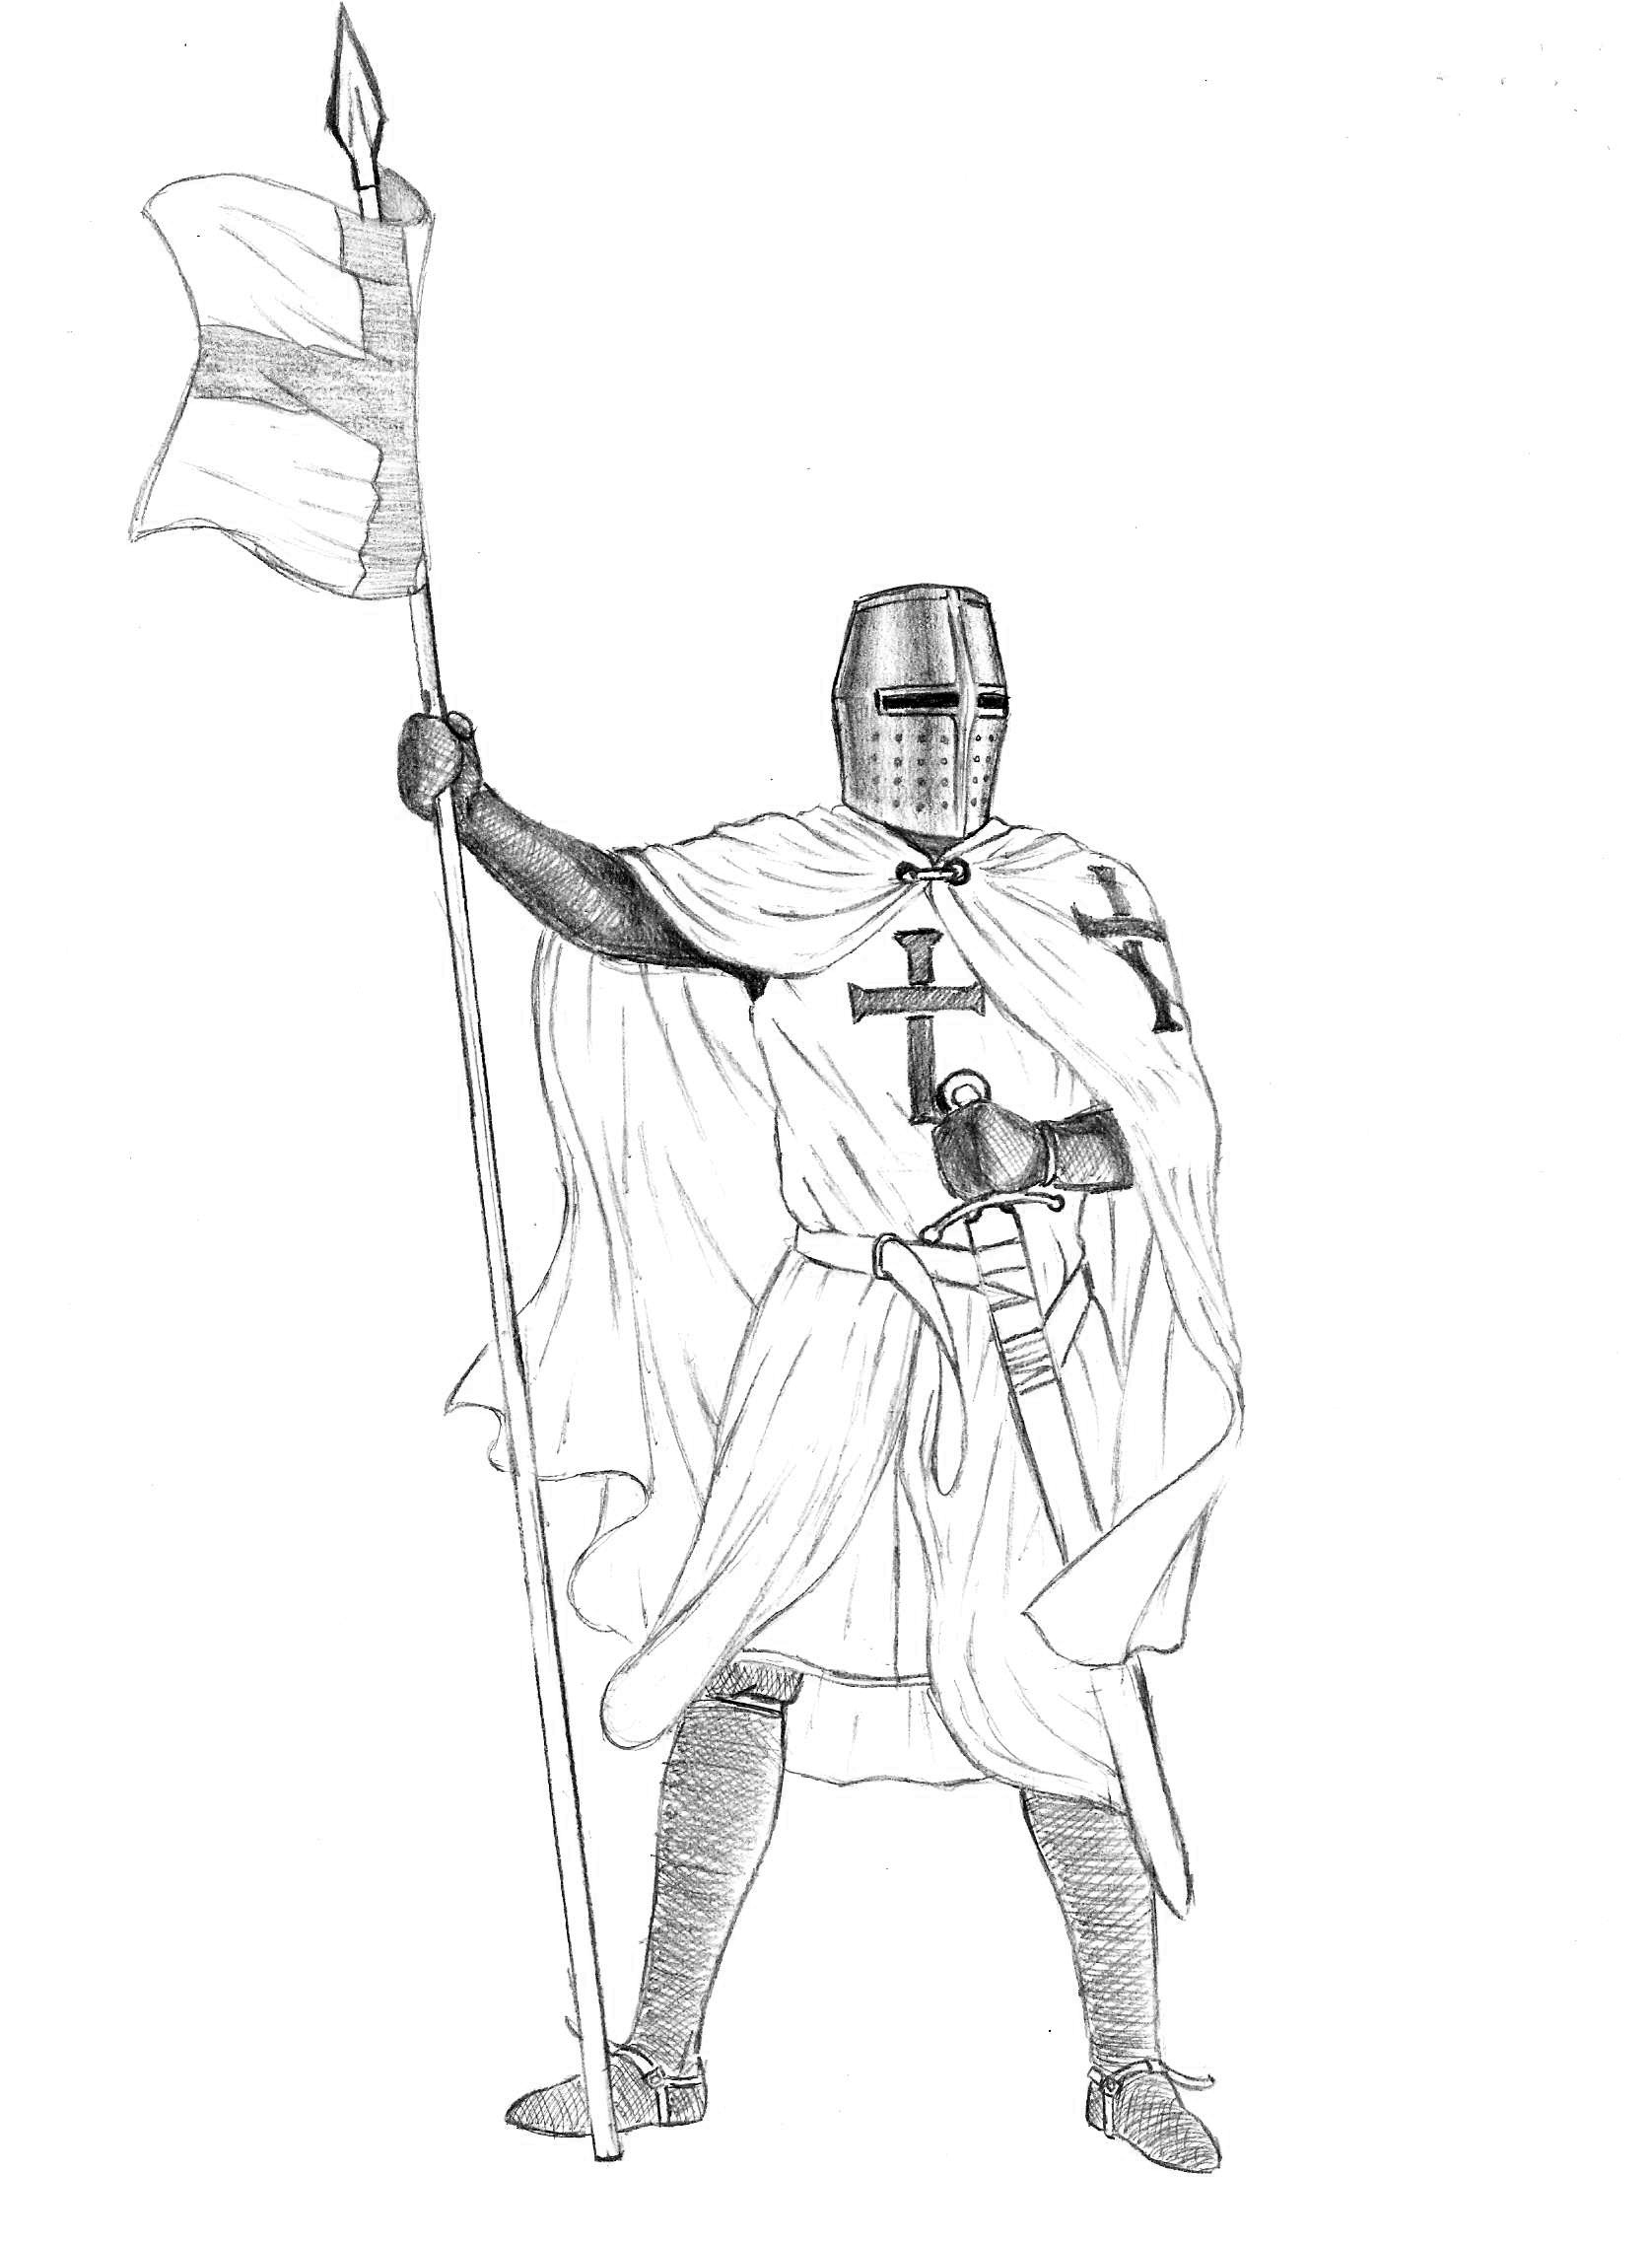
Stage 12
Now you need to draw the shadows on the legs. They are applied in the same way as on the hands at the previous stage. To add realism, leave narrow strips of reflex light (that is, light that is thrown onto an object from a very bright surface of something) on inside shins in the area of the calf muscles. Especially thick shadows will be cast by the surcoat fabric. 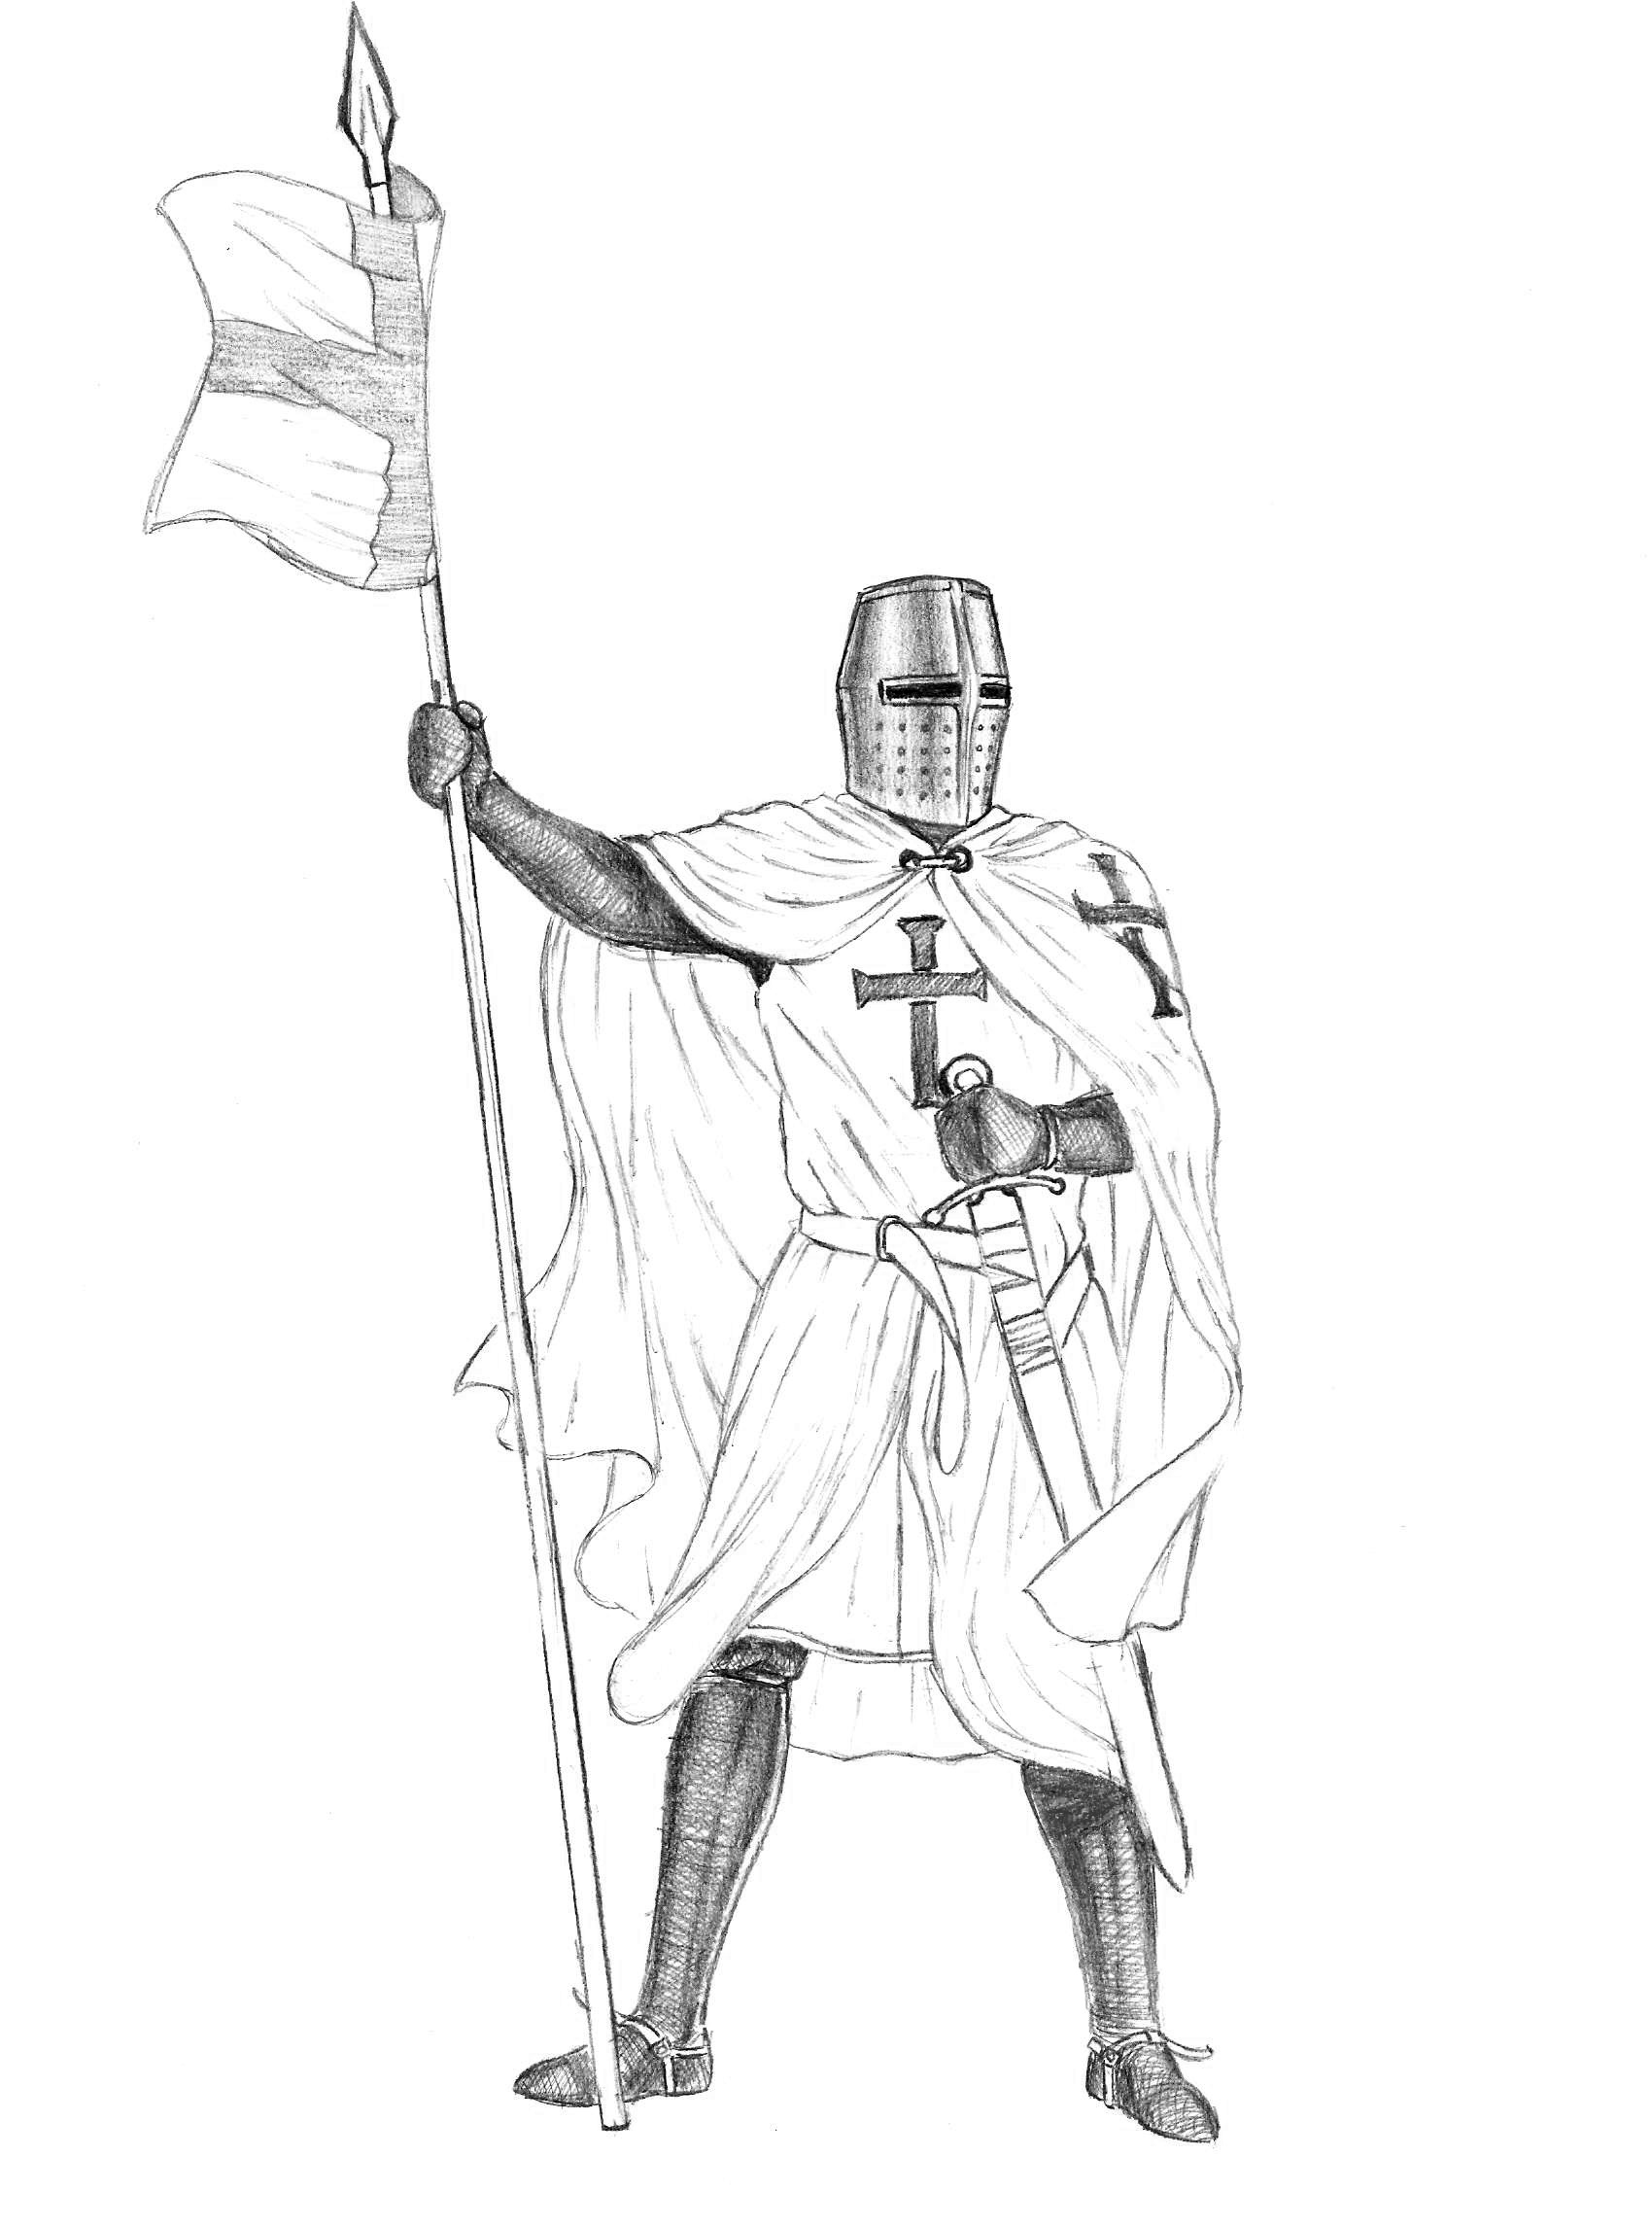
Stage 13
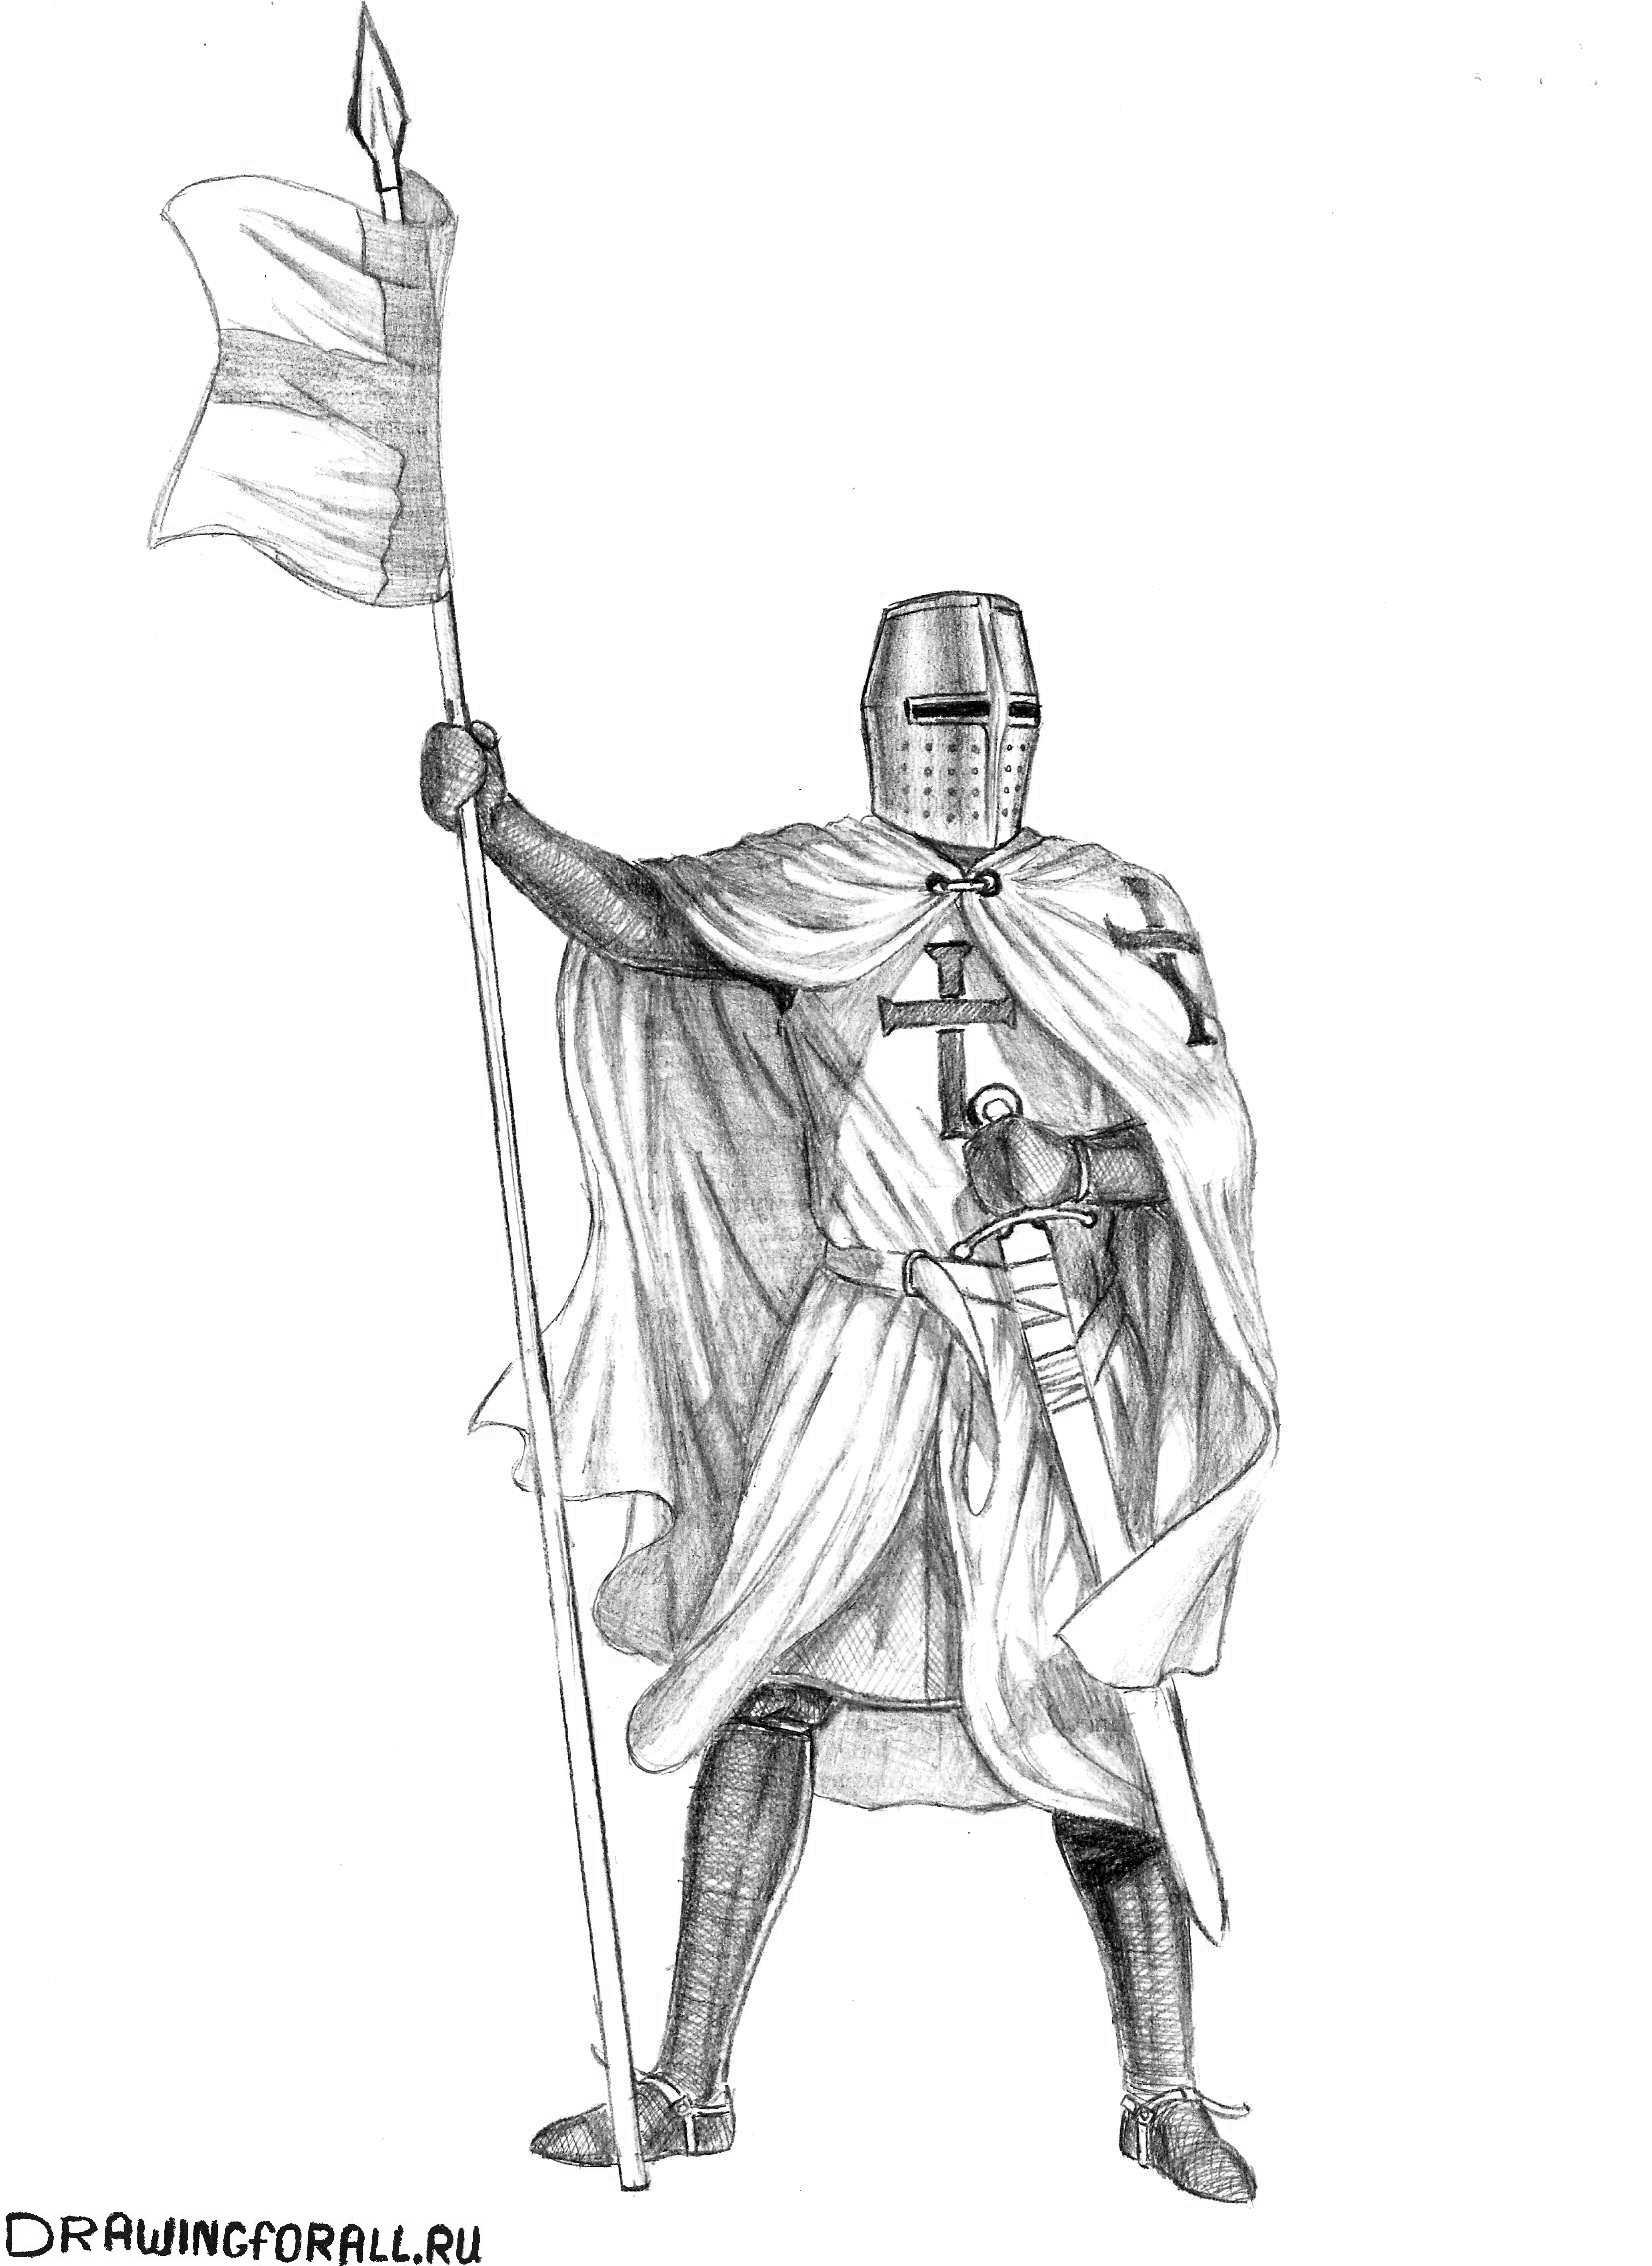
Well, there's quite a bit left. At this stage you need to work on the shadows on the mantle. It may seem to you that the step is voluminous and complicated, but this is not so if you correctly determine the direction and nature of the lighting. As you can see, the light falls on the knight from the side of his left hand. Therefore, almost the entire left side of his cloak should be illuminated. The areas of shadows that are created from the folds should be marked with light, barely noticeable strokes with a minimum degree of pressure on the pencil. It is necessary to outline the forearm of the left hand protruding under the warrior’s cloak, shading the edges of the convexity so that it looks illuminated and bright.
Avoid flashy and harsh shadows, as in painting various characters comics. Even the most shaded areas must be painted carefully and accurately. To make the shadow more dense, shade the required area twice - first lightly shading diagonally, and then another layer on top to make a cross. From the right, the cloak is visible only from the inside, and it should be heavily shaded. Also note the shadows cast by the mantle on the knight's body. They form a sharp triangle. Its top is located under the clasp of the mantle. 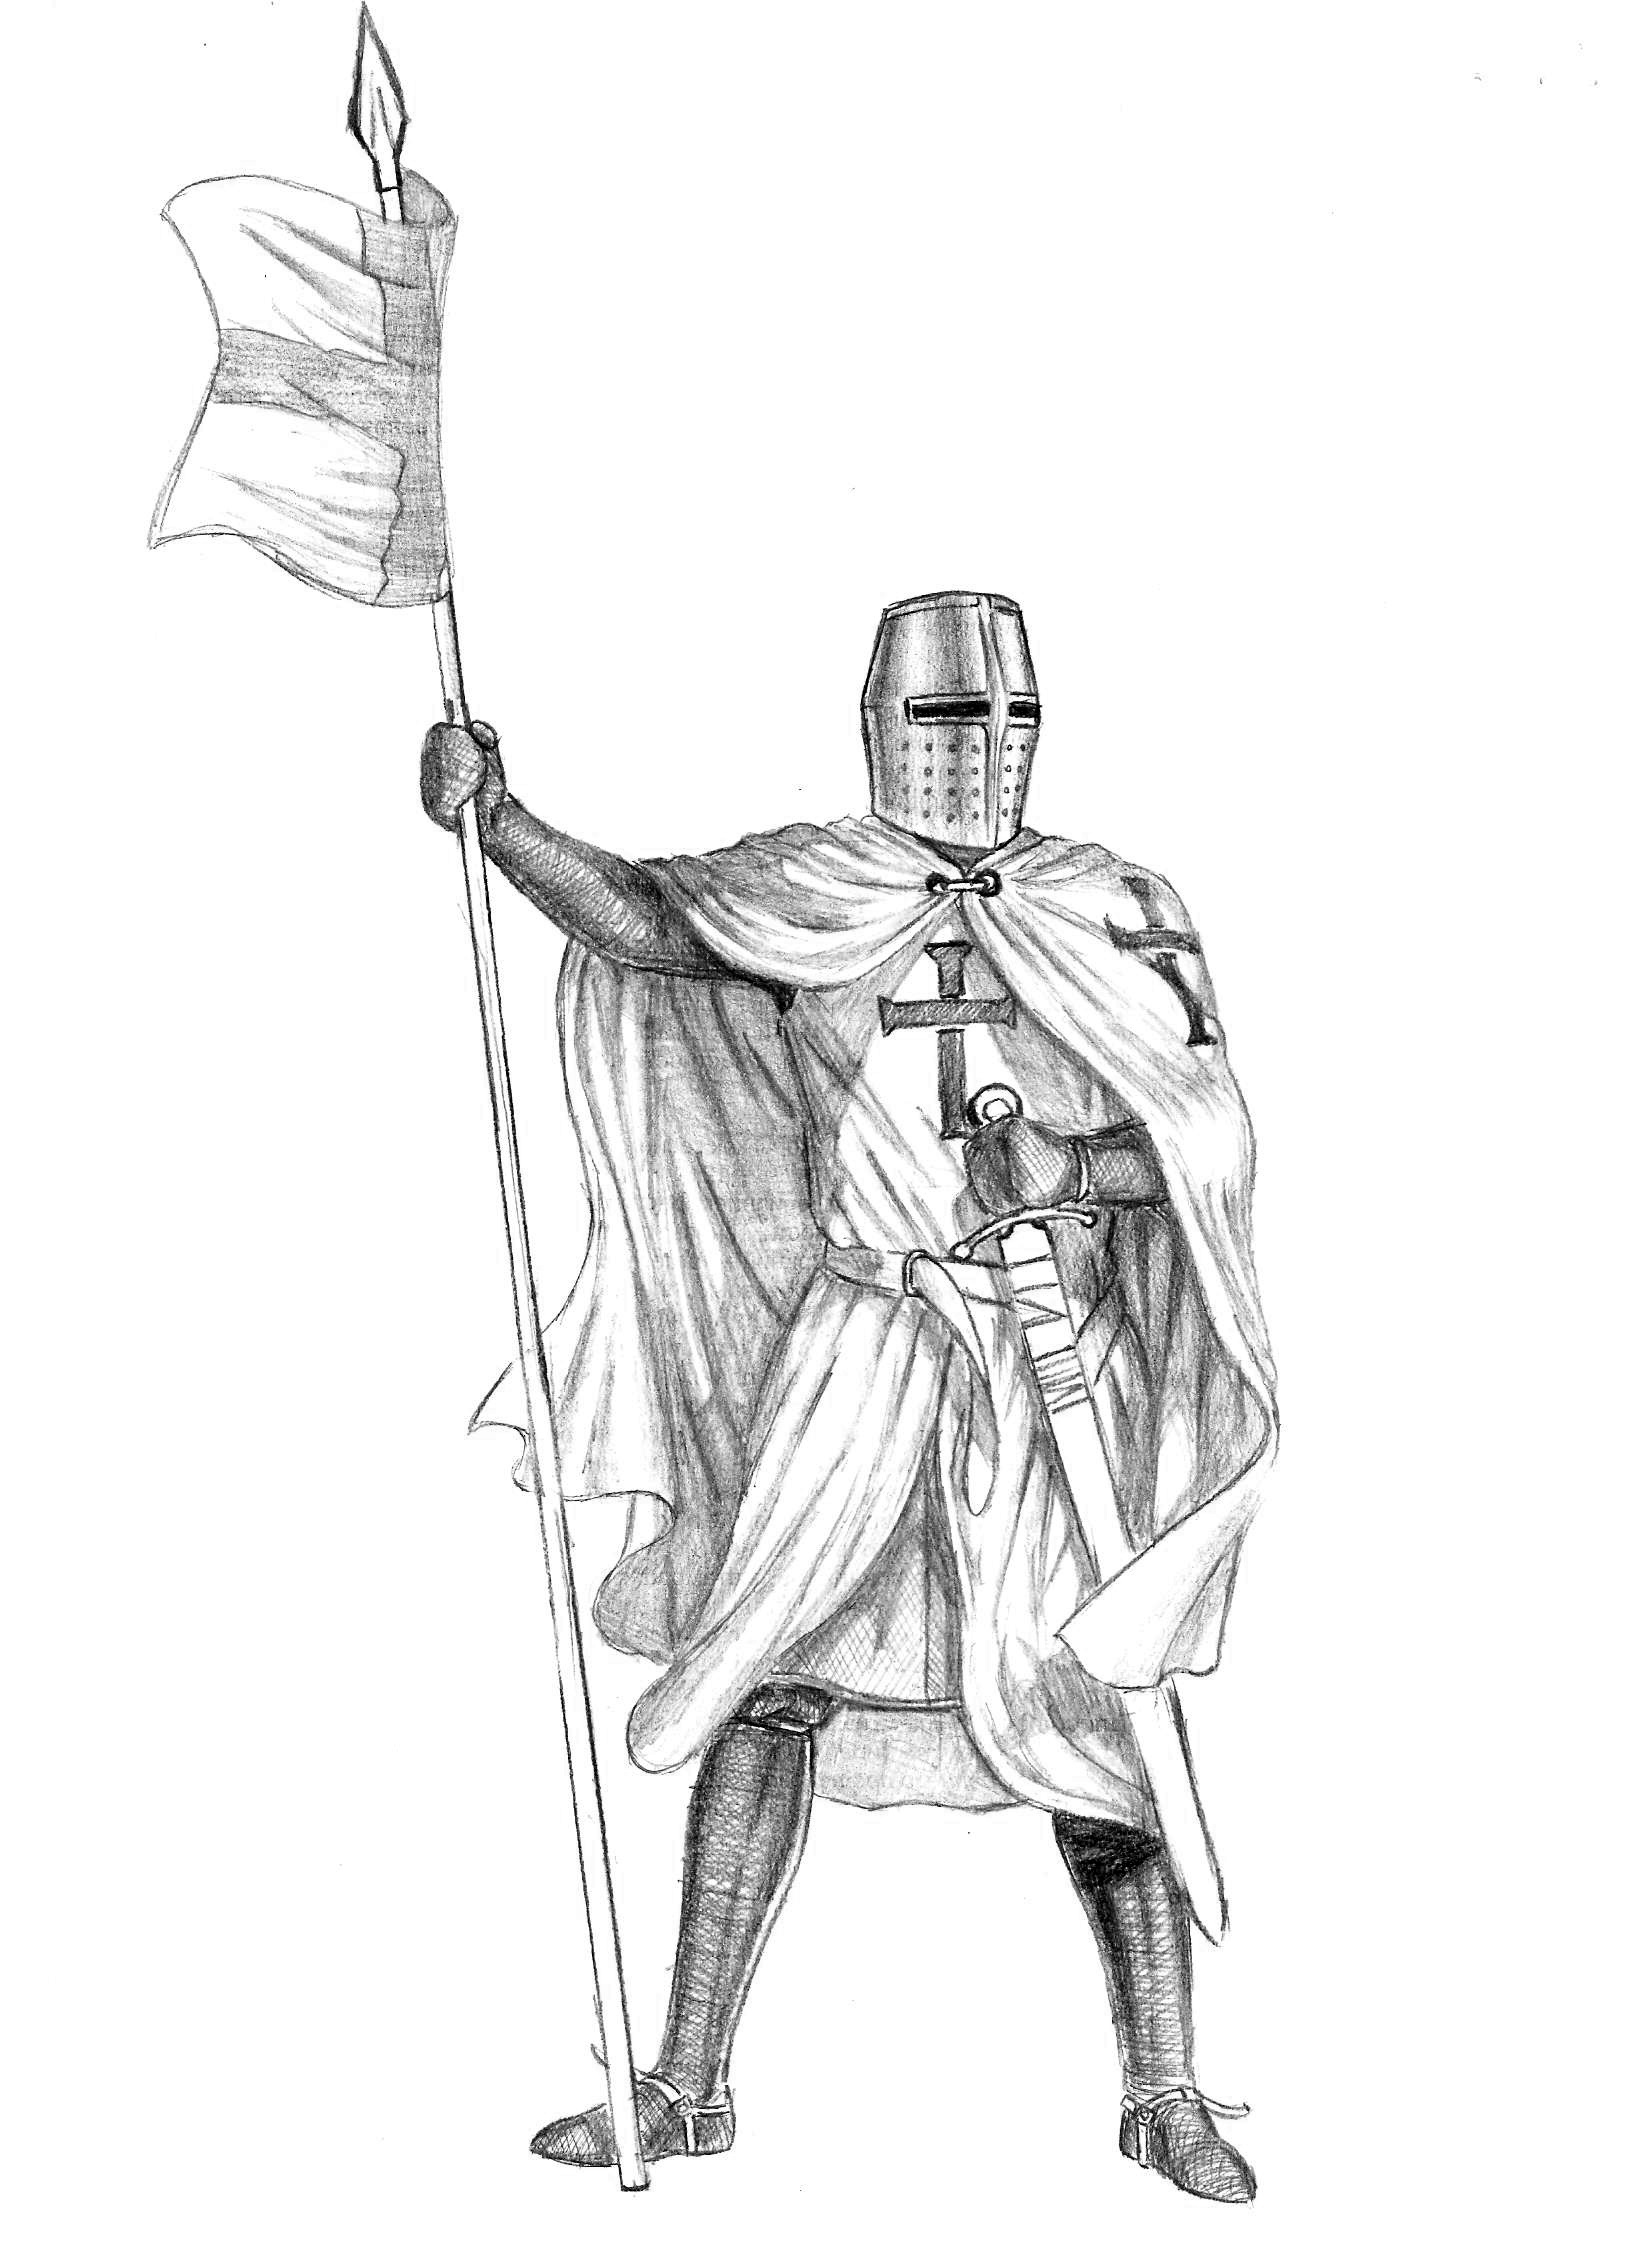
Stage 14
The last step is where you will cast the knight's shadow onto the surface and lightly shade the sword, spear and the section of the robe that covers the neck near the left shoulder. 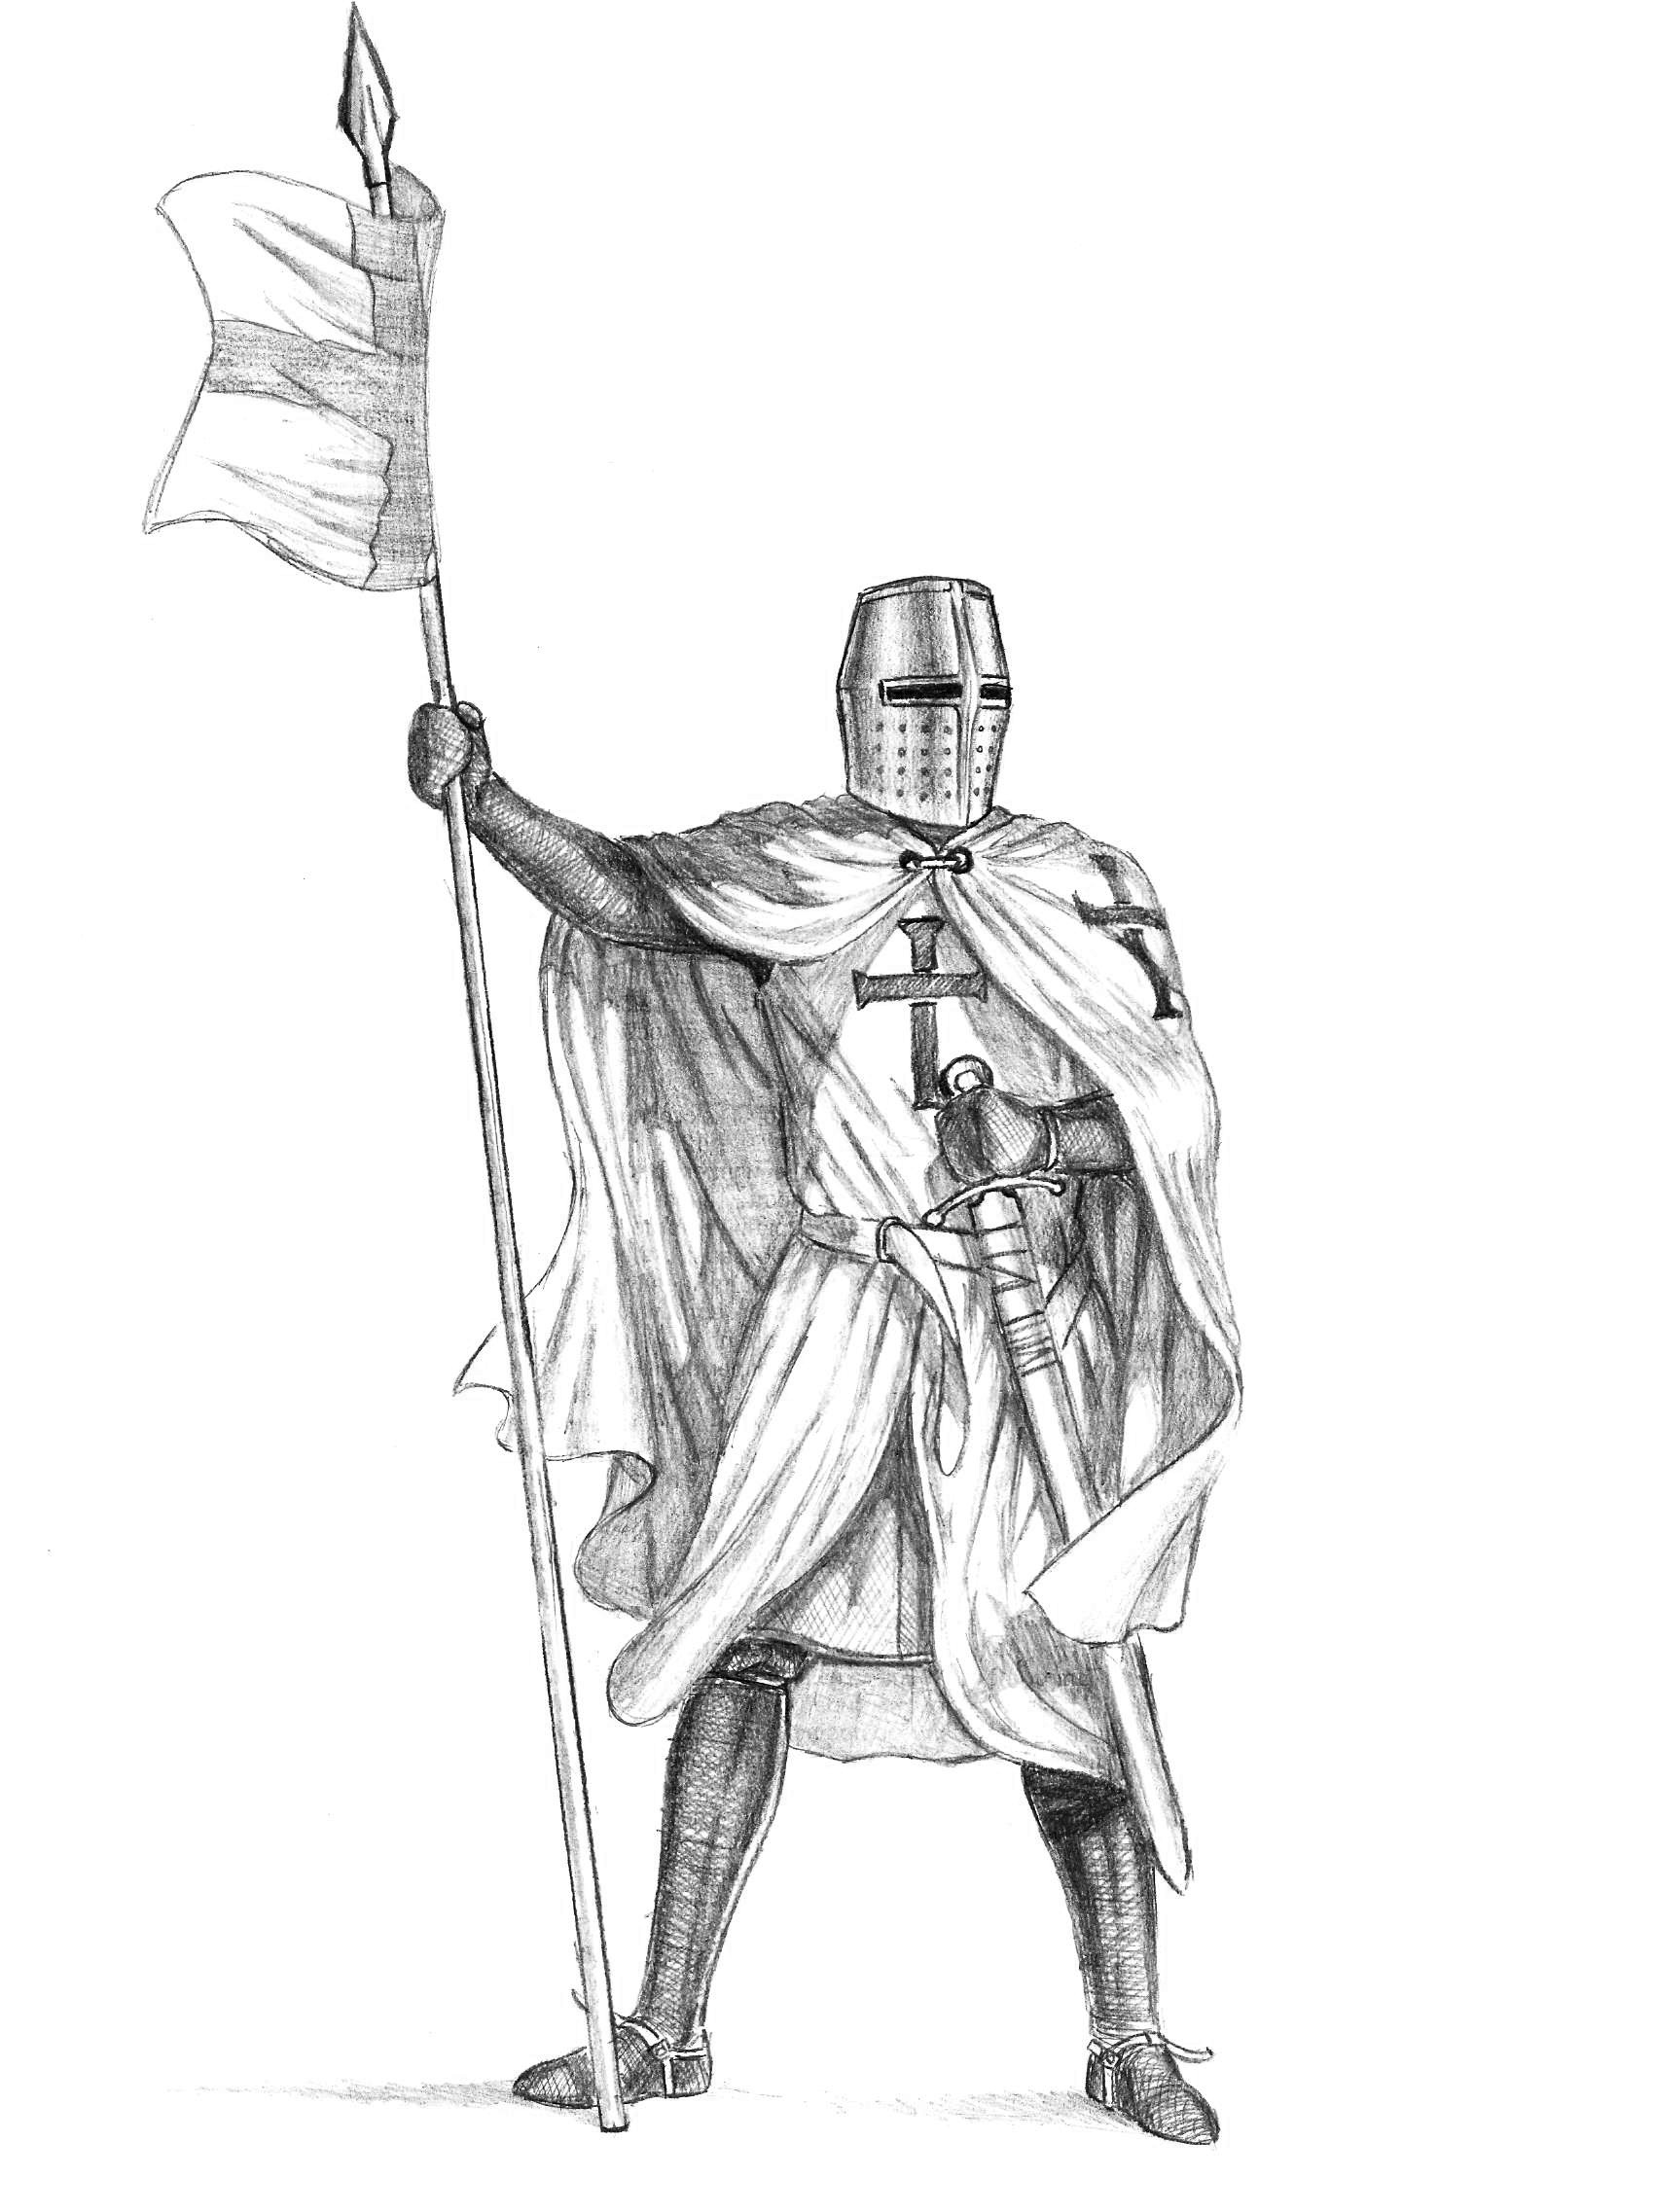
It was a very difficult lesson. If you couldn’t cope with it the first time, then don’t be discouraged - track the stage where you made a mistake and be sure to try again. Leonardo da Vinci often said that any obstacle can be overcome by perseverance. So just try more and everything will work out.
Source this example: drawingforall.ru
Hello! We decided to dedicate today's step-by-step drawing lesson to a medieval knight.
As everyone knows, a knight is not just a warrior who, in medieval epics, fought with and often came into contact with others. Like Japanese knights, these are the bearers of a special noble title. The knightly class had a great influence on the history of Europe; in the dark Middle Ages, many men from different social strata dreamed of becoming a knight.
Representatives of noble wealthy families had the greatest chance of becoming a knight, whose members became famous for their devoted service to the king or for special military merits. History buffs will certainly notice the Templar cross on the robes of our knight - we chose it for a reason, because this particular order is one of the most recognizable in the entire history of knighthood. So, let's start a lesson dedicated to how to draw a knight!
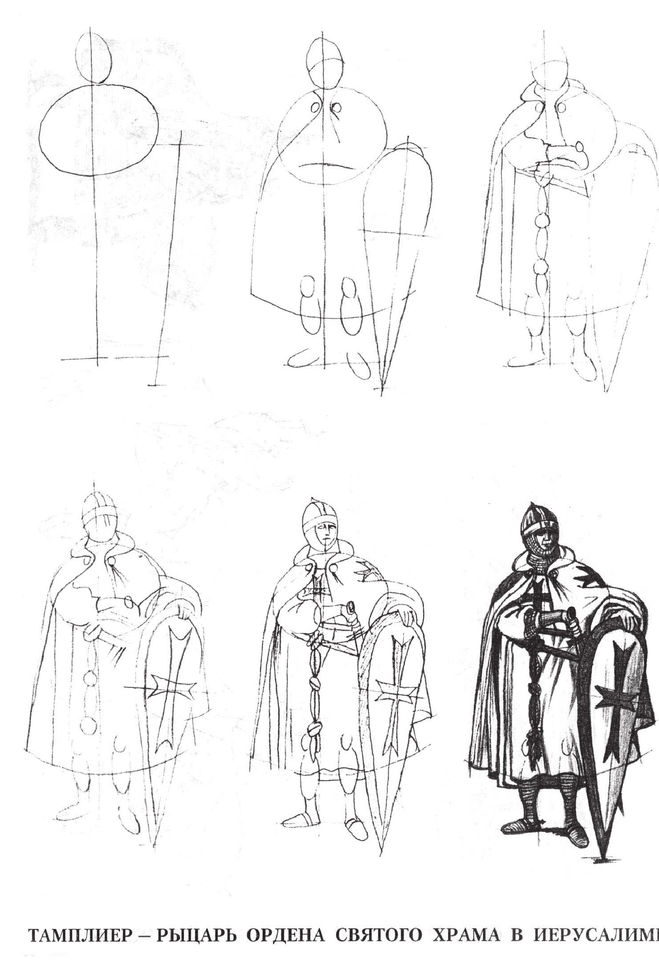
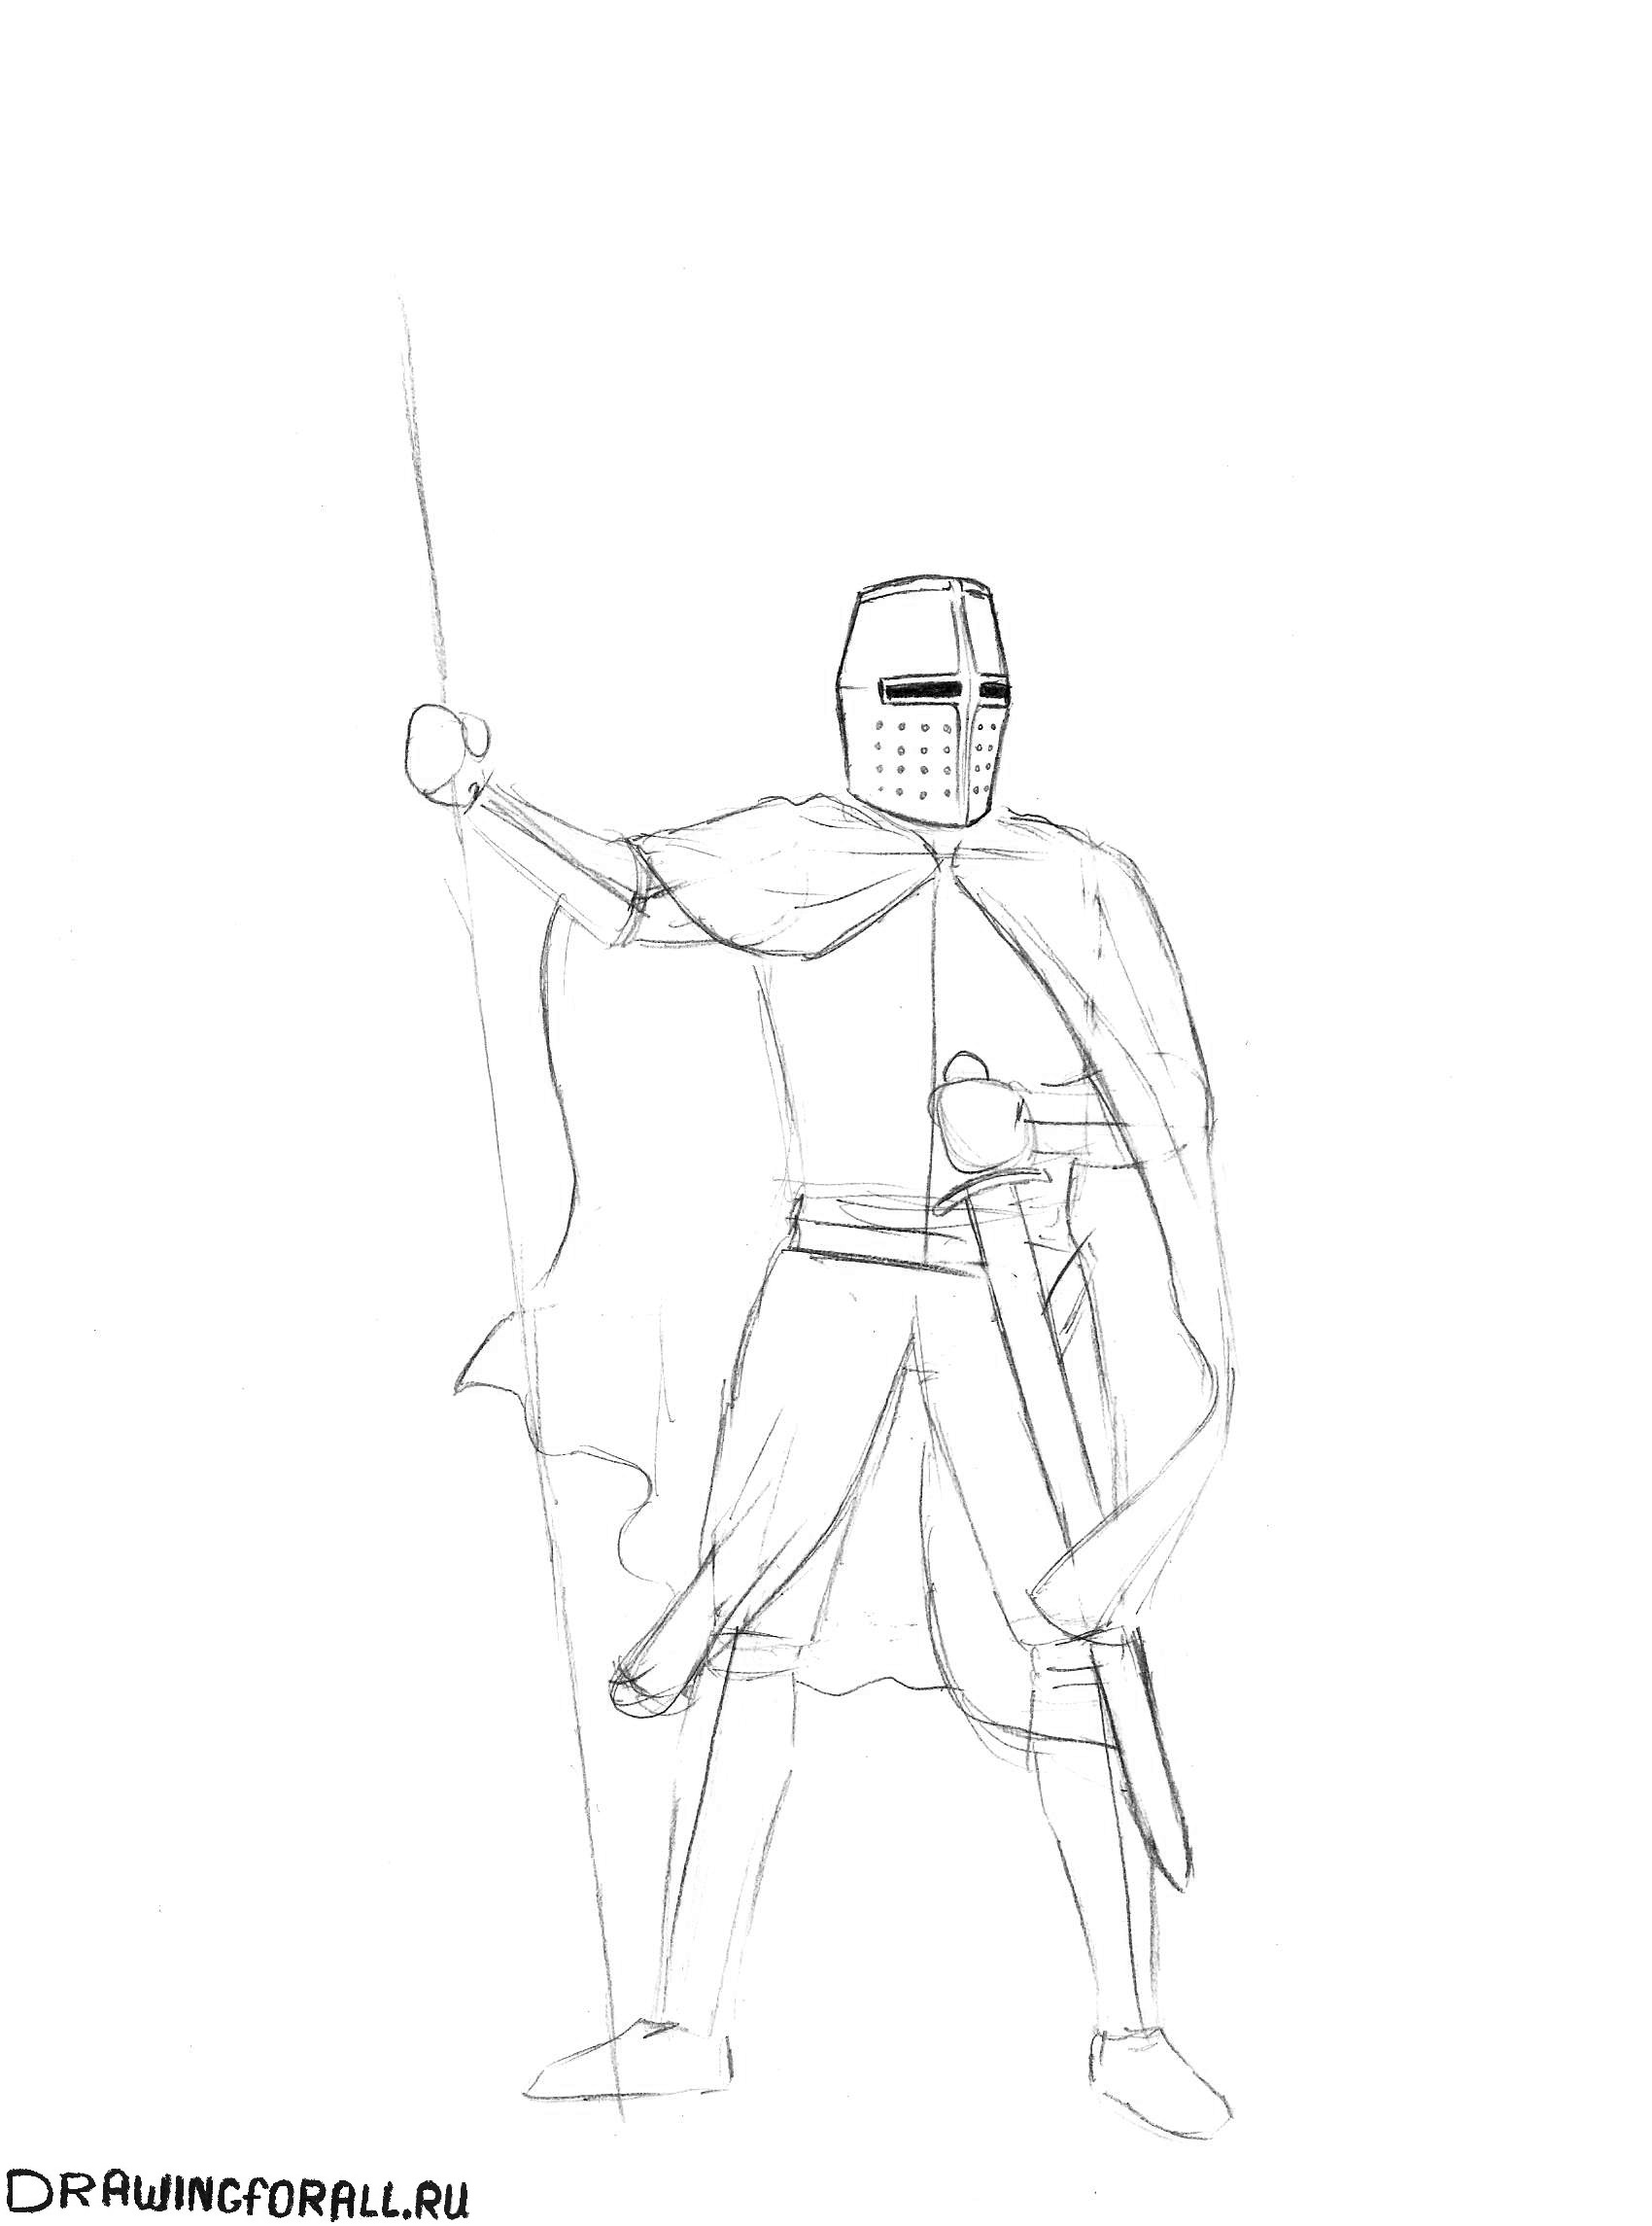
Step 1
As always, we start with a stickman - a man made of circles and sticks, which is drawn to indicate basic proportions and pose. A little about proportions human body- the length of the body should be on average equal to seven heads, the size of the foot is approximately equal to the height of one head, and the distance from the top of the head to the hips is usually equated to 3 heads. By the way, the height of the human head in art manuals is the main unit of measurement of body proportions.
But we digress from our stickman. Pay attention to his proportions, especially his head. It should appear noticeably larger than an ordinary human head, since the knight’s head is wearing a voluminous, massive helmet. The knight's pose itself is quite simple and does not involve any sharp actions or attacks - one arm is bent (the angle is slightly sharper than a straight line), the hand is on the hilt of the sword, and the second holds a spear with a banner and bends slightly.
With the legs, everything is quite simple - they bend at the knees just a little and are in the natural position of a person who simply stands straight and does not try to specifically strain his legs to give them a perfectly straight position. Almost forgot about two important lines- facial and ocular symmetry, outline them and move on.
Step 2
In this step we will add volume to the upper torso and arms, following the lines of the stickman. We outline the body parts in the form of modified cylinders. This will help in the future to accurately draw all parts of the body. In general, in further stages we will only draw the shape of the armor, because, in fact, they hide the entire knight from head to toe.
Step 3
We repeat the actions of the previous step, only regarding the belt and legs of our knight - we make them voluminous. Essentially, the waist area is a triangle, and the thighs of the legs look like cylinders. Don't forget to outline the knees with flat ovals, then draw the calves and feet and move on to the next step.
Step 4
Now let's work a little on the fabric - we are talking about the mantle of our knight, as well as the elements of the robe that are located on the belt and cover the legs to the knees. First, give the mantle a general silhouette, and then draw a few folds, do this using smooth natural lines.
We remember that in the figure we depict a light wind, as it were, blowing the robes of a Templar. Don't forget to mark the folded part of the mantle that covers the left bent arm. A little more work with fabric - draw a surcoat (a piece of clothing that covers the torso and legs). Also in this step we sketch out a sword, the handle of which is completely covered with a brush in a mitten.
Step 5
We have a ready-made silhouette of a knight, and from this step we will begin to draw it in detail from the head to the feet. First, draw a horizontal seam at the very top. Next, we give the shape of the helmet its final look. Then, based on the two perpendicular lines from the first steps, we will draw a vertical seam and holes for the eyes, which we will paint over here.
We complete the step by drawing small holes in the bottom of the helmet - pay attention to their orderly arrangement and the same size. By the way, if you are interested in the topic of the Middle Ages, pay attention to the lesson in which we show.
Step 6
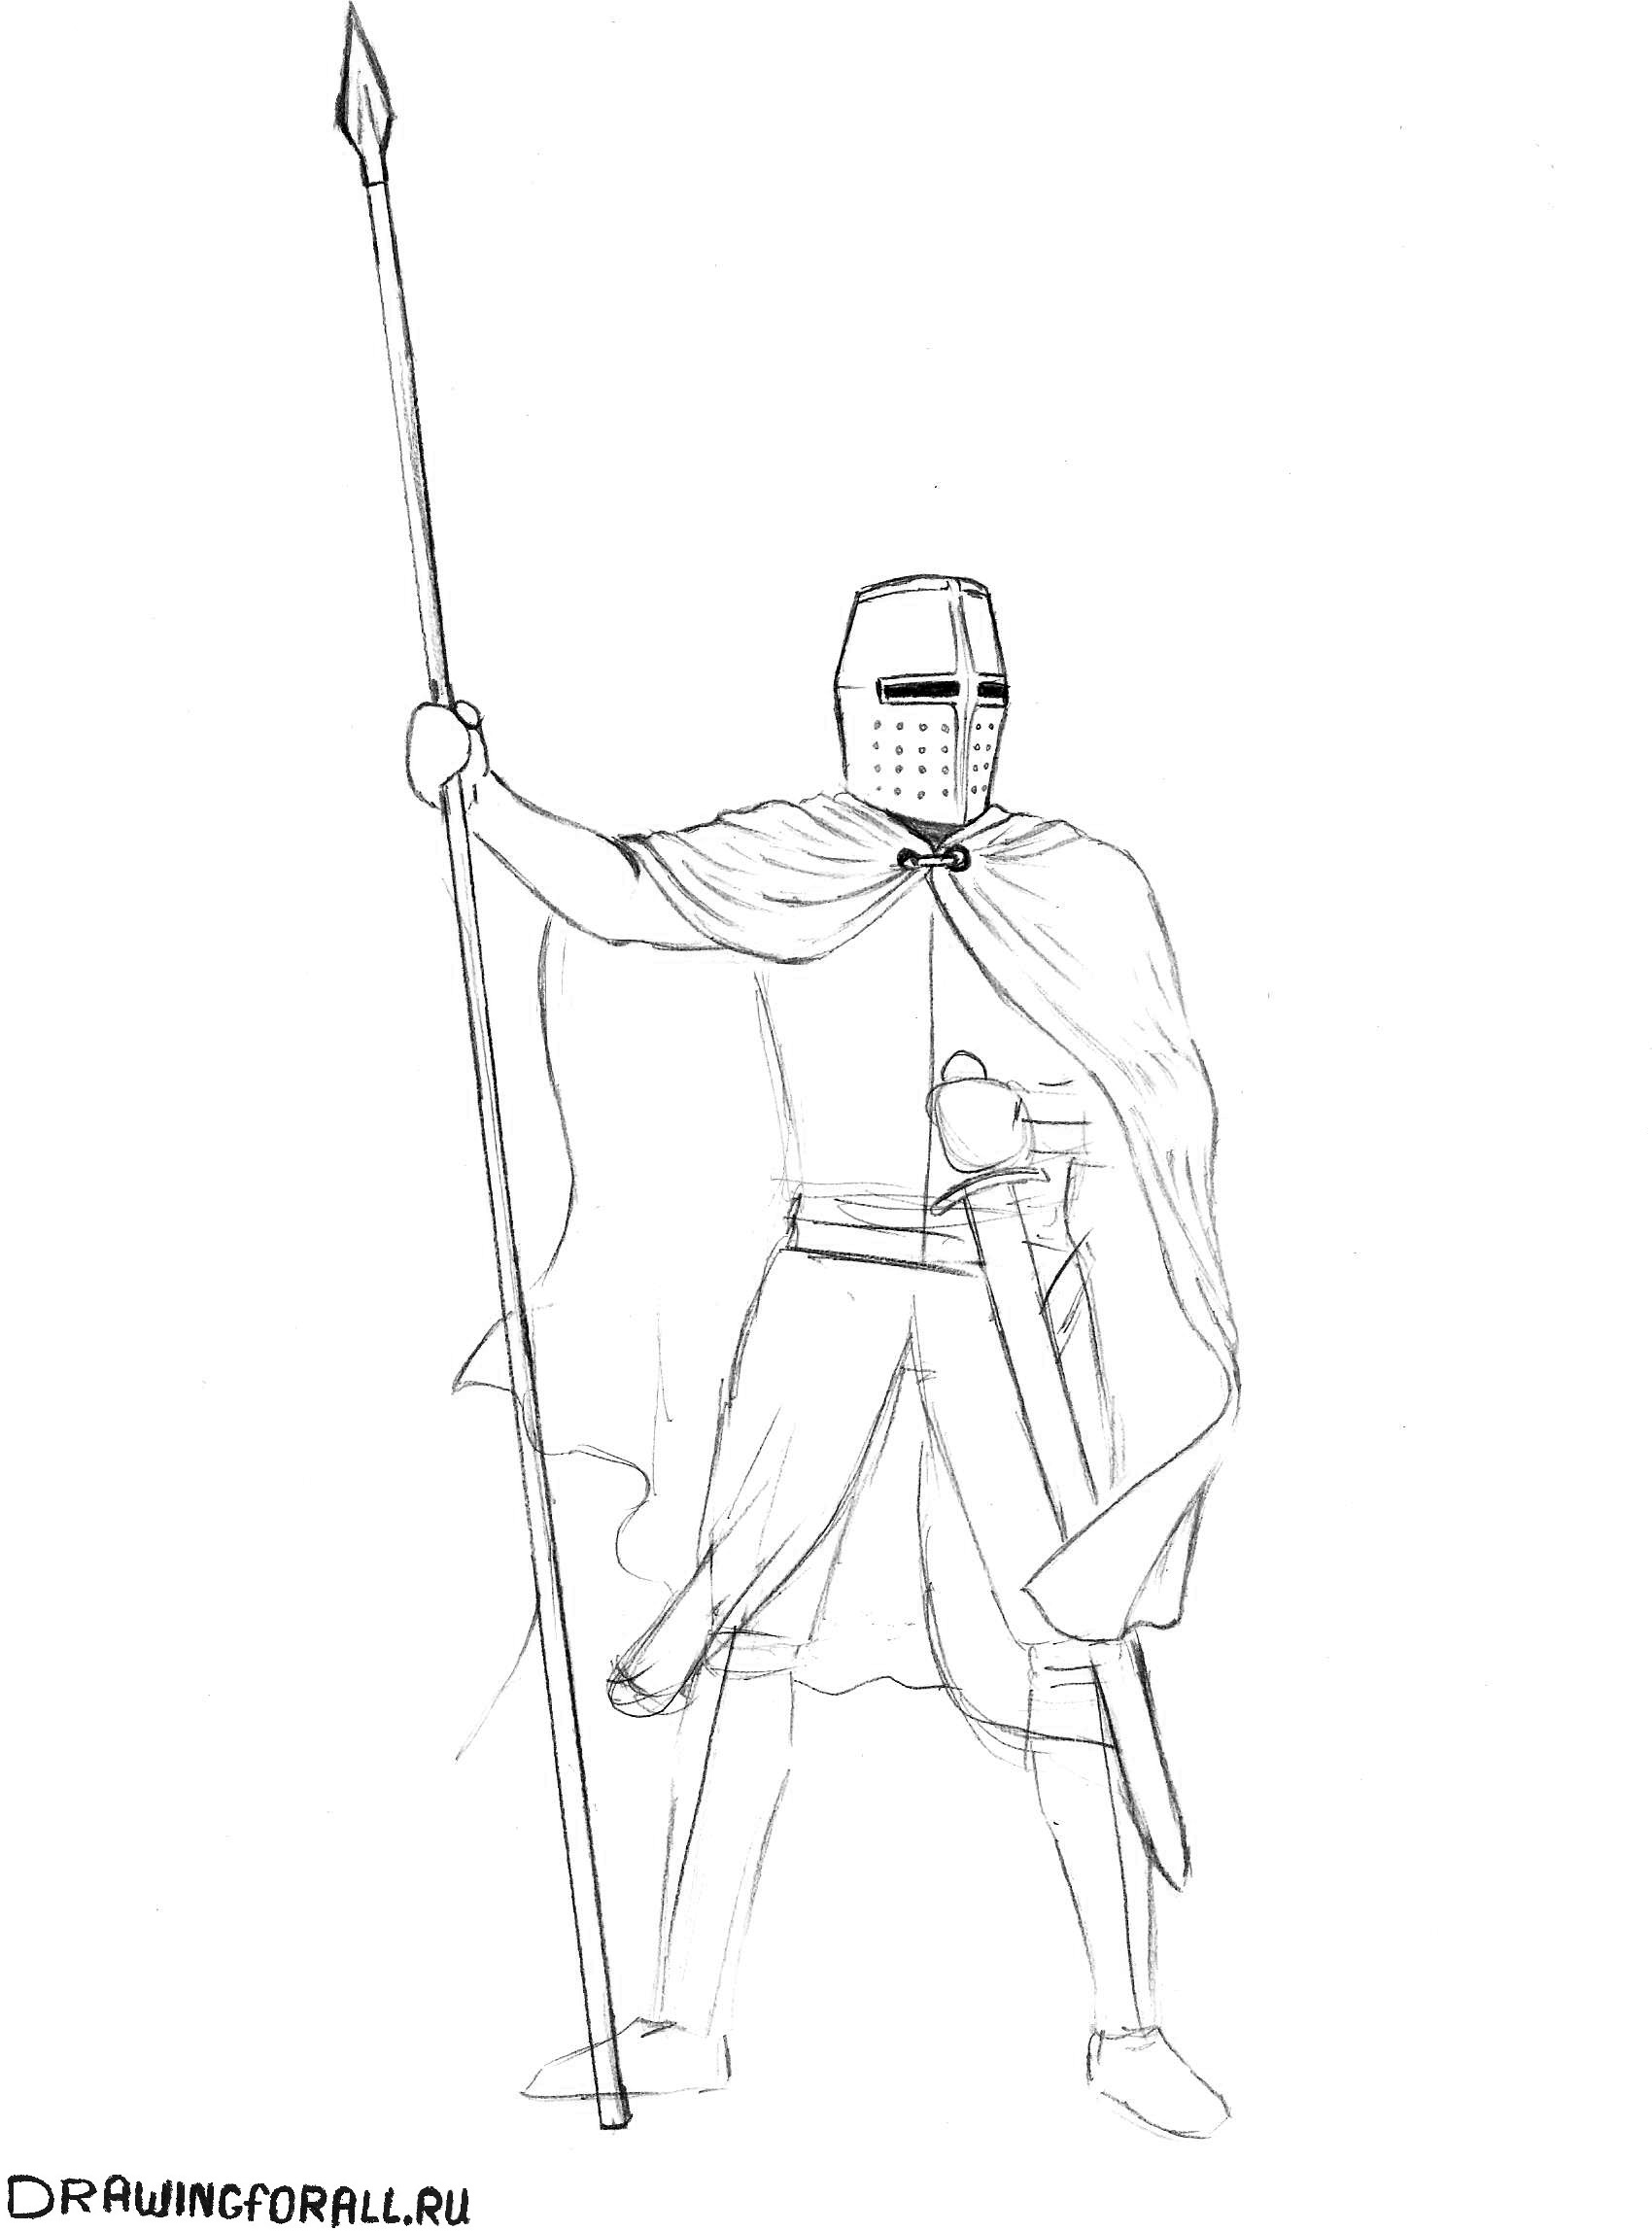
Great, now let's detail the arms and upper torso. First, erase the guide lines from the previous steps in the area of the chest and right arm. Let's draw a cord with two buckles just below the throat - this will be the clasp of the robe. Draw smooth curving lines from it, which will indicate the folds of the fabric tightened with a clasp.
On the left side, the mantle will fall down, so the lines should gradually move into a vertical position, but again very smoothly. Notice how the cloak fits the knight's left forearm and mark this with folds as in our example. Also in this step we will draw a spear - it consists of a thin vertical shaft and a tip that looks like an elongated diamond.
Step 7
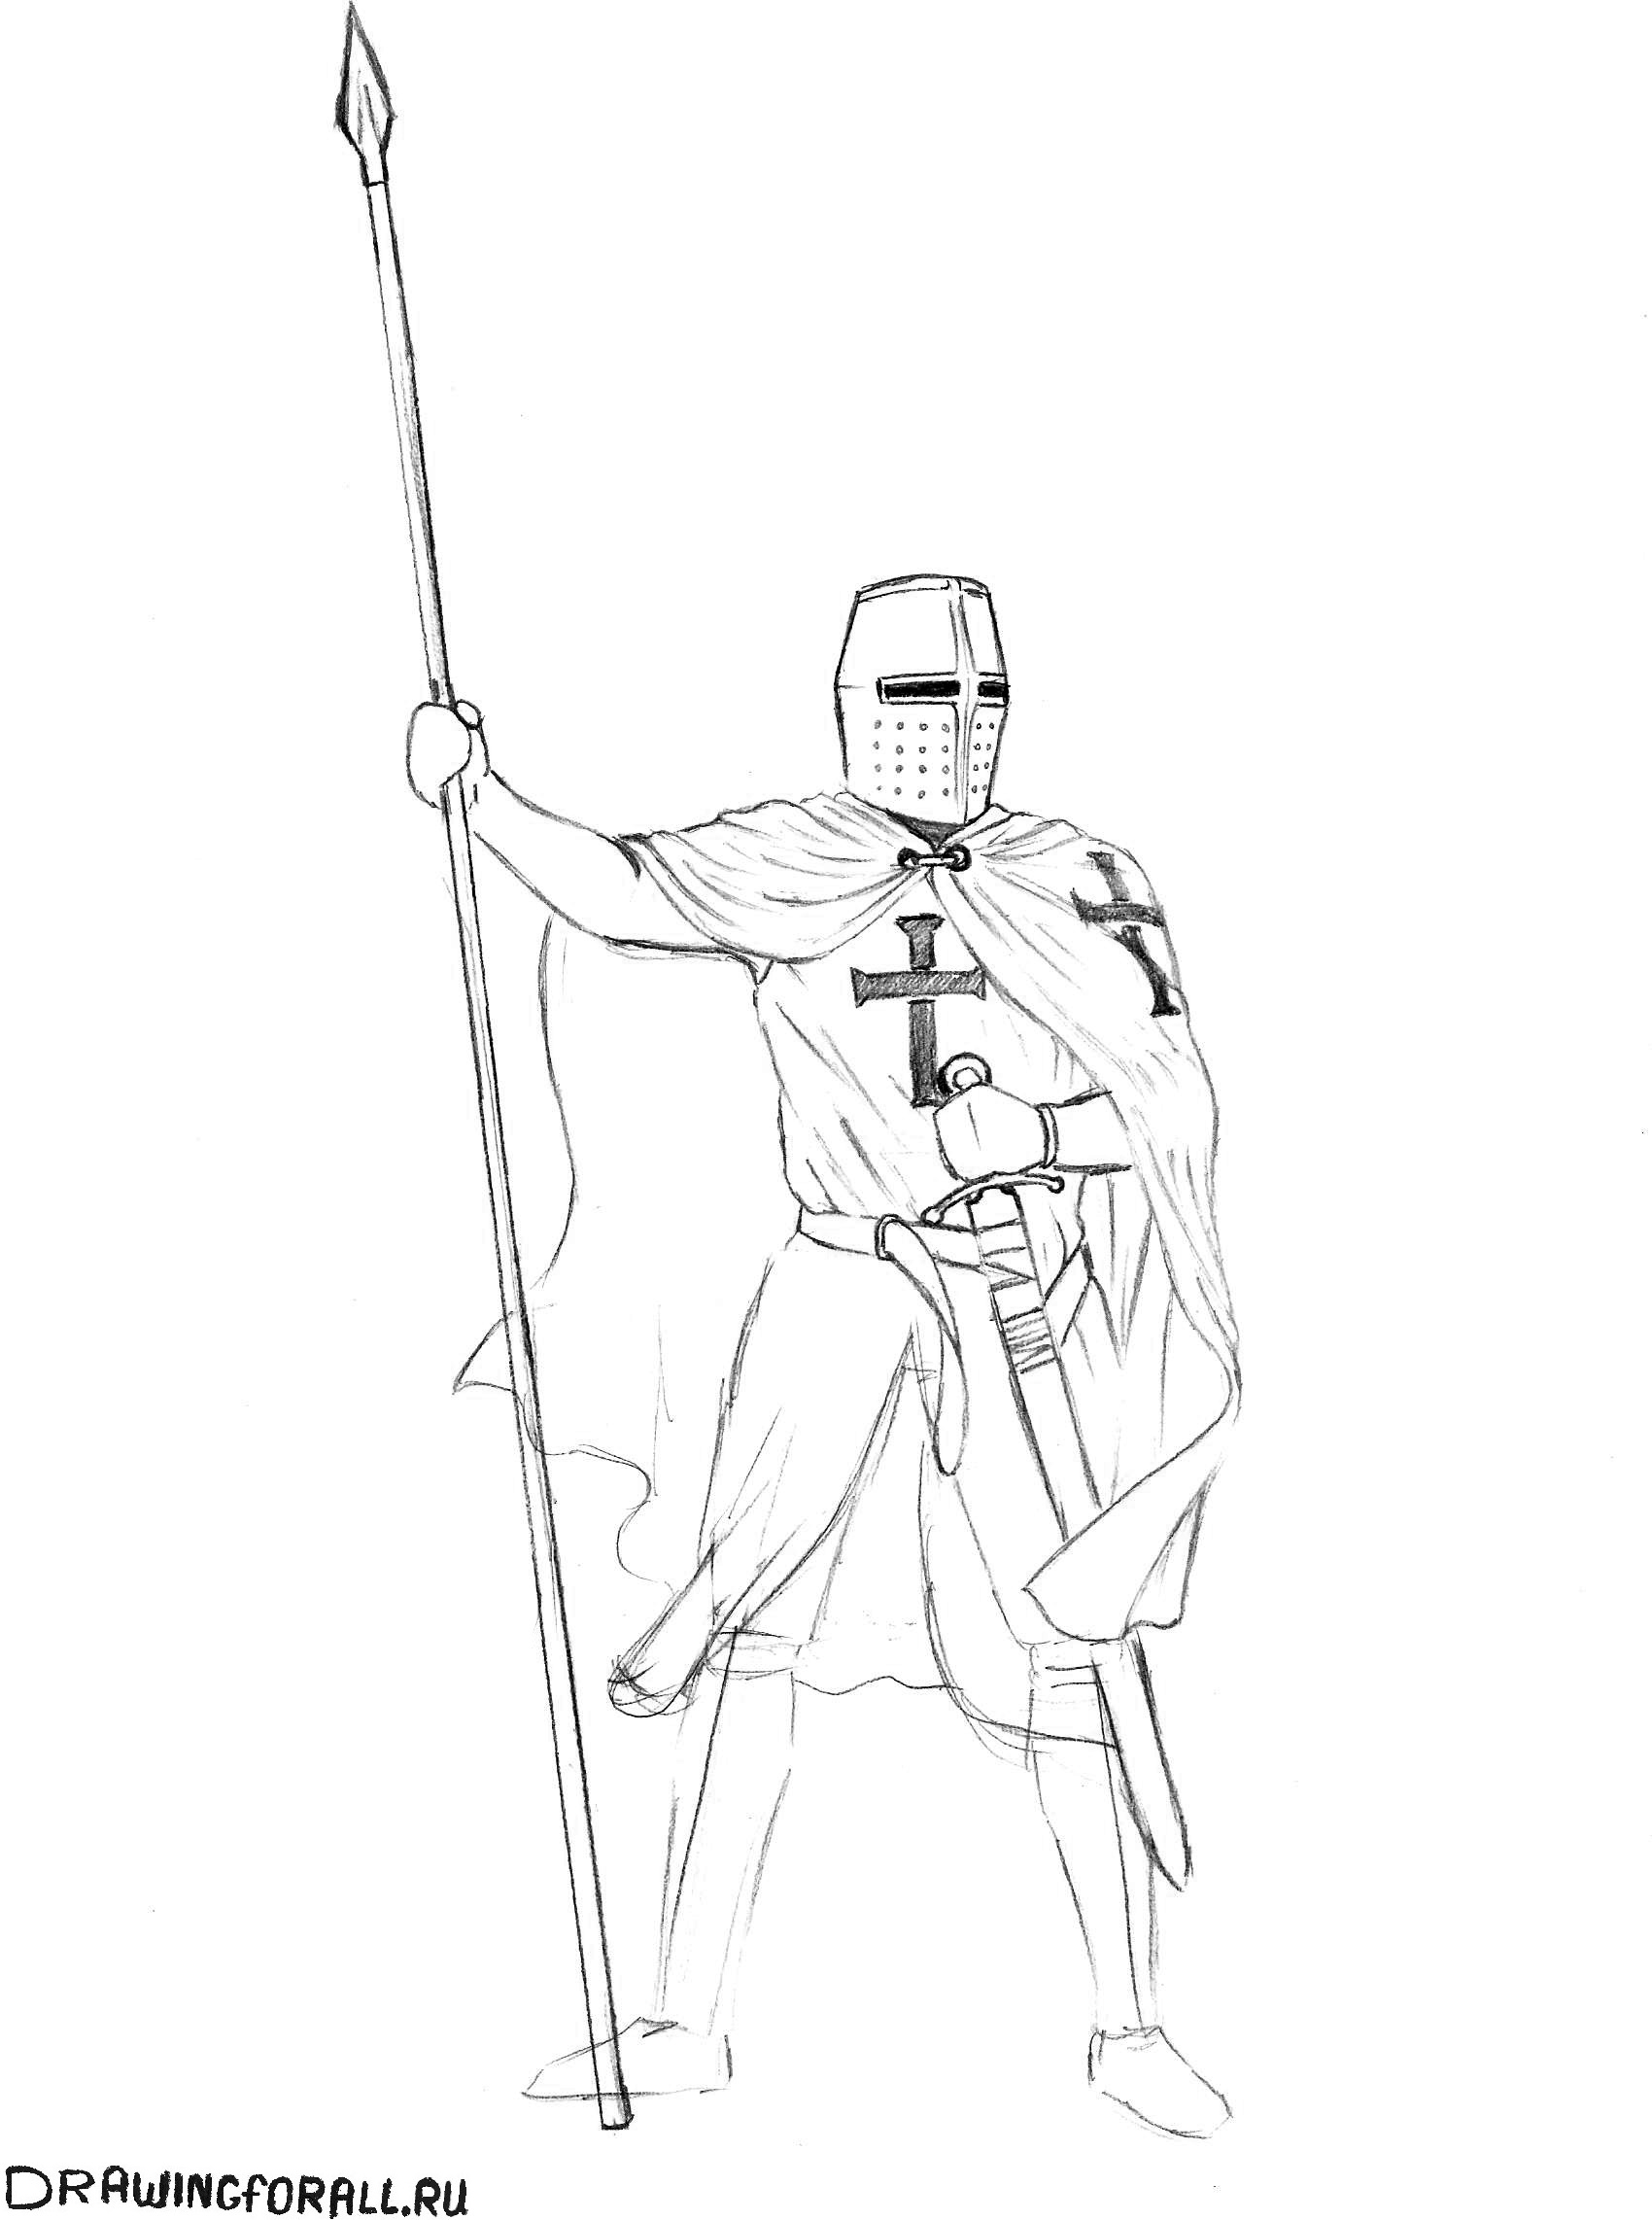
Let's erase the auxiliary lines from the previous stages on the body and draw a Templar cross with flared ends in the center of the chest. On the fabric of the robe we will mark a few folds that should run diagonally, that is, from the armpit to the stomach. (the belt tightens the knight's robe, and the knight's right hand is raised, and therefore the folds will go from the belt up and towards the right hand). Let's draw another cross on the left side of the cloak, just don't forget to take into account the folds in the fabric. Let's draw the belt, the left gauntlet and the sheath of the sword, wrapped in belt strips.
Step 8
We devote this step to the folds on the fabric of the mantle and the lower part of the robe, which covers the legs of our knight. So, first of all, we align the stripes and erase all the unnecessary auxiliary lines. The folds should indicate the position of the mantle, which hangs freely from the right shoulder, which means they should be vertical and relatively long.
Please note that only one fold bends significantly - the one located near the edge of the mantle, while the rest look like smooth lines. Also in this step we will erase the guide lines from the top of the legs and draw folds in the fabric in this area. Draw them with slightly curving lines from the waist to the knees.
![]()
Step 9
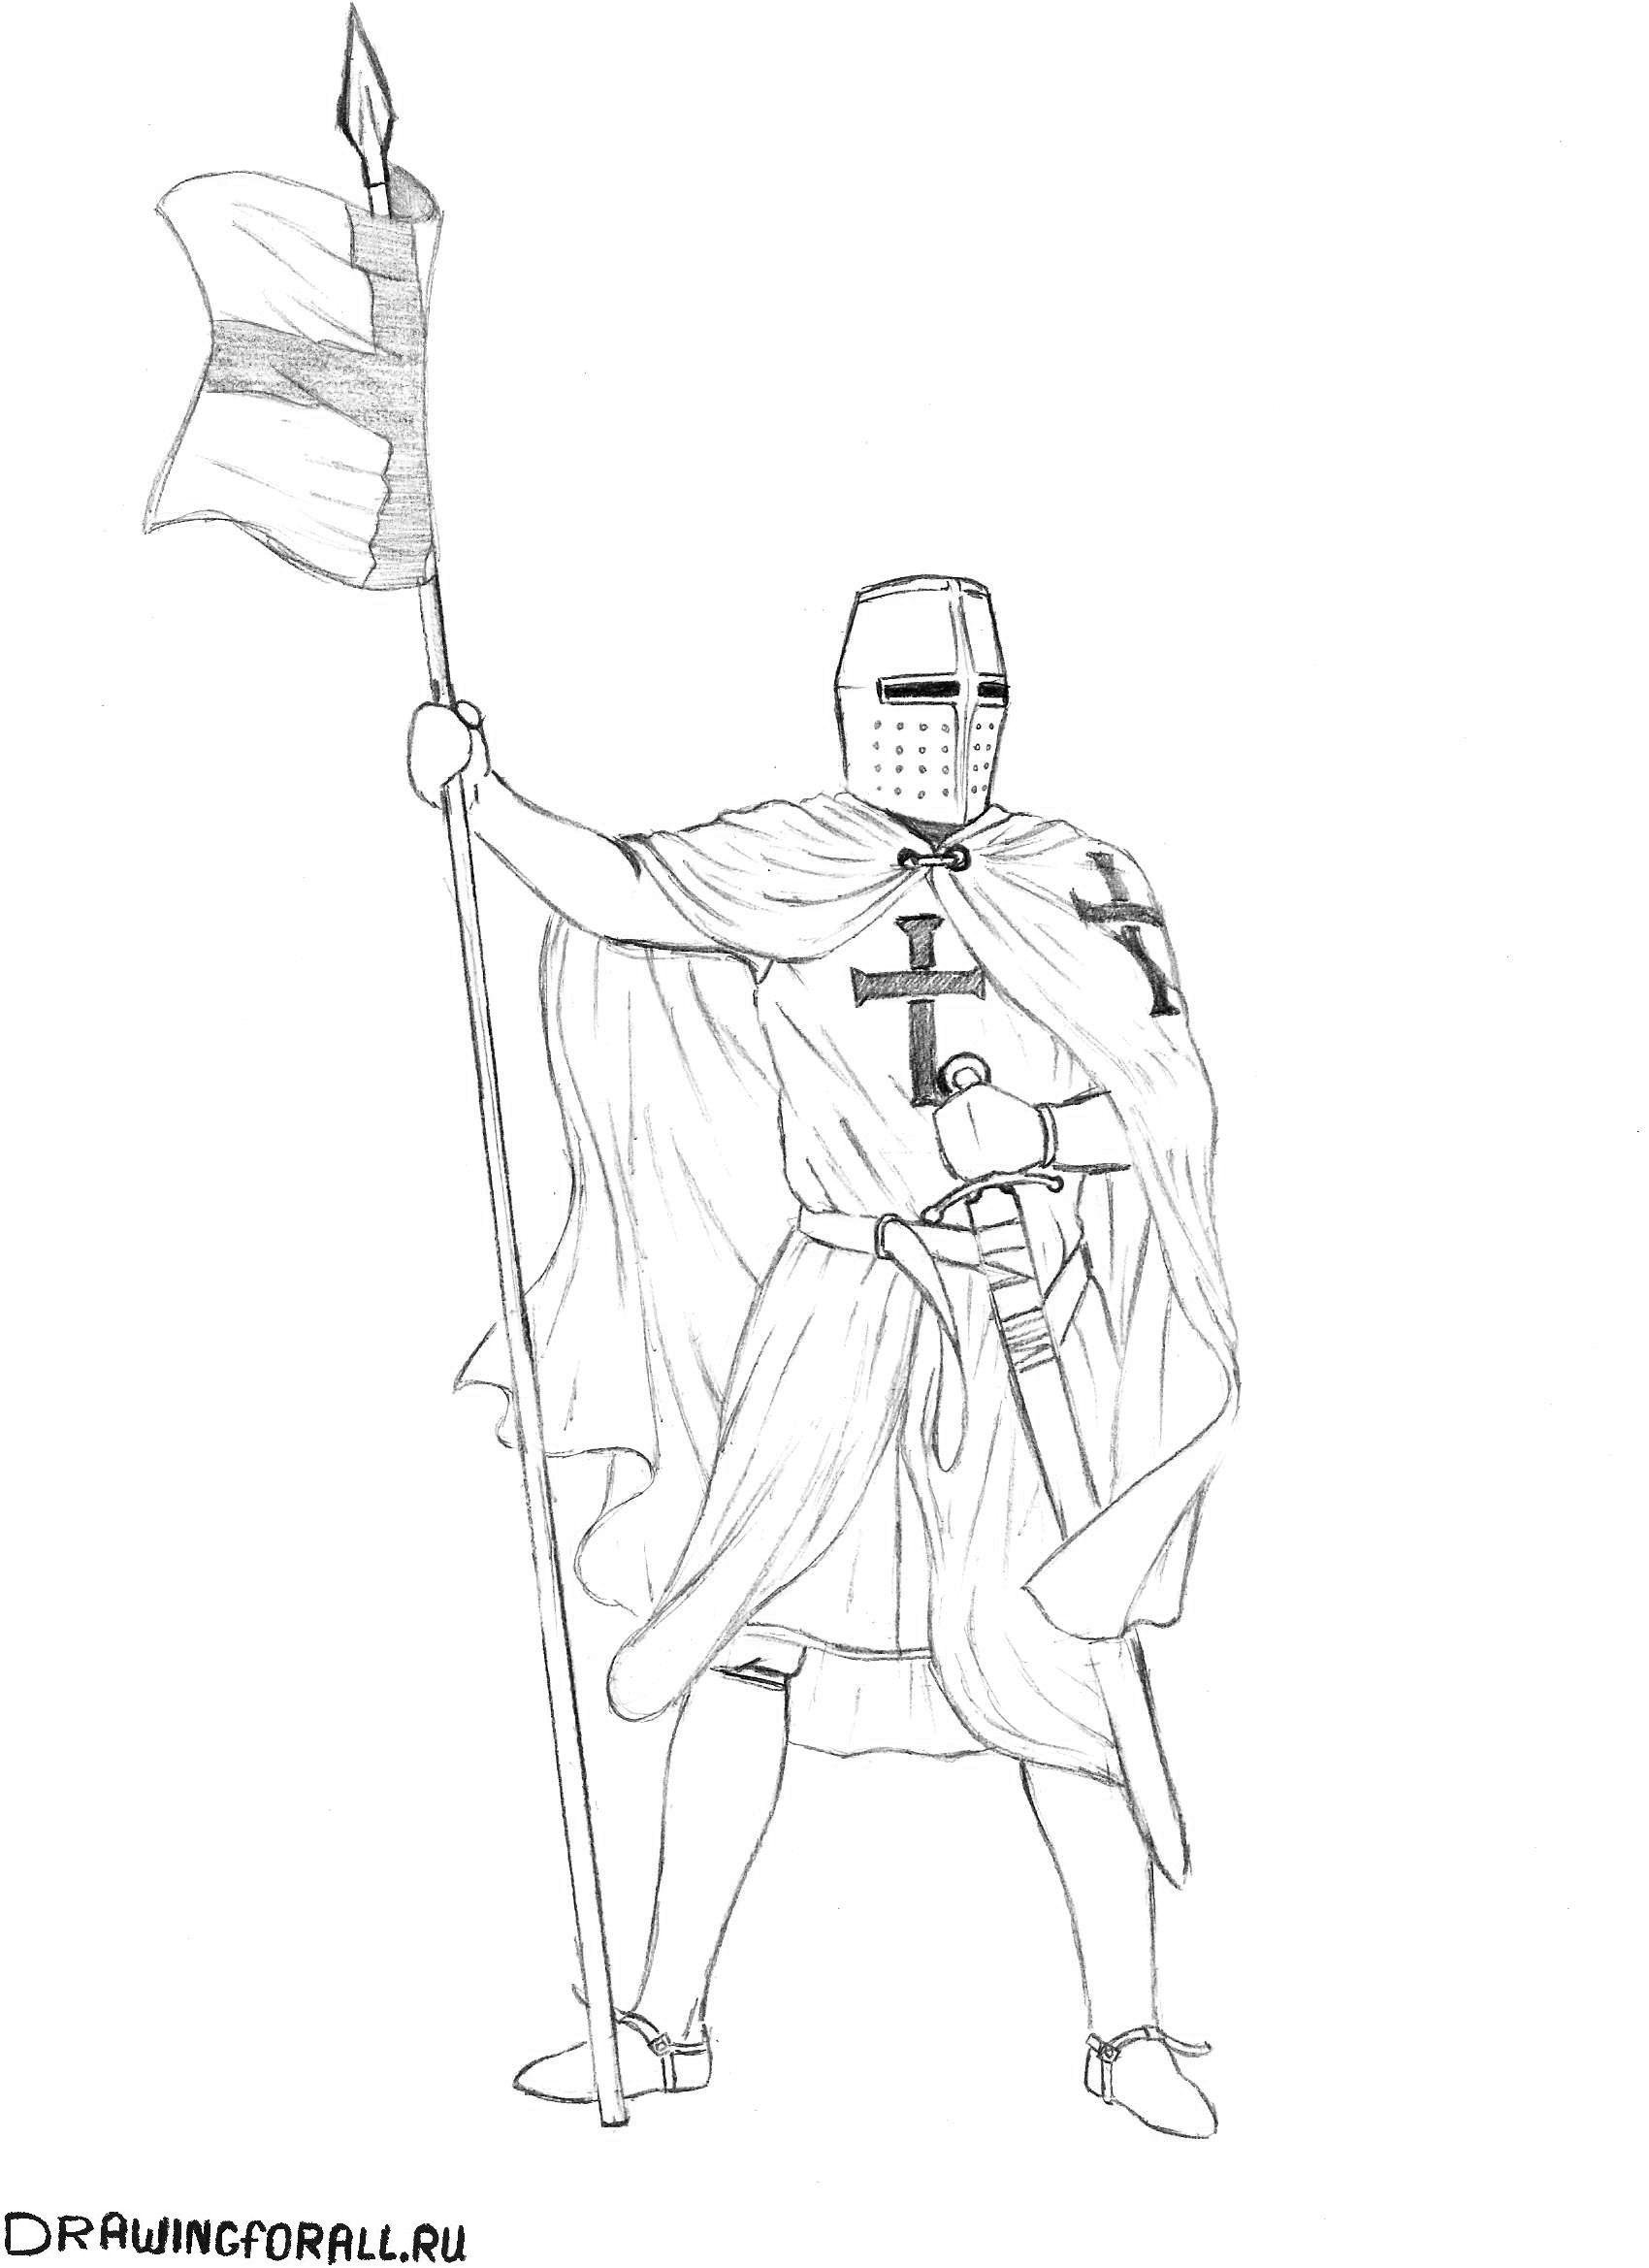
Okay, now let's draw the legs from the knees to the feet - actually here you just need to give the legs a finished look and literally draw a couple of lines on the knees, and also mark the spurs. The chain mail fits quite tightly on the legs, and in this regard, one must try to convey the shape of the legs as correctly as possible. Yes, we almost forgot - we draw the lower part of the clothing, which hangs down from the back. All that remains is to draw a flag with a cross that develops on the shaft of the spear (don’t forget about several folds, they go from bottom to top).
Step 10
Actually, we have the knight ready, all that remains is to work with the shadows. We start, as always, with the head, in our case with the helmet. First, we shade the darkest areas with vertical strokes, trying to indicate the cylindrical shape of the helmet (pay attention to the light stripe at the bottom of the helmet, it must be designated and left almost unshaded). Now, using lighter strokes we indicate the transition from shaded areas to light ones. These transitions should be smooth and natural.
Step 11
Let's continue painting our canned warrior, and at this stage we will work with the limbs. Note that we will draw the armor on the arms and legs in exactly the same way. Take a look at the legs - this is what the first stage of shading should look like.
The entire limb is covered with very fine hatching in a crosswise direction. After this, we apply the darkest shadows and mark the transition from them to lighter areas in the same way as we did with the helmet. Don't forget about the shadows from the mantle on your hands - they should be especially thick.
Step 12
Now the shadows are on the legs. They are applied in the same way as on the hands in the previous step. To make it more realistic, we leave narrow strips of reflex light (light that is thrown onto an object from the bright surface of something) on the inside of the lower leg in the area of the calf muscles. Especially thick shadows will be cast by the surcoat fabric.
Step 13
Well, there is very little left. In this step we will work on the shadows on the mantle. It seems that the step is voluminous and complex, but this is not so if you correctly determine the nature and direction of the lighting. As we can see, the light falls on our warrior from the side of his left hand. This means that almost the entire left side of the cloak should be illuminated, and the areas of shadows that form from the folds should be indicated with light, barely noticeable strokes with a minimum level of pressure on the pencil. It is necessary to outline the forearm of the left hand protruding under the cloak, shading the edges of the convexity so that it itself looks bright and illuminated.
We avoid sharp and catchy shadows, as in drawing comic book characters - and others, so even the most shaded places need to be painted over carefully and carefully. Advice - to make the shadow thicker, shade the desired area twice - first a light shading diagonally, and on top of it another layer to make a cross. On the right side, the cloak is visible only from the inside, and it should be thoroughly shaded. Also pay attention to the shadows that the mantle casts on the knight’s torso - they form a sharp triangle, the apex of which is located under the clasp of the mantle.
Step 14
The final step is to add the shadow that the knight casts on the surface, as well as lightly shading the sword, spear and the area of the robe that covers the neck near the left shoulder.
This was a very difficult lesson from the site team, if you couldn’t cope with it the first time, don’t be discouraged - track down the stage where you made a mistake and try again. He said that any obstacle can be overcome with perseverance - so just try more and everything will work out. And lastly, a question from our editors - who would you like to learn how to draw? Write your answers in the comments, be healthy and visit us often, we have a lot of interesting things!
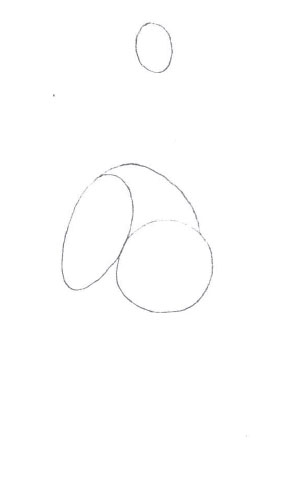
Knights are one of the main characters of various tales, ballads, and legends. These are brave characters who always actively fight in the fight against evil, overcome various trials and difficulties, and are very affectionate towards their ladies - lovers. Often knights sorted things out not only on the battlefield, but also at knightly tournaments. They went through several tests, at the end of which the winner was determined and he was awarded a cup. Knights usually dressed in iron armor, which covered them from head to toe and protected them from enemy attacks. True friends The knights had their war horses. In this lesson you will learn how to correctly draw a knight in armor with a pencil step by step for your drawing.
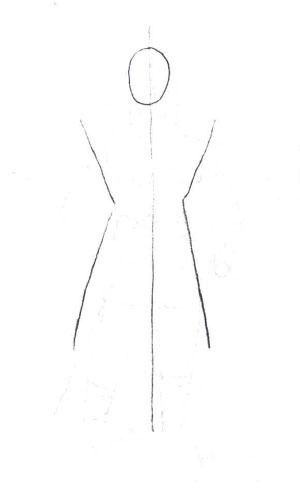
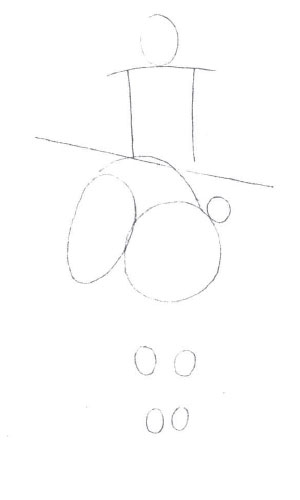
Stage 1. First we draw the auxiliary lines of the knight’s figure. A small oval of the head, a rectangular body extends from it, the lines of the arms are crossed in front, the circle is the closed future palms. The lines of the legs extend from the body.
 |
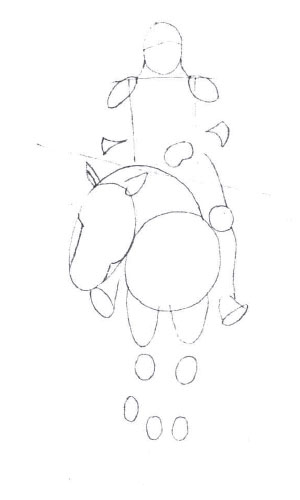
Stage 2. Draw a head wearing a helmet. We outline the contours of the helmet, highlighting its side parts, the cutout for the eyes, the strip to protect the nose, and the frontal part. At the top of the helmet we draw ornate feathers that decorate the knight’s head.
Stage 3. We clarify the shape of the left hand, bent and dressed in armor. We draw the lines of the armor, the bend in the elbow part. The armor plates seem to overlap each other.
Stage 4. Now we show the shoulder and elbow parts of the armor on the knight’s arm. These are massive lines, indicating to us the thickness and weight of this armor.
Stage 6. Now let's draw the gloves on the knight's hands. We draw the lines of the fingers, slightly bent and superimposed on each other.
Stage 7. The turn has come to depict the sword in the hands of our hero. It is drawn in a straight line from the junction of the arms down to the very feet. Let's show the sword's hilt and crossbar.
Stage 8. Note that the knight's waist is tied with a wide belt with a large buckle. We draw the features of the fabric folded at the waist and pulled through the buckle.
Stage 10. We draw the knight’s wide pants, the smooth lines of which connect with the lines of the top of his shoes.
Stage 11. Now all that remains is to draw his boots from the clothes. These are big Wellingtons, covered with a protective layer of leather or thin iron, which also protect the knight’s legs from being hit by enemy weapons during battle.
Stage 12. Let's apply shading to various parts of our drawing.
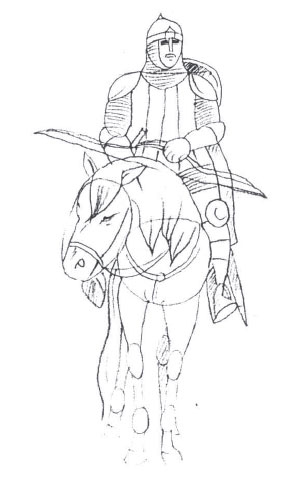
Stage 13. Let's paint our knight in dark colors. It's black, gray, brown colors with small splashes of red (belt, feathers). This is the kind of gloomy knight we have. All clad in iron and ready for battle!
Similar drawing tutorials:
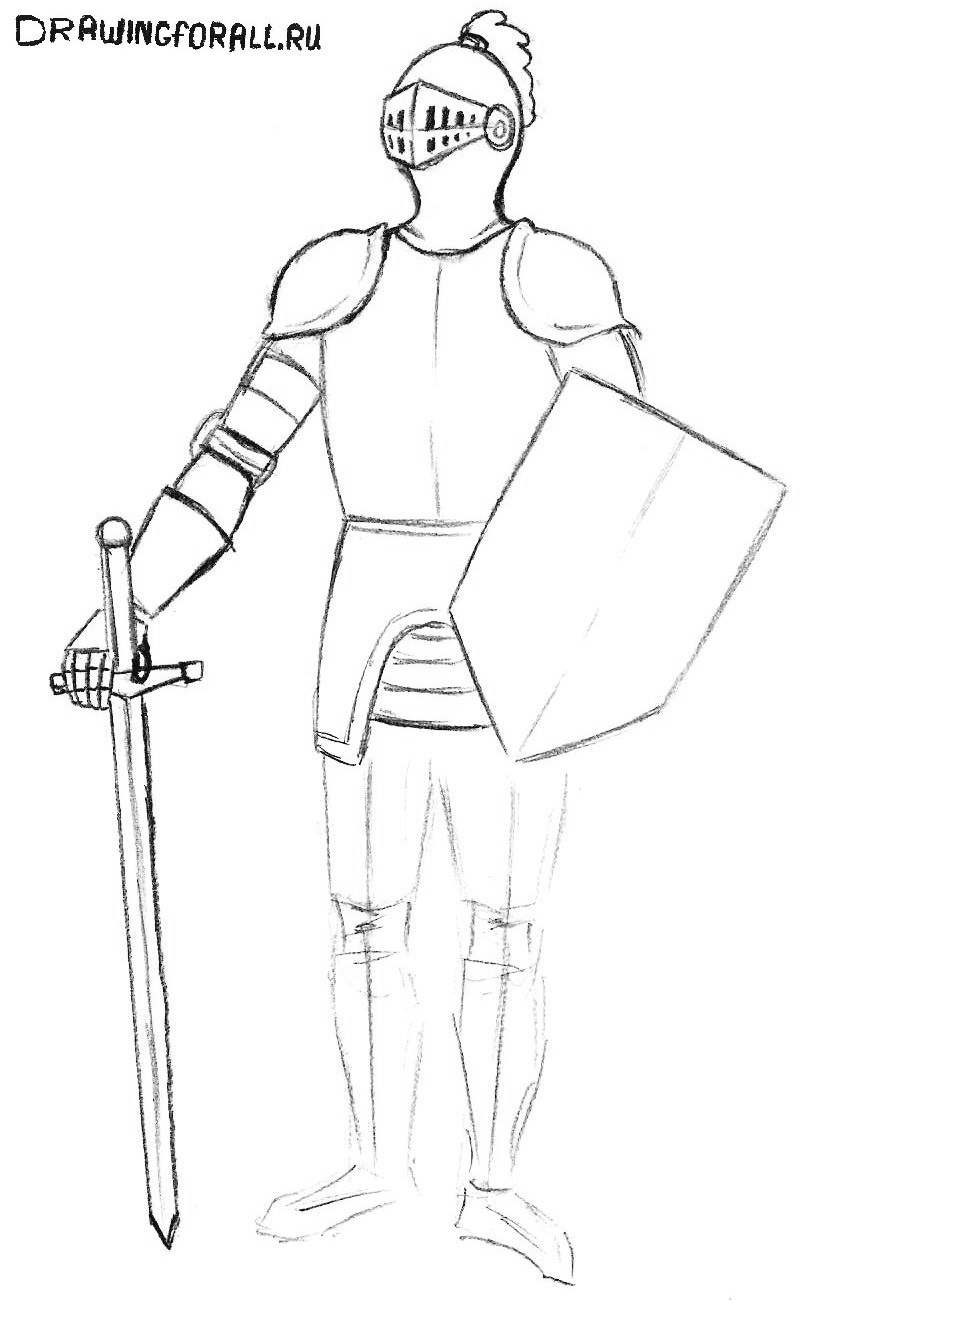
Hello, dear readers! Today we have prepared another drawing lesson for you, in which we will tell you how to draw a knight. In general, we have already drawn a knight, but regarding that lesson we often read reviews that talk about the increased complexity of the drawing. Indeed, our past was not easy - our warrior then turned out to be realistic, with rather complex shadows and high-quality drawing. Therefore, today we decided to present you with another knight, but a much lighter one. It will be a little more complicated than our lessons for beginners, such as articles about drawing,, or. So let's draw it!
Step 1
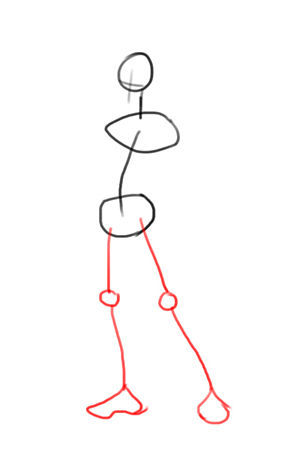
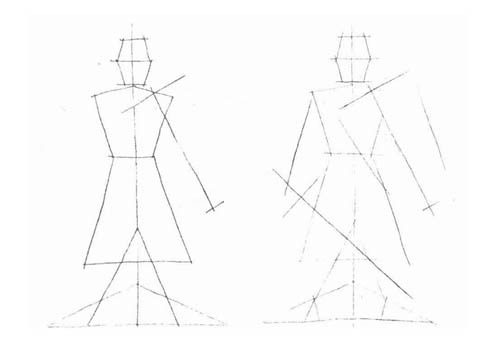
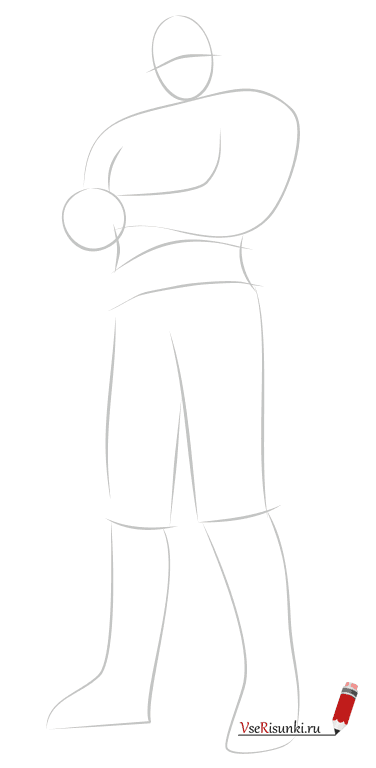
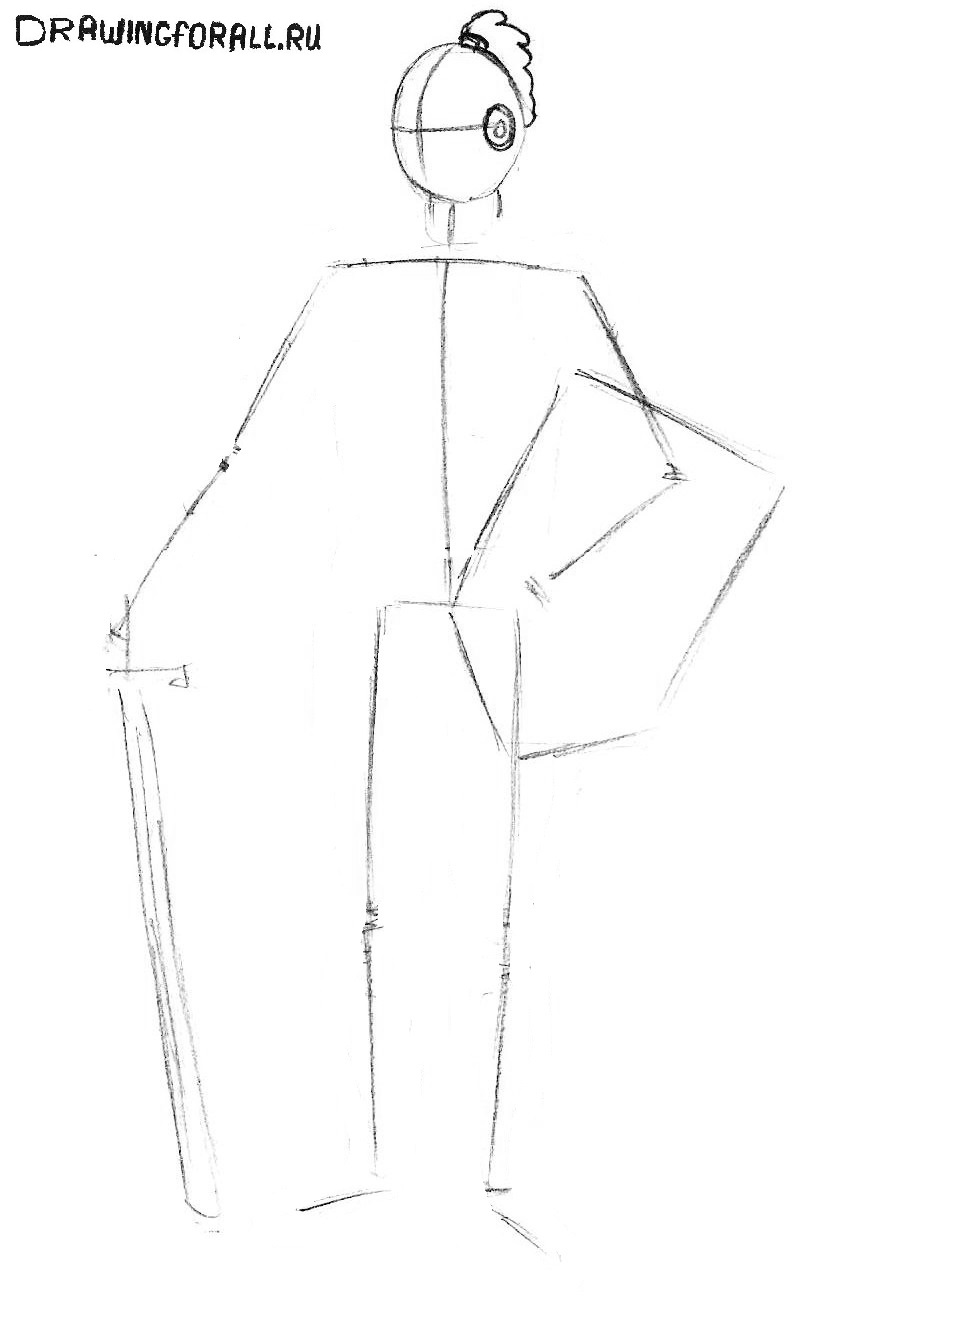
If you want to draw a knight very complex and realistic, or simple, like now, the beginning will be the same - this, of course, is a stickman. Let's start with it, using our help to indicate the knight's pose, his proportions and position on paper.
Our warrior is in a static position, he has straightened up to his full height and rests his left hand on his sword. Don’t forget the rules of proportions - the torso (from the neck to the waist) is on average equal to the sum of the lengths of two heads, the width of the shoulders also includes two heads (only now in width), and the arms extended along the body reach approximately the middle of the thigh. Another important rule— the length of the legs accounts for about 3 heads.
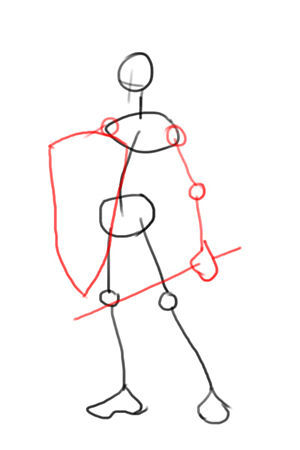
Step 2
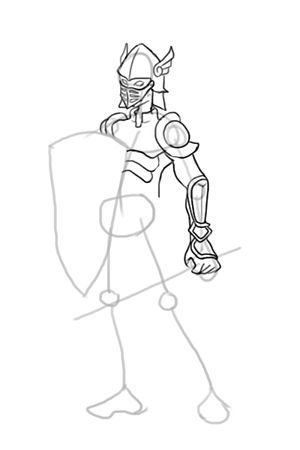
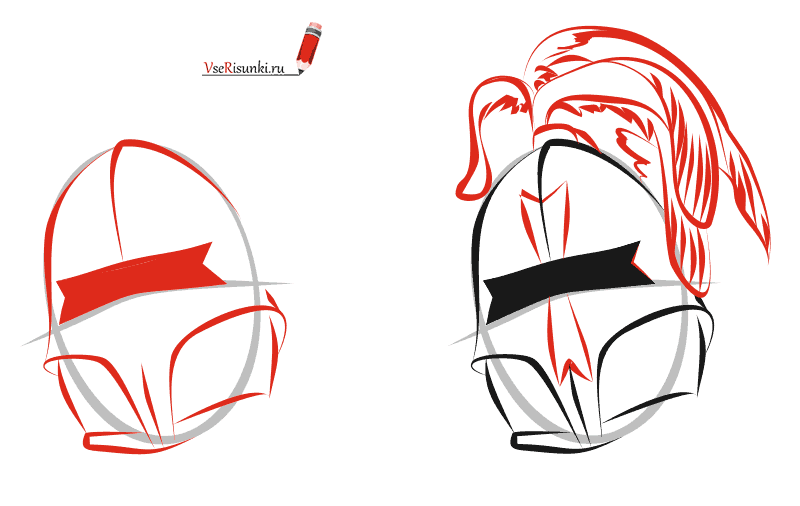
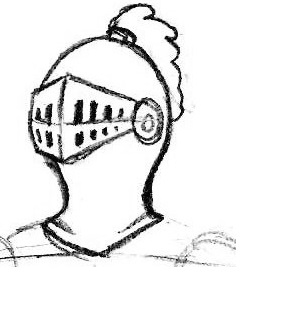
Let's draw the silhouette of the shield and sword, then return to the head. Let's draw a vertical line of facial symmetry and a horizontal line of the helmet visor. An important clarification regarding the vertical line - it must be shifted to the side to indicate the rotation of the head. Use a circle to indicate the moving part of the visor, draw the mane and neck. There's too much going on on the helmet, so it's time for a close-up:
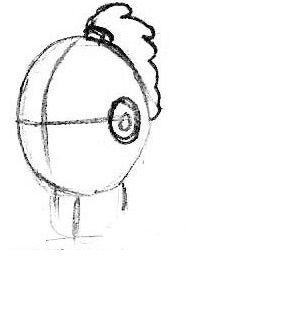
And now the general plan:
Step 3
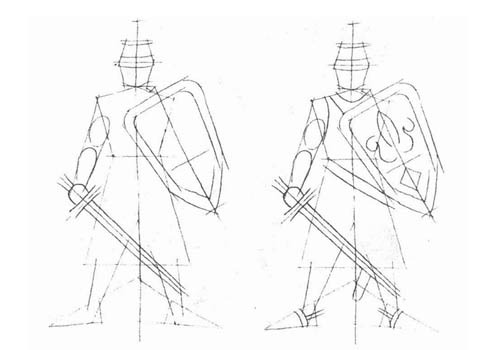
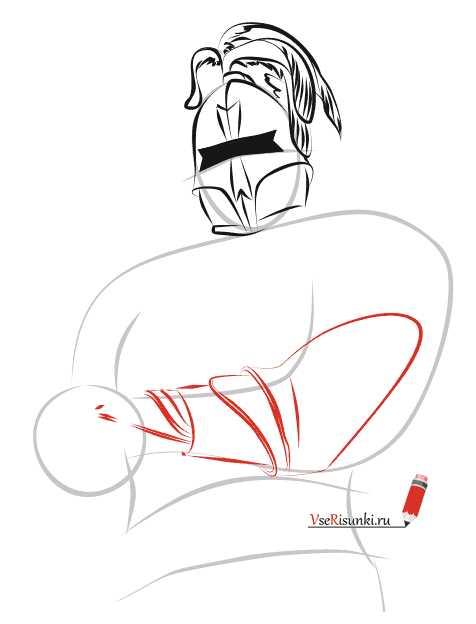
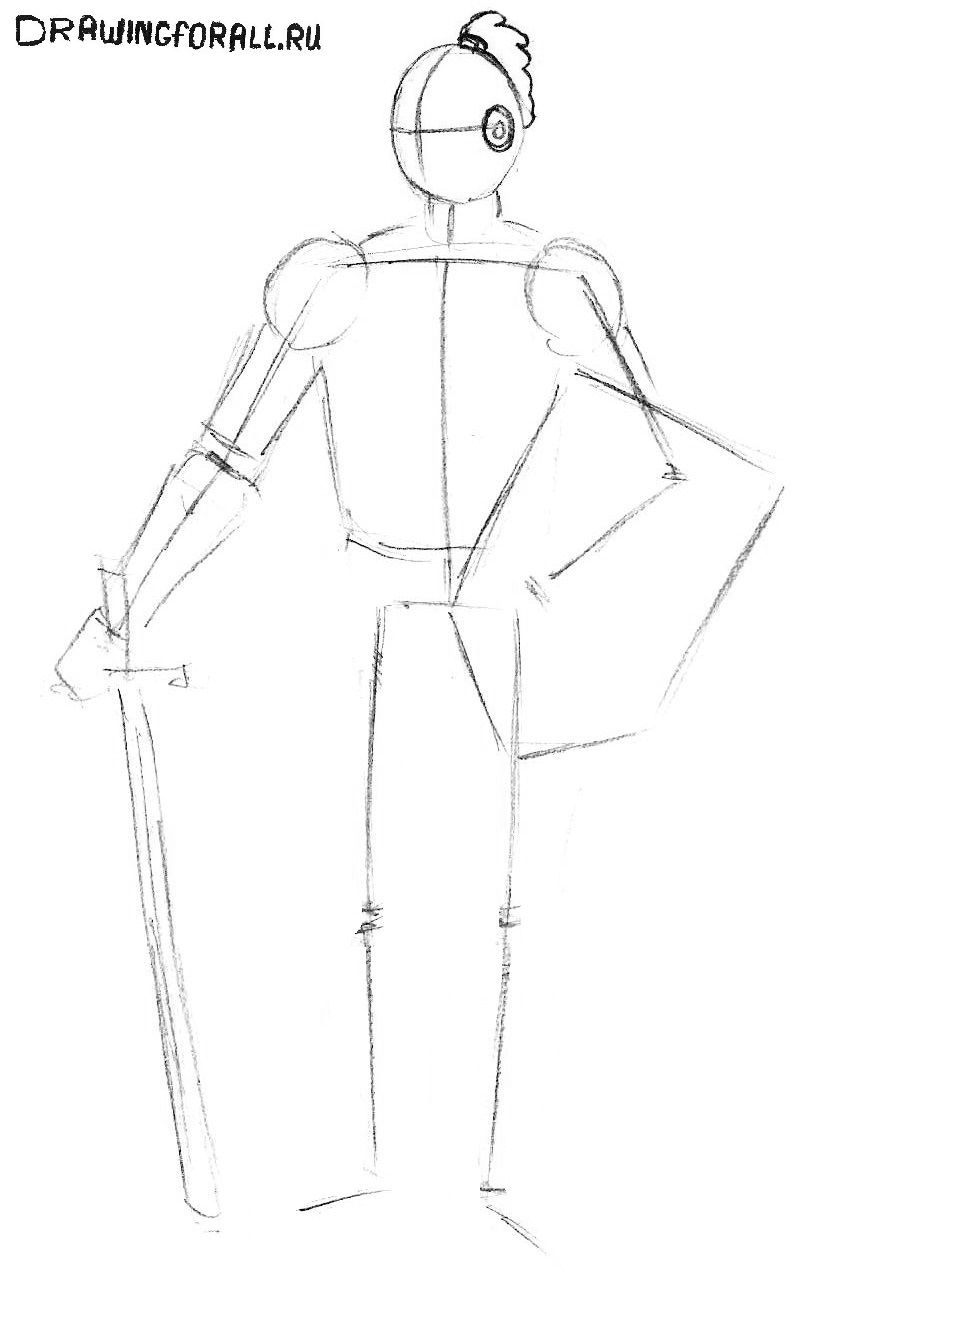
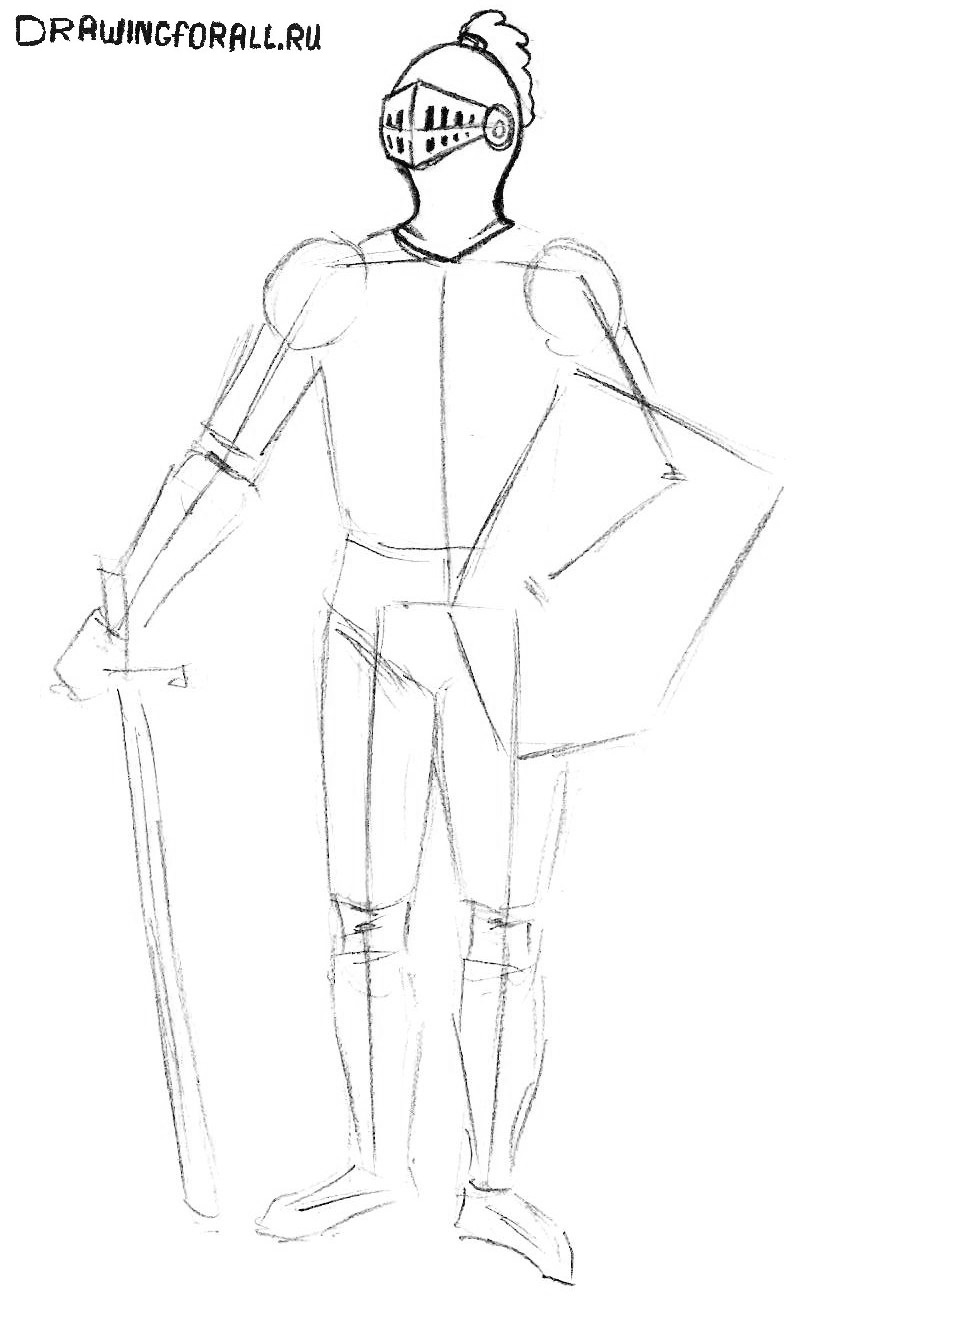
Let's add volume to the body. This will not be difficult at all, because we will not have to draw any anatomical details - the knight is clad in iron from head to toe, a kind of era. Draw the balls of the shoulders, and also outline the torso and use rectangles to indicate the parts of the arm.
Step 4
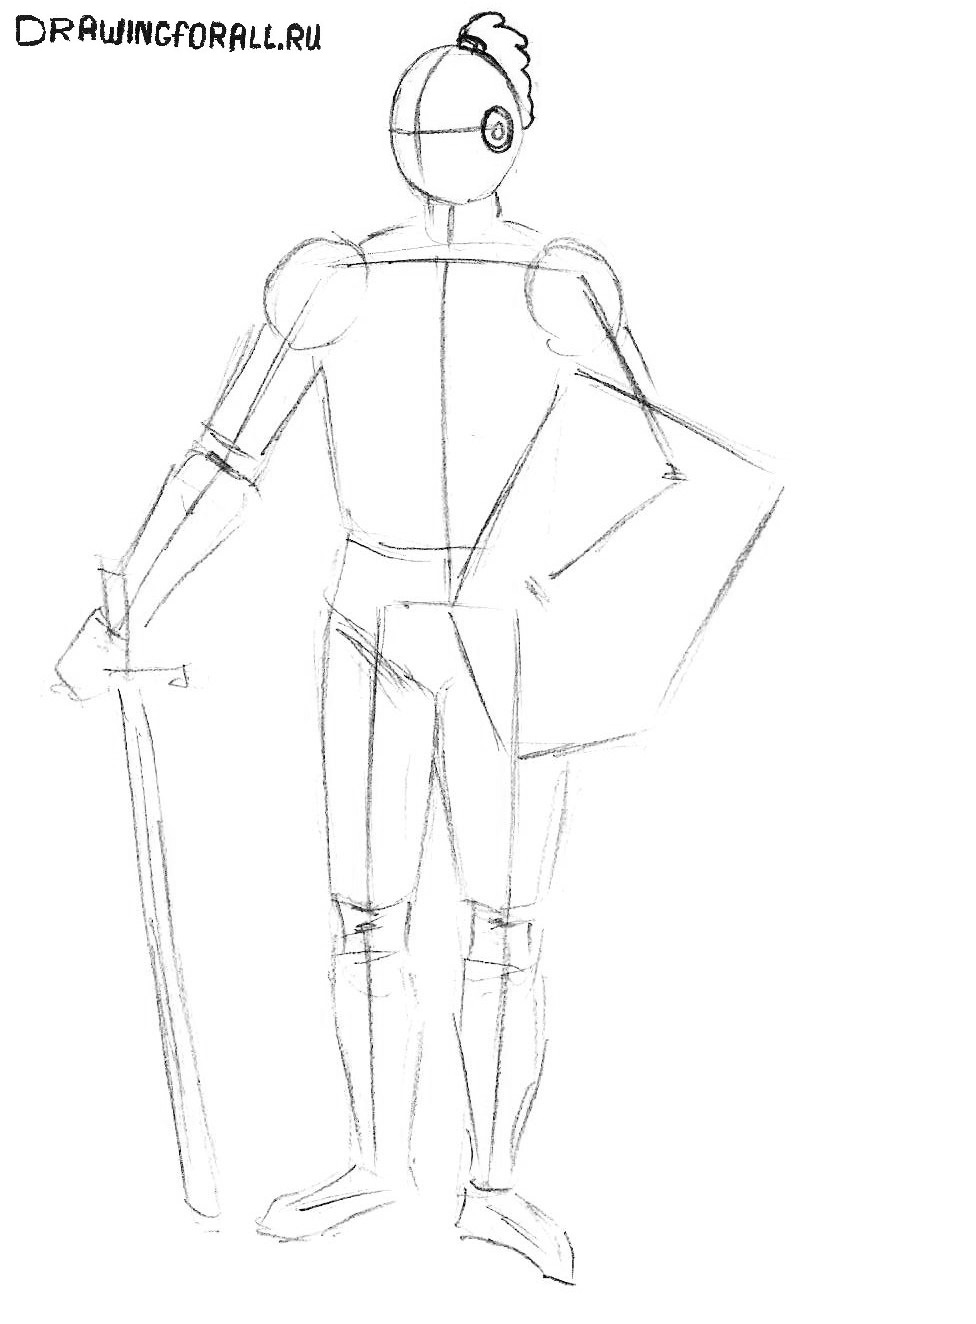
Now let's repeat the same action, but with the lower part of our knight. Mark the belt and groin area with a triangle, and give the legs the shape of figures consisting of long rectangles.
Step 5
The silhouette is ready, let's start detailing. We will do this as always, starting from the head and going down to the feet. Using the markings from the second step, draw a visor, then erase all the extra guide lines from the previous steps, outline the helmet and draw two strokes in the throat area. Traditional close-up:
And now - general:
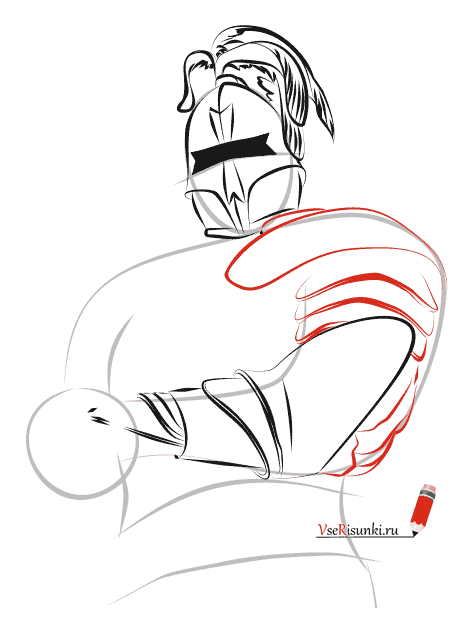
Step 6
Let's erase the extra guide lines from the area of the collarbone and shoulders, and also outline them. Mark the edge at the bottom of the armor that covers the shoulders. Also pay attention to the shoulder to our right - the lower edge of the armor seems to fit the arm, so the shoulder pad needs to be given the same slight bend as in our example.
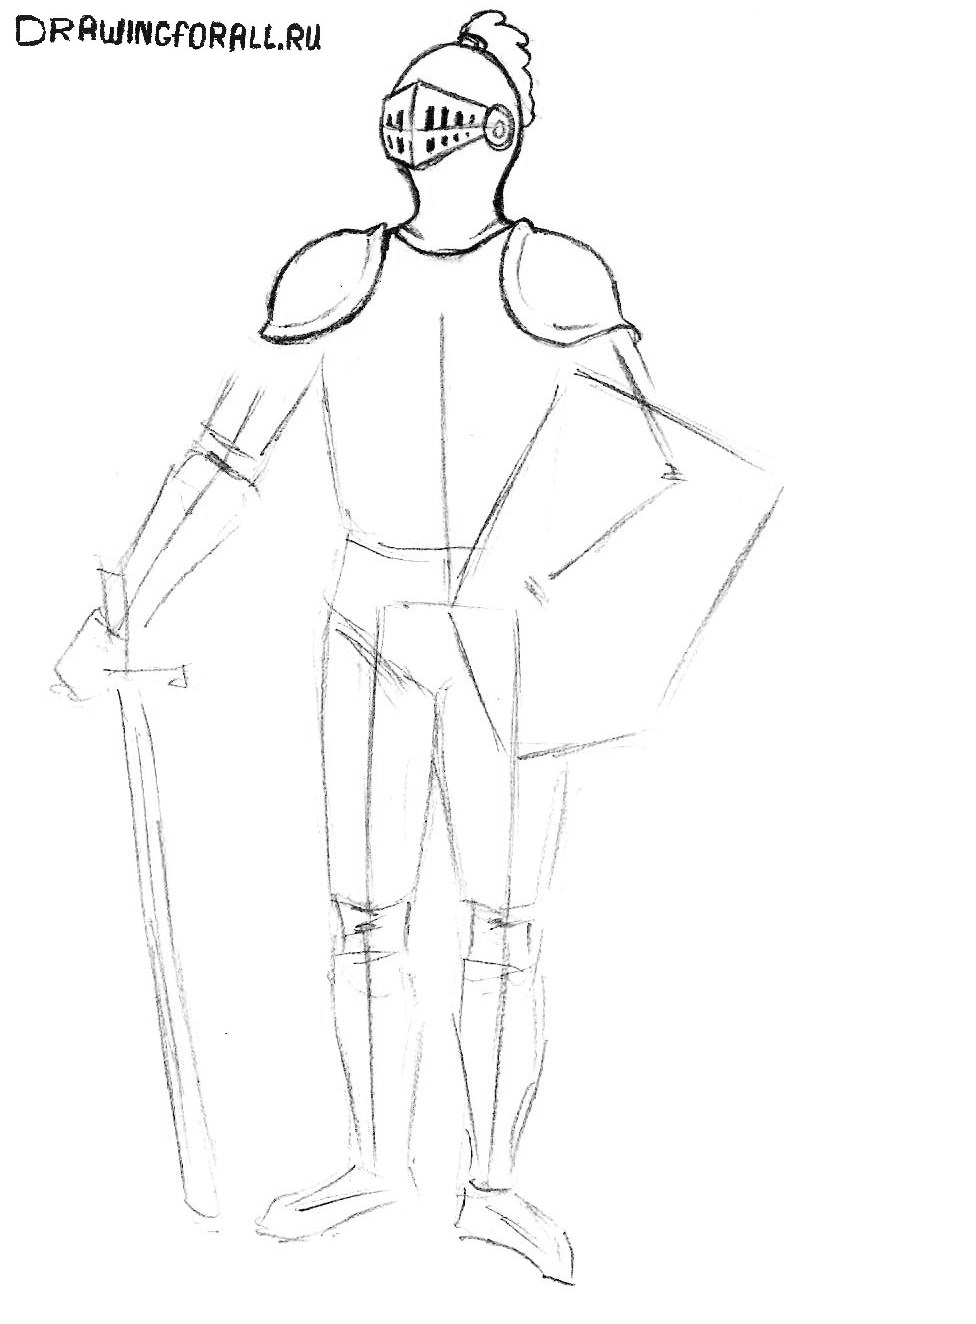
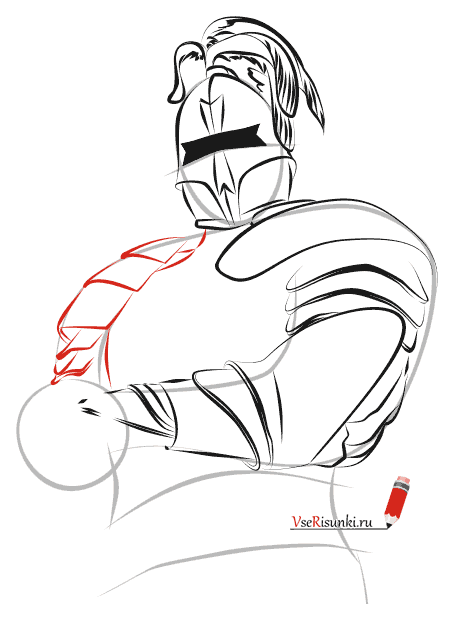
Step 7
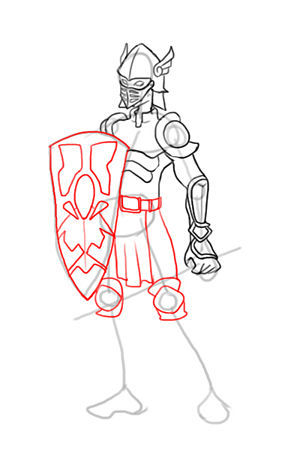
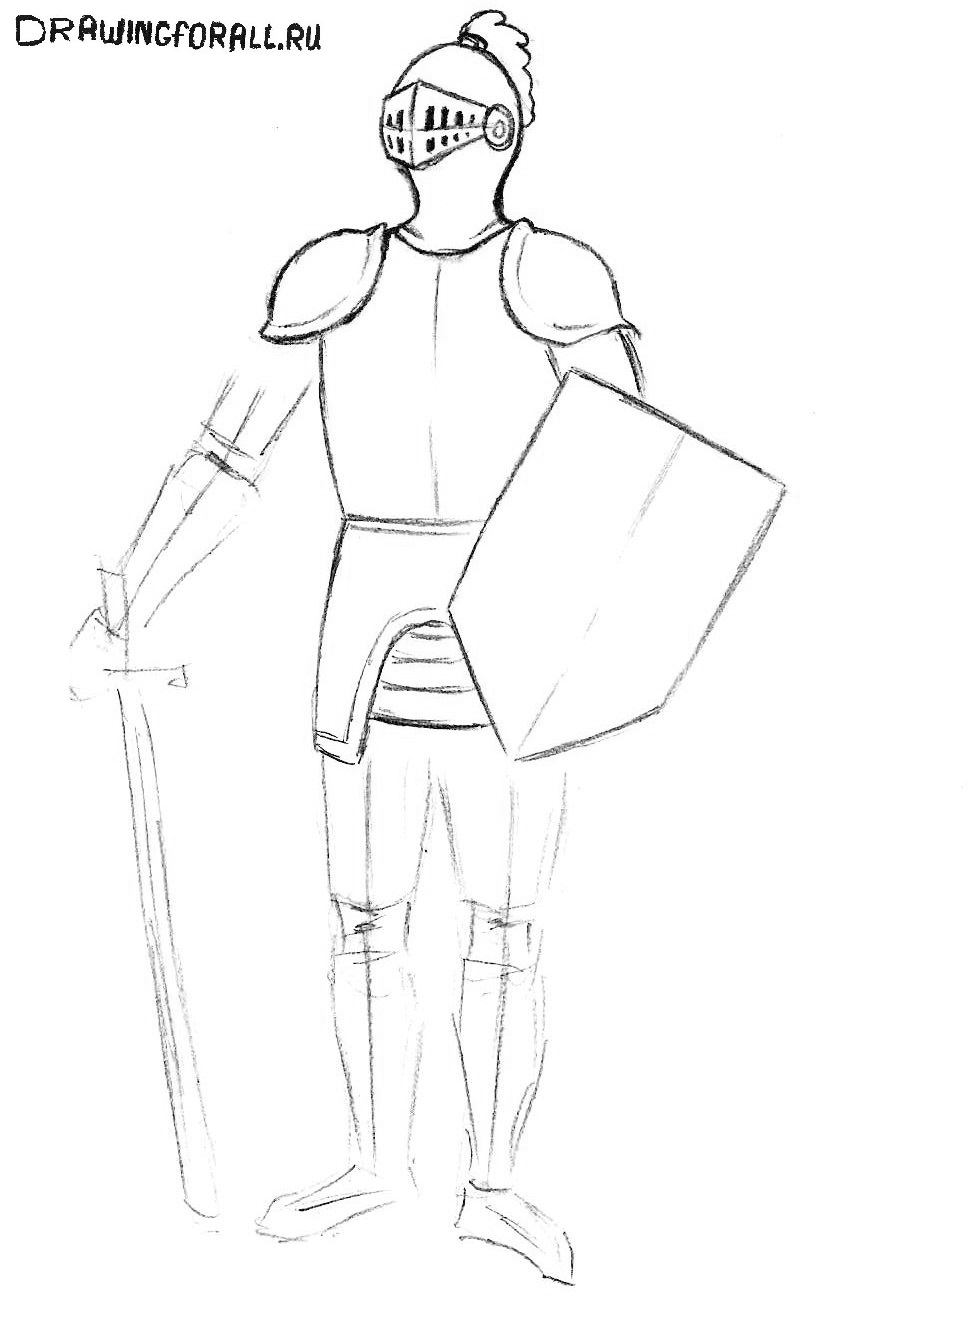
Now let's outline the body, dressed in plate armor(by the way, the part of the armor that protects the torso from the front is called the “breastplate”). So, let's erase the extra lines from the bib, draw a vertical line, which should be slightly curved.
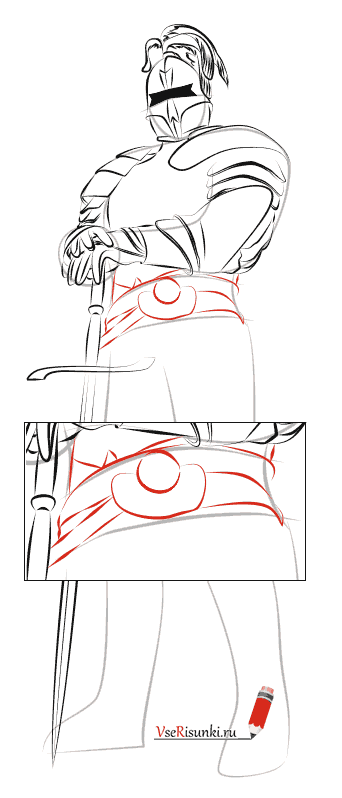
In this step we will draw a metal protective skirt, which is shaped like a horseshoe and mark a border on its edges. In the middle of this element of armor we draw four horizontal stripes - they should be slightly curved and positioned relative to the skirt in the same way as in our sample.

Step 8
A very short step, here we will work on a small part of the shoulder, which is located between the shield and the shoulder pad (we are, of course, talking about the right hand from you and me), as well as on the shield itself. Actually, let's erase the guide lines from specified areas, and edge them with confident, noticeable lines. Yes, we almost forgot - mark the middle of the shield with a light, barely visible vertical line.
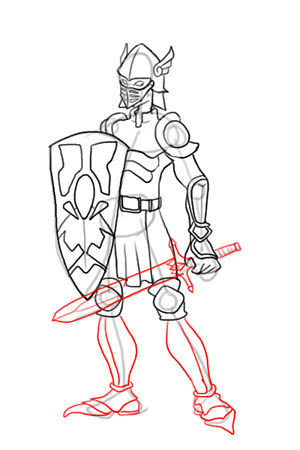
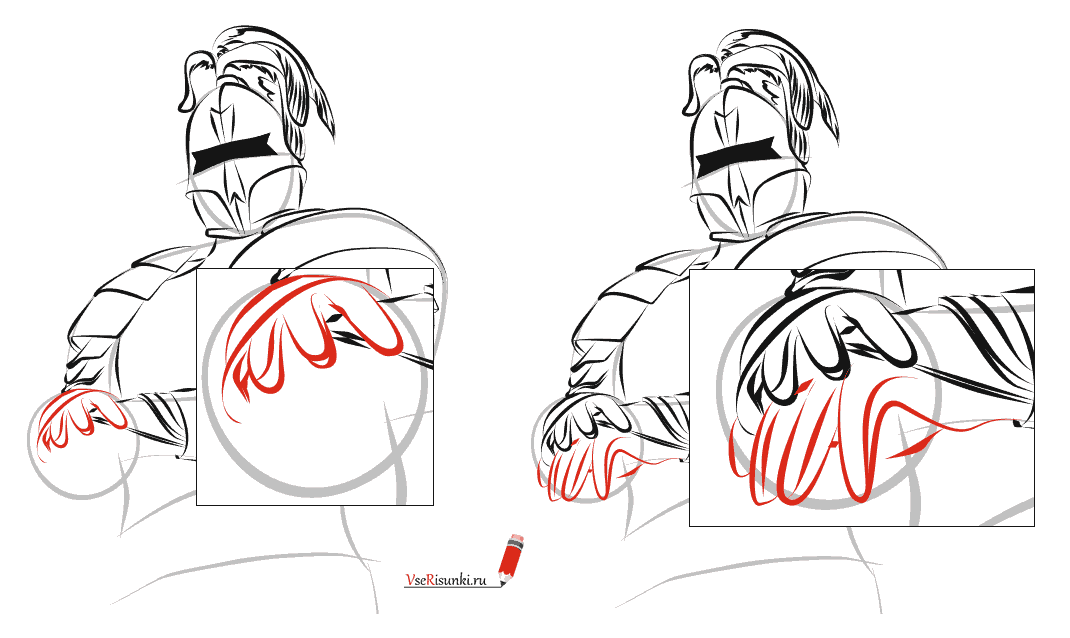
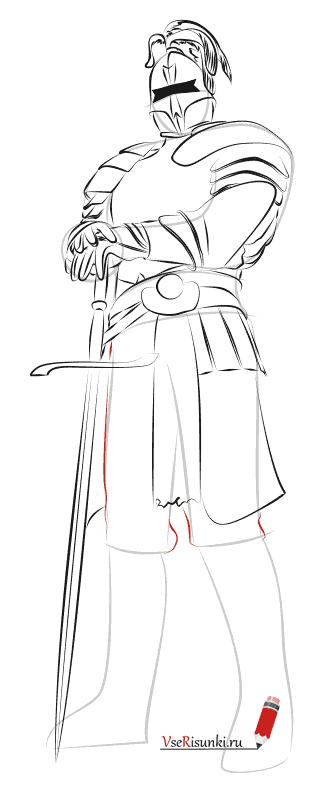
Step 9
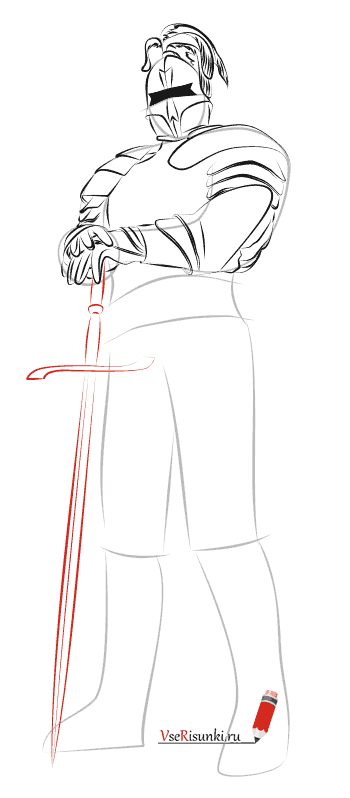
It's time to work on our left hand. Using the previously outlined lines, draw the area of the elbow bend, then draw a glove and a wide stripe in the biceps area. The sword deserves special attention - the handle, like the blade, should be straight and even parallel lines. Hands are traditionally considered a difficult part of drawing, so in our lessons they often deserve close-ups- and this one will be no exception.
Although here, of course, everything is quite simple, the main thing is not to confuse the sizes of the phalanges and position them correctly thumb. Focus on the hilt of the sword and check the location of your fingers relative to it. And now - the general plan:
Step 10
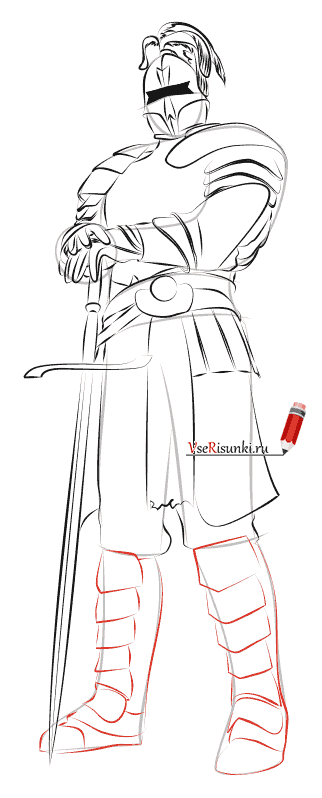
Great, we're already at the finish line. In this stage, we will put the knight’s right leg in order - we will draw a knee in the form of a diamond in a specially marked place, then we will erase the extra lines from the previous stages, outline the leg and draw several horizontal stripes on the foot.

Step 11
The final step is to draw the second leg - everything is completely analogous to the previous step. After drawing the legs, draw the last detail - the spurs.
In this lesson we told you about how to draw a knight step by step, the article was drawn and written for you by members of the Drawingforall team. Visit our website often for new cool tutorials, it will be interesting!
Already drawn +3 I want to draw +3 Thanks, great lesson +43
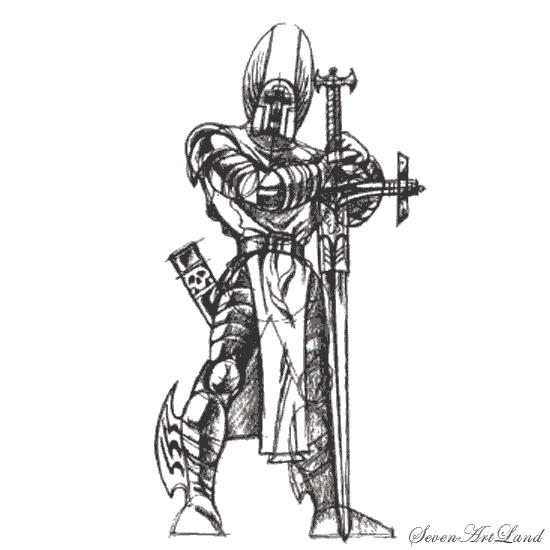
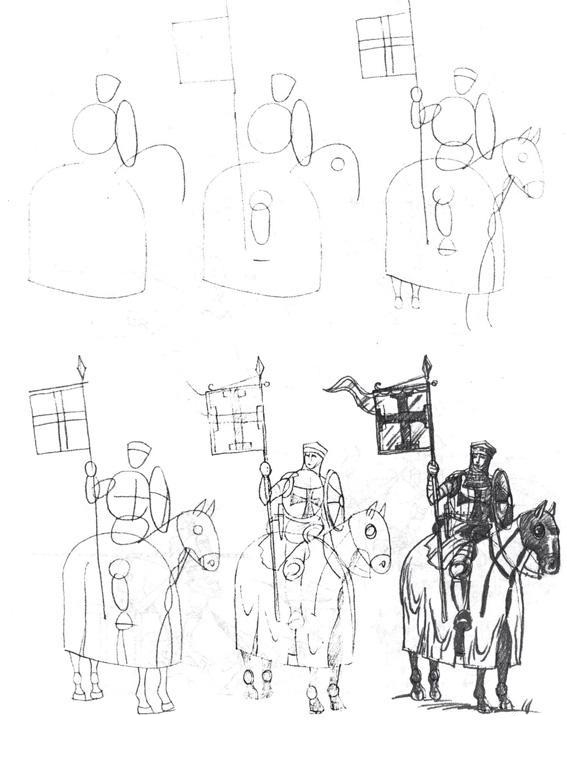
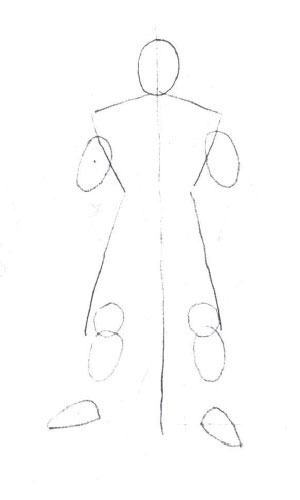
Step 1.
Draw a vertical line - the axis of the crusader's sword. We use two ovals to depict the helmet and the upper part of the body.Step 2.
We draw the center line of the helmet. We use an arc to depict the upper part of the knight’s legs. On center line of the sword we draw a horizontal line on which its hilt will be built. On the vertical we make serifs at the bottom and top, and on the horizontal on the right.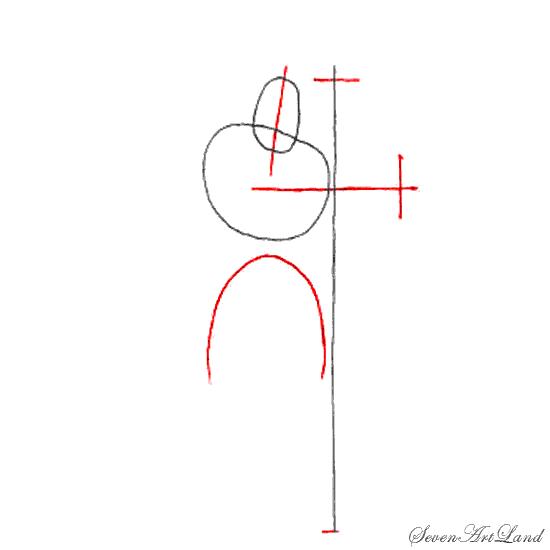
Step 3.
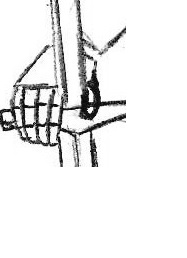
Using a horizontal line we divide the helmet into two parts. We draw the knight's hands, the right hand is drawn with one oval, the left one is built using an arc representing the shoulder and two ovals. We draw the knight’s waist and outline the lower part of the body with an arc. We depict the knees of the crusader with two ovals. Draw the shin part with an arc right leg, depict the soles of the feet. We make a horizontal notch on the knight's sword.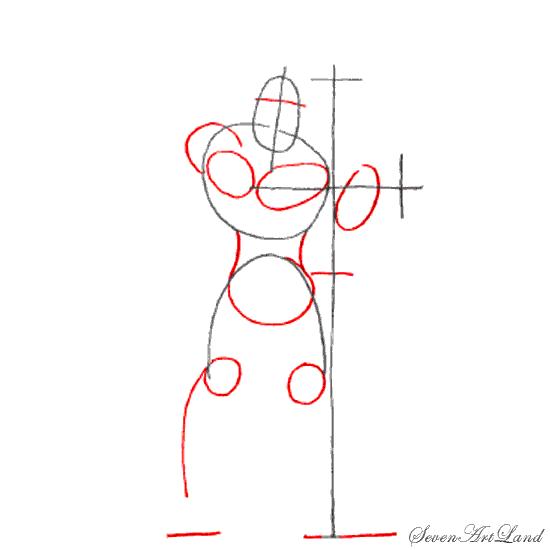
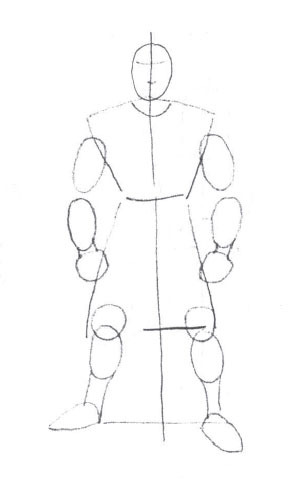
Step 4.
We finish drawing the helmet, depicting two verticals coming out of its upper part, and using an arc to emphasize its lower part. We build a sword, depict its handle and blade, which gradually converges to the bottom. We finish drawing the knight’s legs: we draw the thigh parts with several arcs, then we draw the shin parts with ovals and arcs, and finally we finish drawing the feet. Using several vertical and horizontal lines we show the folds of clothing covering the legs.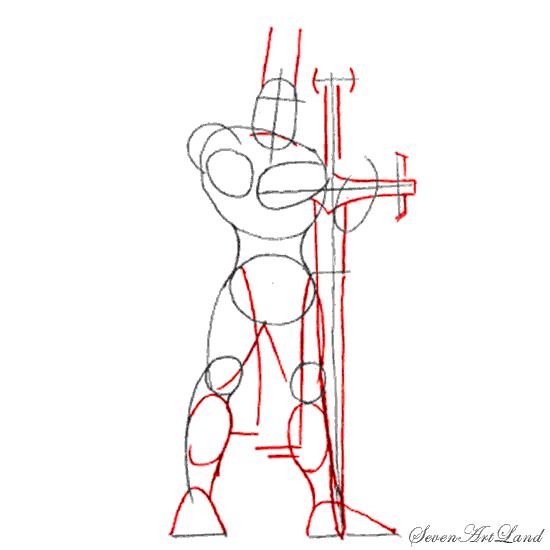
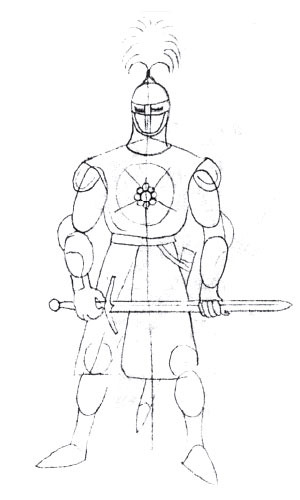
Step 5.
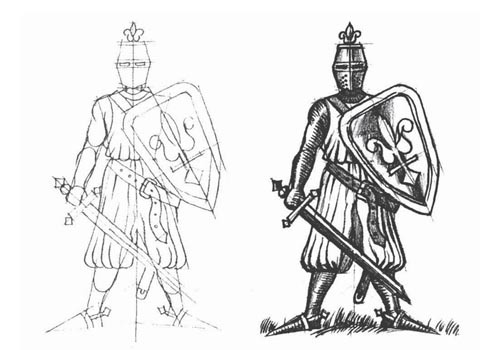
We finish drawing the crusader’s helmet and draw wings on both sides of it. In the helmet itself we make a cross-shaped cutout. Detailed drawing of the armor on the hands, showing their relief with several arcs, and drawing iron gloves on the hands. Minor improvements appearance sword, the shape of its hilt and blade. On the waist, draw a belt that creates folds in the clothing. We depict the armor on the legs, we also use several lines to show their shape on the thigh parts, we finalize the knee protection, and we draw protruding sharp blades on the sides. Behind the knight's back we depict a sheath for a sword. Finally, we show the folds on the clothes.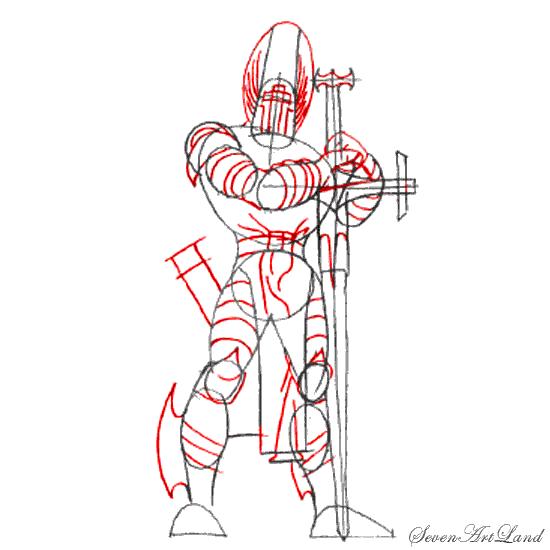
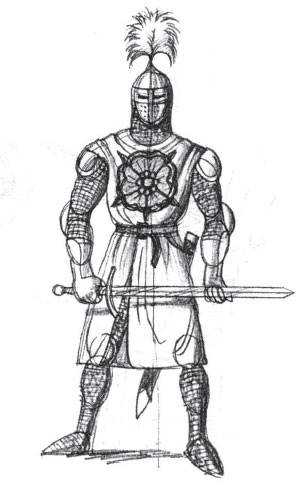
Step 6.
A more detailed drawing of all elements from head to toe, including a helmet, armor on the arms and legs, clothing on the knight’s body, a sword, its hilt and blade, and a sheath for the sword. We identify the dark, shaded parts and shade them, depicting folds on the clothes. Leaving white areas on the armor can create a feeling of shine. The scabbard of the sword can be decorated with ornaments in the form of a skull. Here everything depends on you and your imagination.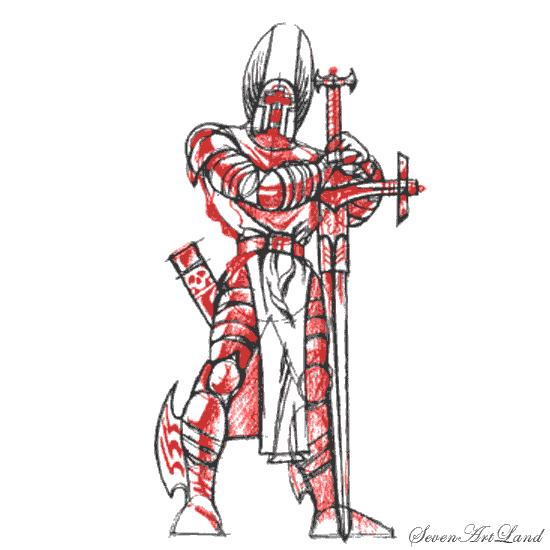
Step 7
On at this stage lesson completed. You can leave a pencil sketch or add color to the drawing. We wish you creative success!