How to transfer an application and other data to a new Android smartphone? Big “move”: how to transfer your data from iOS to Android (and vice versa)
One of the first questions that arises is how to transfer contacts from Android to Android, because manually transferring all the numbers from one Android device to another takes too long, especially if you have a lot of contacts in your phone book.
Below we will talk about several ways that will help resolve this issue in a matter of minutes.
Using a SIM card or flash drive (SD card)
If phone numbers are not stored in the SIM card memory, then we must first copy them to it. To do this, go to “ Contacts» (“Phone book”) and open the section settings (on different smartphone models this can be a virtual button at the bottom of the display or three vertical dots or lines at the top of the screen). In the settings menu that opens, click “ Import Export", then select the item from where you want to copy the contacts.
If the contacts are saved in the phone memory, click " Import from internal memory", and then select " Export to SIM card"(i.e. the point where we will copy):

If the contact numbers were saved in different places, for example, not only in the device’s memory, but also on the SD card, then we first copy the data from the smartphone, and then in the same way from the SD, and then export it to the SIM card.
After selecting the storage location, a list of contacts will open, from which you will be able to save the ones you really need, then press the button “ OK"and this completes the transfer procedure. Now we move the SIM card into the new gadget and, if desired, transfer the data to the internal memory of the new phone in the same way or activate the display of contacts saved in the SIM card in the phone book. What you need to do for this: go to “ Contacts", open the settings (see above), click the contact filter and select the item " SIM card»:

To transfer contacts from one Android to another using an SD card, we perform the same steps, only instead of a SIM card we select a flash drive (SD).
Through synchronization with Google account
Most owners of Android devices have a Google account. This is necessary for downloading applications in the Play Store, but not only. Having a Google account, you can set up synchronization and save not only your contacts, but also other important data - various media files, messages, etc. This is very convenient if you need to restore important information if your phone is lost or broken.
To activate synchronization, go to the main settings of your smartphone, in the “ Personal data"find the item " Accounts", click and select your Google account, go in, and in the list that opens, mark the data to be synchronized, after which the selected information will be synchronized automatically and saved in your personal mailbox:

If synchronization has not been configured, then we will need to copy our contacts to the account. This is done in exactly the same way as copying from a SIM card: “ Notebook", Further " settings", then " import Export", select the source from where we will copy the contacts, and then click on the line with your account.
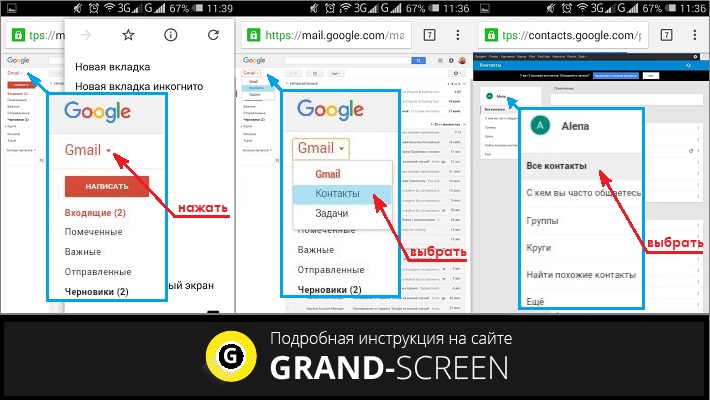
Now, to transfer saved telephone numbers on new smartphone Android, open the browser from it, turn it on full version and go to the site mail.google.com, click on the inscription in the upper left corner of the display Gmail and in the list that opens select “ Contacts", and then " All contacts»:
The pop-up window will display full list numbers in the phone book. Select " All contacts"(or maybe "Select all") and click the line " More».
Now select " Export", and in the window that opens we indicate Google CSV(where CSV is the file format in which the contact list will be located). After this, all contacts will be saved on the device from which you logged into your account, in this case on a new smartphone.
If for some reason you were unable to log into your Google account from your new phone, then, and then.
*Note: if your smartphone model allows USB debugging to be enabled to transfer contacts using this method, do not forget to enable this option first:

There is another way in which your contacts will always be at hand on any device from which you can create an account with Google. To do this, after synchronization, all phone numbers must be saved in your Google account. For example, when creating a new contact, when the system asks where to save it, from three options - phone memory, SIM card memory or Google contacts, select the latter, and then you just need to log in to the new device and all contacts will automatically go to it:

Export contacts from Android to Android via Bluetooth
To use this method, all contacts must be in the phone's internal memory. If some of them are on the SIM card or on external media, then they need to be copied to the smartphone using the method described above.
We connect both Android devices and establish a Bluetooth connection on them: select in the settings and turn on the “Visibility to other devices” option. Then, on the old phone, through the Bluetooth settings, we find a new Android device.
In both gadgets (if necessary), we enter a single password, which should confirm that we are connecting via Bluetooth. Now we activate the “Transfer” option and wait for the process to complete.
Watch the video for more details:
Exporting contacts using third-party software
If for some reason you were unable to use the described methods or simply do not want to synchronize your contacts, you can use special applications that easily solve such problems.
For example, application MCBackup - My Contacts Backup will make a quick backup of the necessary information and send the file in the format .vcf to your email. It will be enough just to go to mail client from the new device and open this file:

Another application - SM Backup - Secure Cloud will backup all your data (SMS messages, photos, calendar, etc.), including your phone book, and provide 5 GB of free space in cloud storage with the ability to restore it on the desired device:

With this, we believe that the question of how to transfer contacts from Android to another Android device is closed. There are plenty of ways to solve the problem, choose any one that is convenient for you. Good luck!
The article describes ways in which you can transfer data from one computer to another with a guarantee of data safety and without much effort. Transferring files, settings and programs to a new computer can be difficult and intimidating for the user, especially if he does not know how to do it correctly and where to start.
Often it all comes down to the user copying the most necessary and important data from the old PC to an external storage device, and then copying it to HDD new computer. This method also exists, but it is associated with the risk of data loss during the process and/or as a result of information transfer. What about applications and settings? operating system?
In fact, there are several ways that will help you transfer data from one computer to another with better quality and with less effort, and, very importantly, with a guarantee of safety.
Content:Data Migration Tools
There are many utilities for transferring data, settings and programs to a new computer. To use them, you just need to install such a program on both computers and use them to transfer your files, applications and settings.
A tool with this functionality is provided free of charge and by Microsoft is Windows Easy Transfer. And although, starting with Windows 10, it is no longer available as a built-in utility in the operating system, Microsoft offers to use another third party application– PCmover Express.
The principle of operation of the program is as follows: connect an external storage device to your computer and launch the application; transfer your data from your computer to an external drive and then connect it to another PC to which you need to transfer the data; run this application on a new computer and transfer data from external media to this computer.
Backup and restore files
The system's built-in File Backup and Restore tool also allows you to transfer files and system settings to another computer.
![]()
Using this tool you can create a system image. This will be a complete image of the operating system, including system files, installed programs and personal files. It is enough to simply deploy the system image that was created from the old computer on a new computer.
Just copy the files
Also, do not forget about the possibility of copying files manually, this way you can transfer personal files from computer to computer. To do this, connect an external storage medium of sufficient capacity to your computer (for example, an external hard drive) and copy all the files that need to be transferred to it. After this, connect this disk to a new computer and transfer the necessary files.
If all your files on your computer are well organized and you know their location on your hard drive, then you will not have any difficulties implementing this method.

This way, you will be able to transfer files, but not settings. If you also need to transfer browser bookmarks, you will need to export/import them using the functions of the browser itself. All modern browsers also have synchronization functions, with which you can import all settings.
Cloud storage
Services cloud storage can store user data, settings and other data, and do a good job of it. To do this, just install the service client on your computer and configure data saving with its help. On another computer, it will be enough to install the same client and log into the account you created earlier, and you will have access to all the data saved in it.
Such services on this moment many, the most popular of which are Dropbox and Google Drive, as well as Microsoft OneDrive integrated into Windows. You can use any one convenient for you.

If your computer crashes
If the transition to a new computer is due to the inoperability of the old one, then the user’s personal data can also be transferred from it.
To do this, connect the hard drive of the old computer to the new one and check how it is detected by the operating system (it all depends on the reasons for the failure of the old PC). If it is recognized by the computer as another hard drive and all files are available for use on it, then it is enough to carry out the actions described in paragraph "Just copy the files". You can only copy them directly to the hard drive of your new computer.
If files hard drive from the old computer are not displayed, then you can restore them using the hard drive data recovery program - Hetman Partition Recovery. To do this, launch it and scan your hard drive. Save all files detected by the program to a new computer hard drive.

Switching to a new computer should not be difficult for the user. Some tools even provide the ability to transfer installed programs and applications. But the most important factor in data transfer is the user's personal files, which should not be damaged or lost during the process or as a result of the data transfer. The methods described above should help the user avoid such unpleasant consequences.
Sooner or later, you need to replace your old Android smartphone with a new one. But before you send the device to the shelf or find another use for the phone, you need to transfer the accumulated information to a new device. In this article you will learn how to transfer data from Android to Android in the most convenient and affordable way.
Methods for transferring information from an Android phone
Since the replacement of smartphones among users is a frequent occurrence, a lot of ways to transfer information have appeared, conditionally divided into three categories:
- Standard tools.
- Third party services.
- Manual transfer.
The first category includes built-in tools implemented by the operating system or user interface developer. For example, the services of the owner of the Android OS, Google, are pre-installed on all devices that have passed certification. Or large companies, developing their own shell. For example, Xiaomi with the Mi Cloud service pre-installed in MIUI firmware.
TO third party services, include mobile and desktop programs, created by Android device manufacturers, private companies or application developers.
Manual method involves data transfer with in-depth user participation. Using tools not included in the first two categories.
Important! The methods in each category are focused on transferring a specific type of data. And the preferred method is influenced by ease of interaction, type, quantity and volume of information transferred.
How to transfer data from android to android using standard tools
The operating principle is based on automatic. In accordance with the configured settings and if the Internet is available, the data is synchronized and sent to the server for storage automatically. And since the content is tied to your account, you just need to enter your login and password on the new device to receive a copy of the content.
Automatic backup will allow you to transfer data and settings: phone book contacts, application installations, calendar events, passwords, browser history, etc.
Media files can only be copied to a cloud drive with a fixed capacity. If you have a lot of videos, music and other massive files on your phone, you will have to buy additional space or use other transfer methods.
Below we will look at three ways to transfer data using automatic backup.
Method 1. Transfer data from Android to Android via Google services
Important!
- To create a backup, having an account is required.
- Recovery options are affected by the device type and . File migration is not possible or only partially possible if data is being migrated from a later version of the OS to an earlier version. For example, from Android 7.1 to 4.1 or 5.0, etc.
- For multimedia files, Google Drive cloud storage is used. The basic disk capacity is 15 GB.
- Application settings are copied to the server no more than once a day. In this case you need to connect Android device to the power grid and Wi-Fi. Also, don’t use your phone for a couple of hours. If the device is inactive for 14 days, Google will delete application data after 60 days. The period is automatically extended when activity resumes.
- Backup for some applications is not supported because the developers have not enabled this option.

Instructions:
Create a Google account if you haven't already. Go to settings, open the “Accounts” section. Then choose – add a Google account. To complete registration, follow the account creation wizard and enter the required information.

Activate backup. In most devices without a modified interface, the parameter is called “Restore and reset”. Activate the option, and also familiarize yourself with the type of data that will be saved. Next, select an account.


Important! To restore the contents of the information on a new Android phone, you need to activate the “automatic recovery function”.
For multimedia files, go to Google Drive, click the “Add” button and specify the path to the files. Automatic uploading of photos and images, available in the settings section.

Method 2. Transfer data from Android to Android using Mi Cloud
Important!
- The service is available only in MIUI firmware.
- To use Mi Cloud, you must first register a Mi account.
- The basic disk capacity is 5 GB.
Instructions:
- Create a Mi account if you haven't done so before. Straight link to the registration page.
- In system settings, open the Mi account section.
- Accept the user agreement and allow access to the service.
- Enter login and password.
- Select the type of data you want to save, and then create backup copy.

Method 3. Creating a local backup on MIUI firmware
Important!
Local backup does not save multimedia files: music, videos, photos, voice recorders, etc.
Instructions:
- Open system settings.
- Select Advanced, then “Backup and Reset”.
- Then – the “Local backup” item.
- In the new window, click on the “Backup” button and select the type of data that you want to save. The “system settings” item includes: Wi-Fi network passwords, messages, call log, etc. “Applications” item – data of third-party applications.
- For convenience, set a schedule to automatically create backups.
- After some time, which is influenced by the amount of information being backed up, a folder with data will appear in memory. Path: Miui – backup – AllBackup. Transfer the folder to the cloud or to your computer so that you can later copy it to a new device.
- To restore files, you should visit the section for creating backup copies, select a backup and click on the “restore” button.

Transferring data from one Android to another Android using third-party services
Transferring information, including photos, videos and music, is carried out using a utility from a specific manufacturer: Motorola Migrate. Sony Xperia Transfer Mobile, HTC Transfer Tool, LG Mobile Switch or . Or programs written by application developers, for example – CLONEit – Batch Copy All Data.
The listed programs work on a similar principle. The user selects the data type, and then a new Android device with the same program. Next, the application creates a copy of the files and sends it to new phone.
Method 1: Transfer files using the Motorola Migrate app
- Download the app on your old and new phone.
- Launch the program and establish pairing between the two devices. Using your old device, scan the QR code on your new phone.
- Select the type of data you need to send, and then choose your preferred sending method.
- Wait until the files being transferred are finished.
Important! The Motorola Migrate utility is not supported on Android 7 and above.
Method 2. How to transfer data from Android to Android using CLONEit
- Install and then launch the apps on both phones.
- Activate Wi-Fi. On the old phone, click on the “send” button, and on the new one, “accept”.
- Wait for both Android devices to establish a connection.
- Select the files required to upload and then the appropriate button to confirm

How to transfer data from android to android manually
Manual file transfer is useful when you need to transfer a specific type of information or a selected group of files. For example, music, videos or application data. Moreover, sending directly to a new Android device, cloud storage or computer is available.
Method 1: Back up applications using Titanium Backup
The program allows you to selectively or completely create a copy installed applications, or save only the data and then restore on a new device. In this case, on both smartphones it is necessary. For details, visit our corresponding resource.
Instructions:
- Open on your old Android device.
- Click on the "Backups" tab.
- Select the application you are interested in and click the “Save” button in the new window. The backup will start automatically. For the duration of creation of the r.k. influenced by the amount of data.
- To transfer data, hold down the application item until a window with actions appears. Select "Transfer latest backup" and then the data type.
- In the next window, select the desired file transfer method: Email, cloud disk, etc.
- If you need to make multiple backups, check required applications. For a complete backup, visit the “Batch Actions” section in the menu.
- By default, backups are saved in the Titanium Backup folder on the internal drive. Move the folder to the new device, then go into the program and restore the data of the necessary programs one by one. Or, through the “Batch Actions” section, restore all applications.
Important! Some programs are sometimes restored incorrectly due to hardware and software differences between the new and old smartphone.
Method 2: Copy files to cloud storage
Cloud storage services offer 5-50 GB of free disk space. Sometimes this is enough to temporarily or permanently store some data, including photos, music or videos. To choose the optimal service, we recommend reading the relevant material below.
Instructions:
- Install your preferred cloud storage service client.
- Register an account and/or log in.
- To copy content, in the application, click the “Add” button, and then mark the necessary files.
- Install a similar client on your new phone and log in. Then go to the application and download the necessary information.
Alternative option:

Method 3. Transferring data to a computer
A convenient method of transferring data in case the old device is damaged - the screen is broken or the sensor does not respond.
Instructions:
- Connect the old cable.
- In the “USB configuration” section, select MPT.
- Wait until the removable drives are displayed. Then copy the necessary data to your computer.
- Then connect your new Android device and transfer the previously copied information.
Method 4. Transferring data to a computer via a Wi-Fi router
Instructions:
- Install the Moto File Manager app on your old phone.
- Connect your smartphone and computer to the Wi-Fi network.
- In the left hidden panel on your phone, select remote control, and then "connect".
- Enter the displayed address on your PC in the address bar of Explorer.
- Transfer content from your old smartphone to your computer.
- When finished, stop the connection on the old phone, and then connect the new device to transfer data.
Method 5: Send files using NFC
Important! Data exchange is possible provided that the old and new smartphone are equipped with a module.
Instructions:
- Open the system settings of both phones. Expand hidden sections to view additional items.
- Activate the NFC module and the Android Beam function to be able to exchange data.
- Select the files you need to transfer, such as photos. Tap the Share button and then select via NFC.
- Place the old phone against the new one. If necessary, confirm receipt of the files.
Method 6: Transfer files using Bluetooth
Instructions:
- Open the settings of both devices.
- In the Bluetooth section, turn the switch to active.
- On your old phone, prepare files to send, select and click on the “Share” button.
- In the new window, select "Bluetooth".
- On the new device, enable discovery.
- Wait on the old phone for the name of the new device to appear, and then select the device.
- If necessary, confirm receiving files on your new Android smartphone.
Method 7. Transferring files using a memory card
If your old and new smartphone support installing MicroSD cards, you just need to transfer the information to the drive and then install the card in the new device.
Important! Do not use this method if the Adoptable storage function was activated on your old phone.
Instructions:
- Insert a memory card into your old device.
- Open your file manager.
- Go to the internal memory of the device, select the necessary data and transfer it to the memory card.
- When finished, remove the memory card and install it in a new device. If necessary, use a file manager to move information from the MicroSD card to the internal partition of the phone.
Method 8. Transferring files using an OTG adapter
If your new or old device does not support installing a MicroSD card, you should use an adapter to connect the drive externally.
Instructions:
- Install MicroSD card into the card reader – Card reader, and then into the USB connector of the OTG adapter.
- Connect the assembled structure to the old phone.
- Open a file manager and transfer data to a removable drive.
- When finished, disconnect the drive and connect it to the new phone. Open the file manager and transfer the data to the internal memory.
Method 9. Use Android applications to transfer data
Another effective method information transfer – programs for data transfer. Works provided that both devices are working properly Wi-Fi modules and/or Bluetooth.
Principle of operation:
- Install one of the programs from the article “” on both devices.
- On the sending device, select the files, then click on the “Send” button or the button with the corresponding function.
- On the receiving device, click on the accept button. Or use the QR code.
- Next, specify the recipient on the sending device. In a little time, the information will be successfully copied to the new device.
Conclusion
For quick and easy transfer important information, use standard backup. This will make it easy to change the device, as well as save time on setting up and entering additional information.
If the standard method does not suit you or is not suitable, then use third-party services.
Large files: music, videos or images are best transferred to a cloud drive, to a computer or directly to a new device. Also, if you have ROOT rights, quick and convenient transfer of applications is available using the Titanium Backup utility.
(8 ratings, average: 4,00 out of 5)
Changing your smartphone to a more modern model is a great solution. The main thing is not to lose anything when “moving”, that is, to correctly copy all the basic information from one device to another. Let's figure it out. how to transfer contacts and data to a new smartphone.
How to transfer data from Android to Android
The easiest way transfer data from one Android smartphone to another - use Google account. It is most likely configured on your old smartphone - just enter the login and password for your “account” when setting up your new Android smartphone for the first time. Contacts will be copied automatically, but applications and their data will need to be reinstalled manually. They remain available in Google Play(both free and purchased) - just go to your store ( Applications->My Applications) and do it.

NFC can be used. If both devices support this contactless technology, you just need to turn it on and use the Android Beam function (look in Settings). Of course, the devices need to be kept close to each other.
Another option is to create a backup copy. Suitable if you have problems, for example, with the Internet or you have not used synchronization with Google.
- Go to Google Play, download the Google Drive application, launch it and log in (enter your Google account username and password).
- Click on the three horizontal stripes in the upper left corner and in the menu that opens, click on the gear icon in the upper right corner.
- Select Backup and leave your phone connected to Wi-Fi and charging. A backup can last several hours. However, if your photos have already been synced with Google, then in a couple of seconds you will be ready.
- Turn on your new Android smartphone, select data recovery from backup and enter your Google account login/password.
- You can continue setting up your phone and even using it, and your data will be restored in the background.

How to Transfer Data from iPhone to iPhone
The easiest way to transfer all data from one iPhone to another is through iTunes. There is also the option of creating a backup in iCloud, but if you have not expanded the storage volume for money, then 5 GB will be available there - this may not be enough, especially if you have been using a smartphone for a long time and have a lot of photos.
- Launch iTunes on your PC or Mac, click on the smartphone icon in the upper left corner. In the "Backups" section, make sure the checkbox is "This PC" instead of "iCloud" and click the "Back up now" button.
- When the backup is completed (this may take a long time), below this button the following message will appear: “Last copy:” - and then the time it was created will be indicated in the format: today at XX o'clock.
- Now take new iPhone and insert the SIM card into it. When you start, you will be asked if you want to restore your data from the backup.
- The options will include “from an iCloud copy” and “from an iTunes copy.” Select iTunes and follow the onscreen instructions. The smartphone will ask you to connect it to a computer with iTunes installed, and then on the computer itself you will need to select which copy you want to restore.

The advantage of switching to another iPhone from using iTunes is that all your programs and Accounts, as well as wallpapers and ringtones will also be transferred. Essentially, you will receive exactly the same smartphone, but in a new case. Unless the location of application shortcuts on desktops may be confused.
How to transfer data from iPhone to Android
To transfer contacts, organizer data and photos from iPhone to Android, you can use Google's backup feature.
- Download from App Store Google Drive app.
- Once it launches, you will need to enter your Google account information. If you don't already have such an account, create one using your computer by typing in the address bar accounts.google.com. In any case, this account in Android will be useful to you.
- Once you're logged into your account, open the menu by clicking on the three horizontal bars in the top left corner.
- Now, in the top right corner, find the gear image and click on it. An additional menu will appear, in which there will be a “Backup” item.
- Select what data you want to back up, connect your iPhone to Wi-Fi and power, and click the big blue “Start Backup” button at the bottom.


Once the backup is complete (this may take several hours), it's time to move on to your Android smartphone.
- Turn it on and, when the gadget asks whether to set it up as new or restore data, select the second option.
- Next, you will need to connect your smartphone to the Wi-Fi network. On the next page, select where your backup is located - “Copy of data from cloud storage” or iPhone. Enter your iPhone and then click Next.
- Now you need to enter your username and password for your Google account and accept the terms of the privacy policy. After that, continue to configure Android smartphone- data will be restored in the background.
How to Transfer Data from Android to iPhone
If your friends finally persuaded you to “change your religion”, and to their delight you decided to leave the world of Android for Apple devices, a reasonable question will arise about transferring data not just to another smartphone, but to another ecosystem. But don’t worry: with our tips you will be able to see in practice how simple and easy everything is.
- First of all, download the application from Google Play Move to iOS, which was developed by Apple itself. The program works in tandem with the iPhone, so you need to run it after you have purchased and unpacked your new iPhone.
- Launch this application on your Android smartphone and turn on your iPhone. The latter will offer to configure it as a new smartphone or restore it using data from another gadget. Select "Transfer data from Android" and click "Next".
- A six-digit code will appear on the iPhone screen, which you will need to enter into the Move To iOS program on your Android device.
- Enter the code, and the program itself will find the iPhone and begin transferring data.
 As a result, your Google account with all content (contacts, calendar data, notes) and photos will be transferred. Also on the iPhone will be installed free apps, which were also available on Android (if any).
The data from these applications, however, will not be transferred - however, the developers of some applications and games allow you to copy data through their own cloud.
What about photographs? Copy via the cloud!
 If the most important thing for you is not to lose your photos, then you should take care of synchronizing them with some cloud service. Of course, you can simply copy all the photos to your computer and then transfer them to a new smartphone, but the clouds will also save you if your phone is lost or stolen. Your photos will always be at hand.
There is one “but” here: the Apple iCloud service is available only on iOS gadgets. So if your move includes an Android smartphone as part of the chain, it won't suit you.
It is best to use the Google Photo service - 15 GB are given completely free of charge, and if you allow it to compress photos up to 16 megapixels (modern smartphones are usually no longer equipped with cameras of higher resolution), then the cloud volume will be unlimited for you. Just download and run Google app Photo, log in to your Google account and allow the application to sync photos. Connect your smartphone to Wi-Fi and wait until all the photos are uploaded.
You can also try Yandex.Disk, Dropbox or OneDrive. All of them have a photo synchronization option and various prize options for smartphone buyers. Check with the seller - perhaps as a bonus for purchasing your smartphone you are entitled to some kind of free cloud storage extension.
How to transfer data from Windows Phone/Windows 10 Mobile
 Microsoft is stopping development of smartphones and PCs on the current version of mobile Windows. It's time to move somewhere. Contacts and organizer data can be transferred to your Google account, and your photos are probably already in OneDrive - Microsoft's standard cloud service, also available on iOS and Android.
If you set up a Microsoft account on your smartphone with Windows Phone or Windows 10 Mobile and your mobile device had access to the Internet, then your data is synchronized with the Outlook web service.
Now go to contacts.google.com, click “More” in the left column and select the “Import” option from the drop-down menu. A pop-up window will appear in which you will need to select Outlook.com, and then enter your username and password for your Windows account. After this, your address book will be transferred to your Google account.
There are several ways to transfer data from Android to another Android. This can be done, for example, using a wired or wireless connection.
The easiest way is to copy all necessary information to an SD memory card and move it to another phone. This method is most suitable when you need to quickly transfer a large amount of data. This method is not suitable for daily transfer of information. How to transfer small files and data to a new phone? Wireless data transfer methods are more convenient here
Transferring data using a computer
Transfer using wireless Bluetooth connection
Bluetooth connection is one of the slowest, but it is usually present in simple models phones and smartphones.
Turn on Bluetooth on both devices. To do this, go to Settings - Bluetooth - and click on the device icon.
A picture should appear on the top panel of the smartphone indicating that Bluetooth is turned on. The icon should not only appear, but also light up bright blue.
- If Bluetooth is not turned on, click on the power icon and look at the settings. Select the “display for all devices” option. We pay attention to the visibility timeout; if necessary, we can set it to the “no timeout” position.
- We do the same on the second phone.
- To check, click “search for devices”. If everything is fine and the receiving device has appeared and is selected as the recipient, we proceed further.
- In the device file manager, mark the desired file and select the option - send via Bluetooth.
- Sometimes the sending party sets a password. In this case, the receiving phone requires confirmation of the password.
Transfer contacts
If there is a need to transfer contacts, it is best to:
- Go to the phone book, press the settings button (three vertical dots).
- Select – “export contacts”.
- Select the location where you want to save - the most optimal is “SD card”; if not, to the “internal storage”.

Transfer contacts to internal storage
- Then, using the file manager (“File commander”), transfer the contacts to the second phone in any way.
- Do the reverse operation on the second smartphone - go to the phone book, select “IMPORT CONTACTS” in the settings - select where to import from - in this case we need “LOCAL CONTACT” - click “IMPORT”.
- The smartphone finds all the contacts that you have ever created - check the box for the version you need (usually the latest one) and “OK”! All contacts have appeared again!
Transfer data using WI-FI
This is the fastest wireless way sending data. It uses a fairly fast WI-FI network, created by the transmitting or receiving smartphone itself.
Shareit

Shareit program
To transfer data via WI-FI, special programs are required. The most popular is, for example, free program Shareit from Lenovo. This program can transfer any kind of files. It is also convenient because it works on computers. It is advisable that the same version of “Shareit” be installed on both phones and computer. This will eliminate compatibility issues. Sometimes in the settings you should specify that WI-FI on all devices operate at the same frequency - either 2.4 GHz or 5 GHz.
Download the program from the manufacturer’s website or Google Play (here you need to register with Google), install it, and run it on both devices.
Select the desired file - select it - press the right mouse button - transfer the file - “Shareit” - find the device to which you want to transfer the information and send it. On the second phone, simply open the folder where the file was downloaded.
You can find out which folder the information is sent to by going to settings. There you can also find out the name and password of the WI-FI created by the sending device. Connection is possible using a barcode and without a password.
CLONEit

CLONEit program
This is a program from the same company, but with slightly different functions. It is used if you need to transfer such specific groups of files as SMS and MMS, call log, calendar, programs themselves and program data, system settings, accounts and passwords to WI-FI, E-mail, bookmarks to Chrome browser, that is, what relates directly to the operating system and installed applications. CLONEit also allows you to backup your entire system.
To work, install the application on both smartphones, on one indicate that it is an information transmitter, on the other indicate that it is a receiver. Next, all that remains is to select the type of information and press the button called “CLONEit”!
MOBILedit

MOBILedit program
This program, the creators of which have been working since 1996. The program is paid, but there is a free version with reduced capabilities for review.
In addition to data transfer, MOBILedit can control a smartphone and has a lot of other interesting features:
- Send SMS.
- Dial the subscriber's number.
- Play games installed on your smartphone from your computer.
- Find and remove duplicate contacts.
- Convert numbers to international format.
- Recover erased information.
- Produce SIM cards.
Data transfer via cloud
Cloud data transfer involves transferring data from phone to phone using data storage services on the Internet.
Google Drive

Google drive
This application includes Google Photos, Google contacts and others. The service allows you to store any photos in compressed form with loss of quality, in unlimited size, completely free of charge. You can open and edit these photos from any device, anywhere.
It also allows you to work with files saved in the cloud by several users. They can both save and edit data at the same time. Synchronization of contacts, settings and all other contents of the phone is provided.
Google Photos
Allows you to save photos and videos, both uncompressed and compressed. In the program settings, you can specify that photos are stored in a compressed format with loss of quality. In this case, Google does not limit the storage size. If the photo resolution is greater than 16 megapixels, it will be reduced to this size. The video size will be reduced to 1080p.
Now there are many other “cloud” information storage systems, for example, Dropbox, Google Drive, One Drive, iCloud or MOBILedit Cloud, and almost all of them have free volume. Some provide 15 gigabytes, others may have 25. Thus, it is not even necessary to buy additional memory for a smartphone or computer - it is enough to have the Internet without traffic restrictions. At any time, you can transfer information from phone to phone, even if you are in another part of the world.
Google Photos makes it possible to synchronize your photos with those that are already uploaded to the Internet. The main thing you need to know is that sending photos over the Internet to the cloud will continue automatically, even if you delete the Google Photos app from your phone. This means that you should definitely disable this function in the settings " Autoloads and synchronization."
Transfer data using a cord

Data transfer via cord
If WI-FI or Bluetooth do not work for one reason or another, you can connect your smartphone to a computer and transfer using a special wire. This method of data transfer is faster than wireless. To do this, just connect your phone and computer with a cord, and the name of your phone and all its contents will appear in “My Computer”.
For Windows, Windows 7 or higher must be installed. For operating room Windows systems XP must first install special programs that are usually provided by the device manufacturer. For example, for Samsung it is Kies, for Nokia it is Ovi, for Sony it is PC (Xperia) Companion.
There are many ways to transfer information. Choose the ones that are most convenient for you.