Download prog ultraiso in Russian. How to create an ISO image from files and folders. ISO image creation software - UltraISO
- an easy-to-use program, available to users of any level. When installing the distribution, you are prompted to immediately create a virtual drive. To create a virtual copy of the disc you like, just install it in the drive, run the program and select the "Tools" menu, and in it - "Create CD Image". To burn an image, it is enough to select in the same menu: "Burn CD image". After executing the "Mount to virtual drive" command, the contents of the disk are displayed in the created virtual media of the computer as if a real disk were inserted into a physical drive. A bootable flash drive is created by transferring a virtual disk image to the appropriate media. The program also allows you to isolate the files of the boot area of the disk, save them and transfer them to another medium. By adding the necessary data to the boot area, you can create your own original disc and burn it to a disc.
Advantages and disadvantages of UltraISO
Accessibility for users of various levels;
+ ease of creating, editing and recording images;
+ the ability to create bootable OS media;
+ support for a large number of image file formats;
+ editing images;
+ Creation of original startup disks;
- paid.
Key Features
- creating virtual images of flash drives, CDs and DVDs, floppy disks, hard drives;
- editing images by adding or removing files;
- creating virtual drives;
- mounting images to a virtual drive;
- writing images to physical media;
- creation of installation disks and USB-drives with OS distributions and programs for PC maintenance;
- support for over 30 image file formats.
*Attention! When downloading the standard installer, you will need a pre-installed archiver, you can
With the help of special programs. Creating a virtual image is a very important moment when you do not have a CD / DVD burner, with the help of such images, in order to play some game, you do not need to have a disk, we will create an emulation using the program, then mount it to the drive.
Today there are a huge number of programs for creating an ISO image, many of them are good and bad, but we will analyze, of course, workable and popular programs. Some of them are free and may not be inferior to paid versions, let's now see what programs we are talking about.
ISO Disk Image Creator - CDBurnerXP
The CDBurnerXP utility is very powerful and works with almost any image. With it, you can both write and overwrite data, as well as erase them. The product is free, so there are no restrictions. CDBurnerXP will easily create a virtual disk that has an ISO extension. Works on all Windows operating systems. What do you need to create a disk image?
- Download CDBurnerXP here this link. The site is official, there is no need to be afraid of viruses. When installing, carefully follow any buttons. One of them "More Options", there you can disable the installation of additional software, such as Amigo, or Yandex Browser. It is better to choose a portable version.
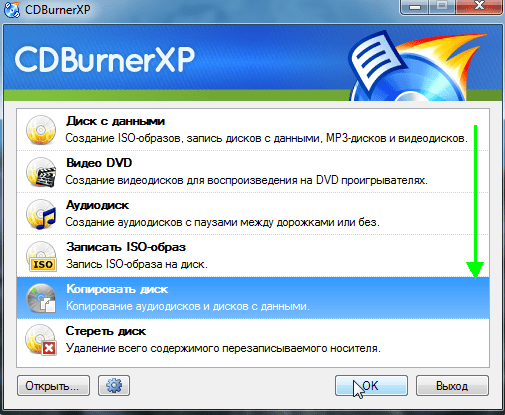
- Now that you have installed the program, launch it. In the window that opens, you will see many options. To create an ISO, you need to select the item "Creating ISO Images, Burning Data Discs...". If you want to create an image from a disk, then select "Copy disk".
- So, a window will open in which you select any files to create an image.
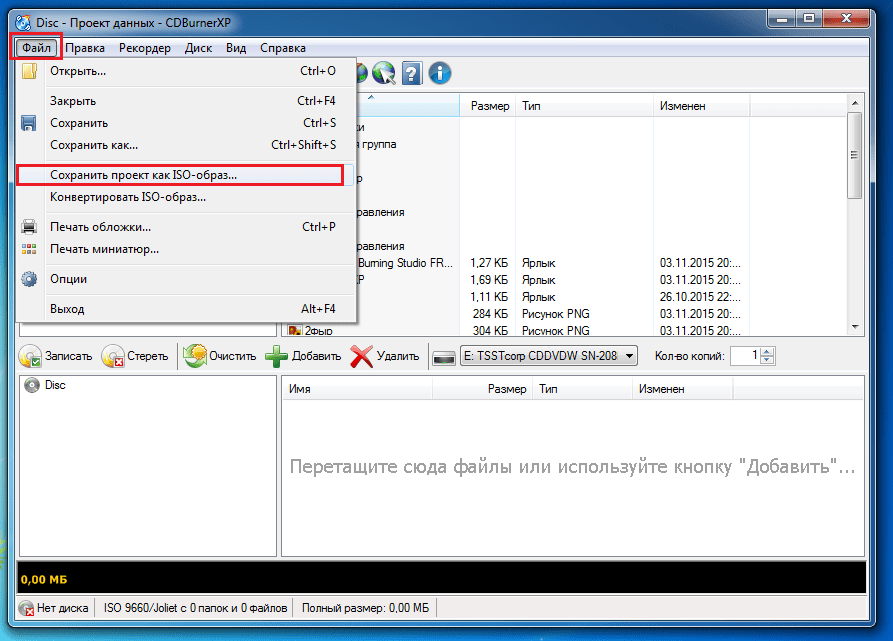
- After selecting the files, we need to save our virtual image. To do this, click on the "File" button and select the item "Save Project as ISO Image".
Creating an ISO disk image with ImgBurn
The next program on our list is ImgBurn. Her interface is very clear, so you can figure out what and how without my help, but just in case, I will write everything down. To begin with, I want to say that the installation file also carries the installation of unwanted software, therefore, when installing, follow all sorts of checkboxes and items. Here is the official site where you can download this program.

So, the ImgBurn utility is, of course, functional and has a simple interface. When you first install and run the program, you will see the interface in English, but you can change it to Russian in the settings. True, for this you need to first download the crack from the official site, and then upload the file to the Language folder.
It doesn't take much to create a virtual image. You just need to click on one of the provided icons in the main program window, add the necessary files and save the image.
ISO image creation software - UltraISO
I do not want such a wonderful program as UltraISO to be in last place. Yes, it is paid, but powerful, it works with all kinds of images, a large number of files, it can create virtual disks and write data to real optical disks.

The demo version of the program allows you to burn an image of 300 MB. Not very much. You can download it from this site. If you need a full version to record large files, you will either have to purchase or find "Activation" on the Internet. Not fair, but you can try.
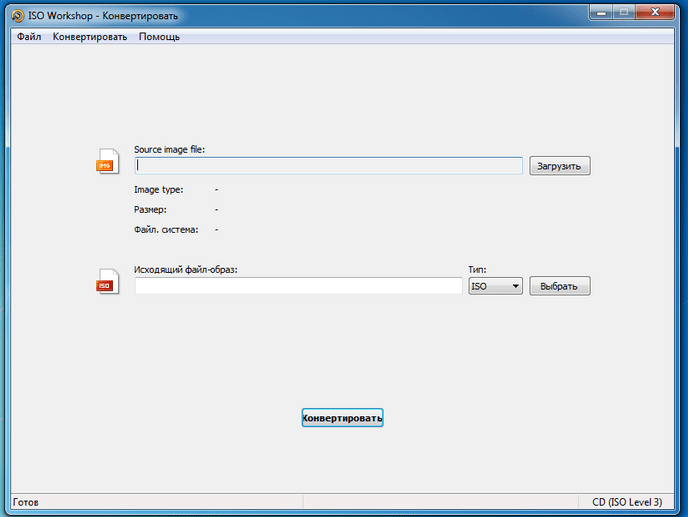
Creating an ISO image using ISO Workshop
Here is another program for creating virtual images - ISO Workshop. The interface is very simple, nothing more. The program, in addition to the ISO format, can also work with .CUE. This is a format that works with album images.

The program can both burn images and extract them, as well as check disks for errors. Here is the official website of the program, download and use.
Ashampoo Burning Studio
And the last program on our list is Ashampoo Burning Studio. The program is free and has a nice interface. In addition to the ISO format, it supports many others. Works with almost any disc. If you decide to use this utility, then you can use it to write data to various disks, overwrite several times, copy disks. You can download the program from the official website. Have you noticed that I mostly only give official sources? Some unscrupulous people try to shove their products or give viral sources to steal your data. Before downloading from dubious sites, it is better to study it in more detail.
Once you have installed and launched the utility, you will see a nice window in front of you:

The program is in Russian, so everything is clear. To create a disk image, hover over the tab "Creating an Image". A menu of 3 items will pop up. First option - "Record image" allows you to write data to an optical disk already prepared for this case. Second point "Create Image" allows you to create an image from a disc already inserted in the drive.
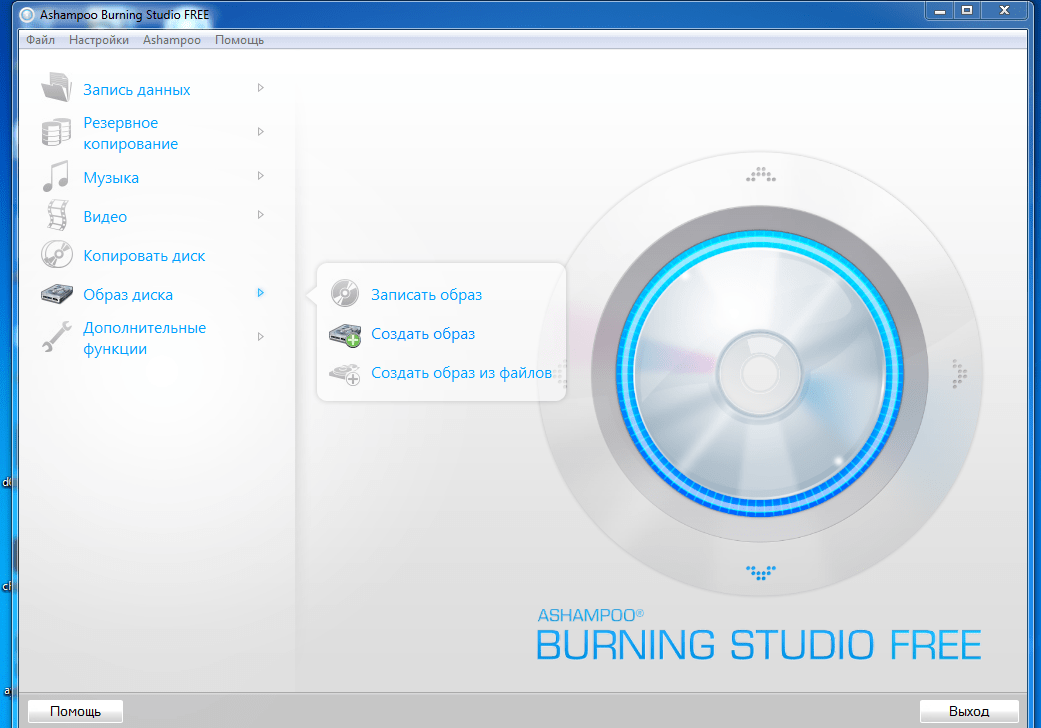
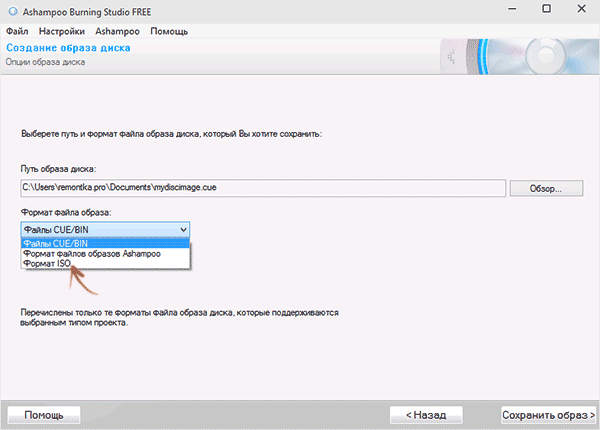
To create an ISO image from files, we need a third option - "Create image from files". So we can create our own ISO images.
Suppose you have already selected this item. A window will appear in front of our eyes in which we need to select the ISO format. In addition to this format, there is also the native format of the program itself and the CUE / BIN format.
That's all, these are not all programs, there are a lot of them on the Internet, both well-known and just that have appeared. Each has many advantages and disadvantages, but with the help of the programs we have reviewed, you can easily create a virtual image and, if necessary, burn the necessary files to a finished disk.
This article will discuss how to create an ISO disk image or create it from files and folders. In general, there is nothing complicated in creating an ISO image, and it would seem that there is no need to write a whole article about this, but due to the nature of my work and hobbies, I often come across people who have no idea what an ISO image is, and even more so how to create it. And I thought that since a large number of people have similar questions, it means that they need an iso instruction (detailed article) as a guide to action.
Working with an ISO image is much more convenient than with files and folders copied from an optical disc. In addition, an exact copy of the original optical disc (diagnostic programs, operating systems ...) will always be stored on your computer, which can be written to blank media or mounted in a virtual computer drive. I already have a tradition of moving from the prologue to the main part of the article through the definition, and this time there will be no exception. So, let's define for ourselves what an ISO image is.
An ISO image is an informal and "slang" term for an optical disc image that contains the ISO 9660 file system. In general, this term can be applied to any optical disc image. In fact, this is an ordinary file that can be opened (mounted) using special programs that emulate an optical drive. Do not forget that the ISO image, unlike the original optical disc, does not contain service information that can be used to protect the disc from copying.
Everyone has long been aware of the fragility of optical media, and if you have a desire to extend the life of an optical disc and insure yourself against data loss, then it makes sense to create its exact copy in the form of an ISO image. To create a copy of the required optical disc, you will need a program to create an ISO image (read how to create a disc image and protect it with a password in Daemon Tools Lite) and here you can make a choice in favor of both paid and free versions.
Free program to create and burn ISO files.
Let's take a look at CDBurnerXP, a free and feature-packed program for creating and burning ISO files. The program also knows how to create bootable discs, check data after burning, convert nrg and bin files to iso, split discs and place data on several discs, burn any CD / DVD discs, including dual-layer ones ... As for me, for a free program, very rich functionality. By the way, the program boasts more than a dozen awards.
First of all, let's look at how to create an ISO image from files and folders in CDBurnerXP.

After starting the program, select the first menu item "Disk with data" and click "OK".
Now you need to find and add the necessary files to the project in order to create an ISO image from the folder (s) and files. 
Next, select the command from the top menu "File" and click on the item "Save project as an ISO image ...". Now it remains to give a name to the future ISO image and click the "Save" button. As you can see, there is nothing complicated in creating an ISO image from folders and files.
Now let's look at how to create an ISO disk image using the same program.

To do this, after starting the program, select the item "Copy disk" and click the "OK" button.
Now, in order to create an ISO disk image according to your requirements, you need to make the necessary settings in a new window. If your computer has several drives, then the first step is to select the one in which the optical disc is already installed.
The "Read Attempts" line by default already contains the optimal number of read attempts when errors are detected, so nothing needs to be changed here. Below are the checkboxes (check box) "Ignore unreadable data" and "Disable hardware error correction", when activated, the resulting image may not be working. It is advisable to activate these checkboxes only in extreme cases, when creating an image becomes impossible without them ...
The next step is to decide whether the copy will be written to another optical disc or saved to the hard drive as an ISO image. By the way, if you have only one drive, then you can select it both as a "Source" and as a target device "Receiver". In this case, CDBurnerXP will create a temporary intermediate disk image file on the hard drive (hard drive). After creating the image, the original disc will be ejected from the drive automatically, and you will need to insert a blank disc into it for burning.
For example, I will create an ISO image of an optical disc and save it to the computer's hard drive. To do this, you need to rearrange the radio button (switch) to the "Hard disk" position, select the folder, name the file and select its type. In my case it will be the ISO type.

It remains to click the "Copy disc" button.

After the process is completed, an ISO disk image will be created on the computer's hard disk in the folder you specified, which, if necessary, you can burn to disk using CDBurnerXP.

This program has only one drawback - it cannot mount an ISO image into a virtual drive. But with such huge capabilities of this application, this drawback is not significant, especially since there are a large number of free programs for mounting an ISO image on the Internet.
Program for creating an ISO image UltraISO.
Now let's look at the paid UltraISO utility, which is designed not only to create ISO images, but also to work with many other types of files. This program can edit the contents of both CD and DVD images, emulate a virtual optical drive and burn the created images to a real external media.
In addition, the utility can work with images created in other programs such as Nero Burning Rom, Alcohol 120%, Clone Cd and others. And also create boot disks for various operating systems, edit files and folders inside images and make images from both optical discs and USB drives and hard drives.
Before you buy the UltraISO program, you can try to work with it in the trial period and thereby decide whether it will take root on your computer and whether you will like it. True, in the trial period, the program has a limit on creating an image of 300 MB. After you download the program and install it on your computer, click on the created shortcut on the desktop and the application will open a welcome window.

Here you are offered to buy the program, enter the registration code or run it in the trial period.
To begin with, I suggest creating an ISO image from files. To do this, you need to find, select and add the files you need to the project using the "Add" button or by simply dragging and dropping files and folders.
Next, you need to save the project as an ISO image. To do this, select the "File" item in the top menu and click on the "Save as ..." line in the drop-down list. Next, you need to give a name to the project, select the type of ISO and click on the save button.
Newcomers to working with a PC often face the fact that they cannot open any file. This is due to the lack of software capable of reading it and due to ignorance of file extensions. Often this problem is caused by the ISO format.
What is the most commonly used disk image format. More precisely, data based on ISO 9660 standards. This format was released in 1988. The image file reflects an exact copy of the physical disk: directories, file system information, boot data.
What are disk images for?
To better understand what ISO is, consider the scope of this format. Image files are used to create copies of DVD/CD discs. When forming an image, a copy of each bit of the CD is created according to the original media. If you simply copy files from a DVD or CD to your computer's hard drive, boot information, disc titles, and track information will be lost. Having a disk image, you can later easily restore the original version of the duplicated media.
Virtual Disk Benefits
Now you have a general idea of what an ISO is. What is needed to open it without writing to a blank disc? For these purposes, there are special programs. Such a program will create a virtual disk on your computer, with which you can safely open files with the following extensions: NRG, CCD, CDI, B5T, ISO, MDS, BIN / CUE, BWT and others.
Other benefits of virtual disk:
- if you urgently need to rewrite the disk, but you do not have blank "plates", you can burn the image and run it using a virtual disk;
- handy when you don't have a CD/DVD-ROM burner;
- you can use the image instead of your favorite disk, thereby reducing the wear and tear of both the disk and the drive;
- unlike optical, you can create a large number of virtual disks.
How to open a disk image?
To open the image file, use a program called Alcohol 120%. Let's consider this process step by step.
- Download and install Alcohol 120%.
- Run the program. Select "Virtual Disk" from the second menu on the left.
- In the window that appears, mark the required number of virtual disks (for example, 1), click OK.
- Look in the lower right corner of the program, a virtual drive has appeared there.
- Select menu "File", "Open".
- An image file will appear in the upper right part of the program, mark it with the right mouse button, and then select the "Mount to device" action. The image can be used.
There are other programs for working with disk images:
- virtual drive;
- ISOBuster;
- PowerISO;
- DAEMON Tools.
In order to use the following software:
- Ashampoo Burning Studio
- UltraISO;
- CDmage;
- Alcohol 120%;
- ISOBuster;
- ISO Commander;
- Nero.
Consider an example of burning an image to a CD with the UltraISO program.
- Download and install UltraISO.
- Launch it, select "Open" from the "File" menu.
- In the window that appears, mark the desired file, click "Open".
- Click "Burn CD image" (the button is located on the toolbar).
- Select the recording method, speed. Click "Record".
How to create an image?
You can create an image of the desired disk yourself using the above programs. Consider the sequence of steps for creating an image file using Ashampoo Burning Studio.
- Download and install Ashampoo Burning Studio.
- Insert the disc into the drive, open the program and select "Create / burn a disc image", then - "Create a CD / DVD disc image".
- Click next.
- Specify the location to store the image file, as well as the desired extension. Click "Next".
The image has been created. From this image, you can install any game or program, as well as just view its contents.
We hope that this article has helped you to fully understand not only , what is ISO, but also how to work with this format.
Good afternoon.
I must make a reservation right away that this article is in no way aimed at distributing illegal copies of discs.
I think that every experienced user has dozens or even hundreds of CDs and DVDs. Now it is not so important to store all of them next to a computer or laptop - after all, hundreds of such disks can be placed on one HDD, the size of a small notebook! Therefore, it's not a bad idea to create images from your disk collections and transfer them to a hard drive (for example, to an external HDD).
The topic of creating images when installing Windows is also very relevant (for example, to copy the Windows installation disk to an ISO image, and then create a bootable USB flash drive from it). Especially if you don't have a disk drive on your laptop or netbook!
Just as often, creating images can be useful for game lovers: discs get scratched over time, they begin to be difficult to read. As a result of intensive use, a disc with your favorite game may simply stop being read, and the disc will need to be bought again. To avoid this, it's easier to read the game into the image once, and then start the game from this image. In addition, the disk in the drive makes a lot of noise during operation, which annoys many users.
So let's get down to the main point...
1) How to create an ISO disk image
The image of such a disk is usually created from discs that are not copy-protected. For example, discs with MP3 files, discs with documents, etc. For this, there is no need to copy the "structure" of the disc tracks and any service information, which means that the image of such a disc will take up less space than the image of a protected disc. Usually, for such purposes, an ISO format image is used ...
CDBurnerXP
Very simple and multifunctional program. Allows you to create data discs (MP3, document discs, audio and video discs), in addition, it can create images and burn ISO images. This is what we will do…
1) First, in the main window of the program, you need to select the option "Copy disk".
The main window of CDBurnerXP.
Drive: CD-Rom where the CD / DVD disc was inserted;
A place to save the image;
Image type (in our case ISO).

Set copy options.
3) Actually, it remains only to wait until the ISO image is created. Copying time depends on the speed of your drive, the size of the copied disc and its quality (if the disc is scratched, the copy speed will be lower).

Disc copy process...
Alcohol 120%
This is one of the best programs for creating and emulating images. By the way, it supports all the most popular disk images: iso, mds / mdf, ccd, bin, etc. The program supports the Russian language, and its only drawback, perhaps, is that it is not free.
1) To create an ISO image in Alcohol 120%, in the main program window, click on the " Image creation«.

Alcohol 120% - creating an image.
2) Then you need to specify the CD / DVD drive (where the copied disc is inserted) and click the "next" button.

Select drive and copy settings.
3) And the last step... Select the location where the image will be saved, as well as specify the image type itself (in our case, ISO).

Alcohol 120% - a place to save the image.
After pressing the "Start" button, the program will start creating the image. Copy time can vary greatly. For a CD, this time is approximately 5-10 minutes, for a DVD - 10-20 minutes.
UltraISO
I could not help but mention this program, because it is one of the most popular programs for working with ISO images. Without it, as a rule, it can not do with:
Installing Windows and creating bootable flash drives and disks;
When editing ISO images (and she can do it quite easily and quickly).
In addition, UltraISO allows you to make an image of any disk in 2 mouse clicks!
1) After starting the program, you need to go to the "Tools" section and select the option " Create CD image...«.

2) Then it remains only to select the CD / DVD drive, the place where the image will be saved and the type of the image itself. Remarkably, in addition to creating an ISO image, the program can create: bin, nrg, compressed iso, mdf, ccd images.

2) Creating an image from a protected disk
Such images are usually created from game discs. The fact is that many game manufacturers, protecting their products from pirates, make it impossible to play without the original disc… I.e. to start the game - the disc must be inserted into the drive. If you do not have a real disk, then you will not start the game ....
Now let's imagine a situation: several people work at a computer and everyone has their own favorite game. Disks are constantly being repositioned and over time they wear out: they get scratched, read speed deteriorates, and then they can stop being read at all. To do this, you can create an image and use it. Only to create such an image, you need to enable some options (if you create a regular ISO image, then at startup, the game will simply give an error that there is no real disk ...).
Alcohol 120%
1) As in the first part of the article, first of all, launch the option to create a disk image (in the menu on the left, first tab).

2) Then you need to select the disk drive and set the copy settings:
Skip reading errors;
Advanced Sector Scan (A.S.S.) factor 100;
Reading subchannel data from the current disk.

3) In this case, the image format will be MDS - the Alcohol 120% program will read the sub-channel data of the disk into it, which will later help you run a protected game without a real disk.

By the way, the size of the image during such copying will be larger than the actual volume of the disk. For example, based on a 700 MB game CD, an image of ~800 MB will be created.
Nero
Nero is not just one disc burning software, it's a whole suite of disc burning software. With Nero you can: create any discs (audio and video, with documents, etc.), convert videos, create disc covers, edit audio and video, etc.
Using NERO 2015 as an example, I will show how an image is created in this program. By the way, for images it uses its own format: nrg (it is read by all popular programs for working with images).
1) Run Nero Express and select the section "Image, project ...", then the function "Copy disk".

2) In the settings window, pay attention to the following:
On the left of the window there is an arrow with additional settings - check the box " Read subchannel data«;
Then select the drive from which the data will be read (in this case, the drive where the actual CD/DVD is inserted);
And the last thing to specify is the source drive. If you are copying a disk to an image, then you need to select Image Recorder.
Setting up protected disc copying in Nero Express.
3) When you start copying, Nero will prompt you to choose a location to save the image, as well as its type: ISO or NRG (for protected discs, choose the NRG format).

Nero Express - select image type.