Apple ID. What is apple id? What is an Apple ID and how to create it
If you have just started using Apple products, bought yourself an iPhone, an iPad tablet, an iPod or a computer running Mac OS, then sooner or later the question arises - Where to get an Apple ID? Mostly, this question arises among novice users who do not know, or who are using another Apple device.
In fact, an Apple ID account provides other opportunities, in addition to purchasing and downloading applications, music and videos; the Apple ID is used when contacting the company’s support service, ordering from an on-line store, when using iCloud and iChat services.
Regular readers website already know where to get an Apple ID. In previous articles we have already looked at how to register an Apple ID without credit card. We performed the registration procedure in two different ways:
- (without a computer, on iPhone/iPad)
- (using a computer)
You can create your own Apple ID for free. If you are asked to send an SMS or pay money to register an account, do not sign in, it is a scam. Today we will get acquainted with the third method of registration account Apple ID, which is executed using any web browser.
I warn you right away that this method has its drawbacks. After the Apple ID registration procedure, as soon as you want to use the created account, the system will display the following message:
“This Apple ID name has not yet been used in the iTunes Store. Review your account information."
Then you need to enter your payment card number. Therefore, if you have not yet acquired a payment card or do not yet want to link it to your Apple ID, then register an account without linking it to a credit card using the links above, otherwise you will not be able to download free applications from the AppStore.

We will register an Apple ID using a computer, but in general you can open the Safari browser on the iPad or iPhone itself (of course), and with the same success go through the account creation procedure.
1. Launch Safari, Opera, Google Chrome, Internet Explorer or Firefox and enter in the address bar: Appleid.apple.com/ru/, or simply follow the link

2. A page will open entitled “ My Apple ID"if the page is on English language, then in the lower right corner there is a round icon with a flag, by clicking which you can select your country or region. If you are registering a Russian account, select Russia; if you need an American account, select USA.

3. Press the blue button – Create an Apple ID to start the registration procedure

4. Creation of Apple ID starts with address entry Email, which will be used as an Apple ID in the future. Below we enter the password and confirm it again, enter the password in English, and follow the recommendations that we are talking about. Although the procedure for creating an Apple ID in the browser is made very convenient, so this time there should be no problems with the password. As soon as all the items in the tooltip turn green, the password has been entered correctly and meets the security requirements. Having figured out the password, select a security question and answer

5. Next, fill in your first and last name; it is not necessary to enter your middle name.

6. The country should already be set, all you have to do is enter your address, city and language

7. After filling in all the data, you must enter the symbols (anti-spam), check the box and press the button – Create an Apple ID
8. Upon completion, the registration system will ask you to check your mail and confirm your email address, to do this, log into your email, open the letter from Apple and click - Confirm now >

9. In the page that opens, enter your Email, which is now your Apple ID, enter the password that we filled out in step No. 4 and press the button - Confirm address. After which your email address will be confirmed and linked to your Apple ID.
That’s it, now you know another way, where to get a new Apple ID, or rather, how to create it. You can get a free Apple ID in other ways, links to which are provided at the beginning of the material. Using the ID, you can install applications and games on your iPhone, iPad and iPod touch, but first you need and .
In this instruction, I will explain how to find out your Apple ID.
What is an Apple ID?
Official definition:
Apple ID is an authentication system that the company offers for many of its products, such as iWork, iTunes Store, App Store, iCloud, etc. Apple ID serves as an account that allows users to access company resources.
If we talk in simple language, That:
All your purchased or downloaded free games, movies, and music in these online stores are linked to your Apple ID. Without your own Apple ID, you won't be able to download programs and games to your iPad. Even iCloud won't work without an Apple ID. It is to the Apple ID that you need to link your credit card in order to make purchases in the App Store, iTunes Store...
If you bought an iPad, then the first thing that should come to your mind is to register an Apple ID. We have two instructions on our website. Use the one you like best:
During registration, you will find out your Apple ID.
Golden axiom
The Apple ID matches the email you used to register your account.
But there are situations when the user:
- I forgot my Apple ID and was logged out of the App Store
- I changed my iPad and don’t remember exactly what Apple ID I used to install the apps.
- I never knew my Apple ID, so someone created an account for him. And now it's time to take everything into your own hands...
- and so on.
I will summarize this entire experience and show how you can find out your Apple ID without knowing it...
Direct to iPad
We look in the App Store in the Selection tab. At the very bottom in the left corner there should be an Apple ID. If not, it means you either haven’t downloaded anything from the App Store yet or are logged out. Screenshots were taken from iOS 7 (iOS 6 and below the principle is similar).
Let's go to Settings. In chapter iCloud There should be your Apple ID at the top. If it is not there, it means that no one set up iCloud on the iPad or it is currently disabled there. You can also look at the sections: Messages or FaceTime.

If the searches above didn’t yield anything, then we’ll look in iTunes.
On iTunes
Open iTunes and in the iTunes Store section look at the upper right corner. Your Apple ID should be there.

If this does not help (or you are in this moment logged out), then we go to the section Programs, there we click on any application with the right mouse button. Select from the drop-down menu Intelligence.

And in the window that appears, in the “File” tab, find your Apple ID.

If this does not help and you see a completely unfamiliar e-mail address next to your Apple ID in all applications, then you do not have your own Apple ID and I recommend registering it.
If I’m wrong, then go through all your e-mails in memory and try to recover your Apple ID password by e-mail. The easiest way to do this is through iTunes.

You will be redirected to a website where you need to enter your expected e-mail. If the Apple ID associated with this email exists, then you will receive an email to reset your password.
If you still don’t recognize your Apple ID, then get a new one. I provided links to instructions for registering an account above.
If you have any other questions, write in the comments.
Hello, dear readers of the blog site. I’m slowly acquiring gadgets from Apple - I really liked their uncompromising approach to user convenience.
iTunes is installed exactly like any other application on your computer, and has support for the Russian language. In addition, you can immediately understand what exactly it will allow you to do and what opportunities it will provide:

At one of the steps you will be asked to check the box to accept the agreement for the use of this software. When you first launch it, you will be asked to give Apple access to your media library so that photos of artists and disc covers can be uploaded to it. I don't need it, so I chose the cancel option.
After downloading and installing iTunes on your computer, it makes sense to immediately click on the one located at the top left "Login" button and register in iTunes, i.e. create a new account.

Press the button "Create an Apple ID". We continue and agree to the terms of registration.


To secure your profile, it is better to answer the questions and enter another mailbox address. If one already exists, then it will be sent to it in the future. New Password. Next, enter your date of birth. If you are under 18 years old, I advise you to enter a different date, since many applications are only allowed to be downloaded by adults.
Then click on the “Continue” button, after which you will be prompted to immediately enter your credit card information, with which you can pay for the purchase of applications in the App Store. Is it possible to create an Apple ID without a map?? Of course, you can, but you will have to start registering from the beginning.
To add card details, in the upper left corner of the iTunes window, click on your Apple ID and select “Account”.

In the window that opens, find the item "Payment method" and click a little to the right on the “edit” link.

It's simple: enter the card number, security code and other data. When you register for the first time, one ruble will be withdrawn from your account in order to verify its authenticity.

If you then connect it to a computer Ipad via USB when iTunes is turned off, this will cause it to launch and it will automatically detect the gadget connected to it, and will also display it in the form of a button like this:

On the button on the right there will be an upward-pointing triangle (you might have seen something like this on CD players, where it was used to eject media). I accidentally clicked on it at first, expecting the context menu to appear, but instead the button disappeared and my iPad disconnected from the computer.
I had to close and reopen iTunes to reconnect with my tablet. You need to click a little to the left and then all the diversity will open to you inner world your gadget. On the first tab "Review" a page opens with its name and model, as well as with all other data. Battery charge, capacity, serial number.

You can update it right away software your gadget (check for availability and download a new version of iOS) or restore its state to factory settings (the “Restore iPad” button), that is, erase all personal data and bring the device to the state in which you purchased it (alas, this is for scratches does not apply).
It turns out that from here you can control your “apple”, as well as create backups or recover from them. You can even encrypt them for greater reliability if the data stored on the iPhone or iPad is confidential. By default, iTunes will create an image of your tablet or phone on your computer, but you can also save important data in the cloud, which Apple calls iCloud.

Create backups ( sync iPhone, iPod or iPad with iTunes) is very important, because if you lose data or purchase new version gadget, we can download all the programs again - in this case we won’t have to search and buy everything again.
Moreover, as shown in the screenshot located just below (the second), it will be possible set up automatic synchronization immediately when you connect the device (via USB), and you can also set up wi-fi synchronization between your computer with iTunes and your iPhone.

All this data can be saved not only on a computer, but also in cloud storage, the so-called iCloud.

With its help, you can download some data, for example, saves for games directly to the gadget without connecting to a computer via the Internet.
How to sync iPhone, iPod or iPad with iTunes?
Also at the bottom there is a very convenient and interesting panel, here we can clearly understand what exactly takes up space on the internal memory and how much. You can also click the “Synchronize” button.

A what exactly will be synchronized between a computer and an iPhone, iPod or iPad? Well, this is up to you - just go through all the other tabs of the top menu and check the boxes in the right places.

It turns out that here you can download music, video or photos from your computer to your device and back, but not only that. Moreover, there is an opportunity create your own music library(not from tracks purchased from the Apple store, but from our own tracks that live on your computer).
To do this, open the folder with your music in Explorer (or Total Commander), and in iTunes go to the “Music” tab.

After that, select all the necessary tracks in the explorer and drag them to the empty space in the program, as shown in the screenshot.

iTunes will offer to convert some types of music files into a format convenient for this program:

You can edit this music and even listen to it directly in iTunes. Right-click on any music file icon and select “Play” from the context menu. A player will appear on the top panel, where the bitten apple used to be.

If you click on the arrow in this very player, a window will open where you can choose which music will be played for which. If you are not satisfied with these “gray notes” instead of the cover of your favorite band, then you can change it as well as the name.

To do this, right-click on the icon again and select “Details”. A window will open, where you can write the title, album, etc. To change the cover, first copy the image you want, then go to the cover tab and click paste. Beauty.
To transfer this music to your device, click on the device button (Iphone or iPad) in the top right, and in the window that opens, go to the “Music” tab, where you can specify what exactly to copy. Well, to start synchronization, click on the button "Ready", located at the top right of the window.

If everything worked out, then instead of the player a bar will appear showing the music loading.
Great, you have music on your iPhone or iPad. A You don’t want to sync movies via iTunes? The process of uploading video to the gadget is approximately the same as uploading music; in the upper left corner we find a button and select “Movies” there. In the same way as in the case of music, drag the video files into the program and click on the “Finish” button. You can download books in the same way.
iTunes and App Store
Movies, books, music - everything is there. But what else is needed for complete happiness? Of course, access to a store with millions of applications for every taste, which can be obtained both from a gadget and from a computer using iTunes.
Let's press the button "iTunes Store", which is in the upper right corner. A store opens before us where you can purchase movies, music and applications. We already have films with music, so click "App Store".
The large banners on top are new and popular apps. On the right you can select a category or, going down a little lower, another section. If you wanted to fuck free application, then press "Download" or "Buy" button, in case it is paid. To install it, you will have to enter the password you created earlier when creating your Apple ID.

The downloaded or purchased program will live in your Apple ID account, and you can always install it on your gadget. To do this, connect it to your computer and go to the Applications tab in iTunes. Find there visually or using the search bar the application you just downloaded and click the “Install” button opposite it.

If you need to install any other applications or games from iTunes on your iPhone or iPad, then also click on the “Install” button opposite them. The text will change to “Will be installed.” Next, go down and click on the “Apply” button located there.

The synchronization process will begin, during which your new application will be successfully installed on your gadget.
In general, no one is stopping you from connecting to the Internet via Wi-Fi and browsing the App Store directly from your Apple gadget in search of the necessary software or games. However, the variety of options only adds to the convenience.
Improving the usability of iTunes and the App Store

Well, now you can use, at first glance, a very complex and sophisticated program, but in the end, convenient and functional. I guess that's all I wanted to tell you about right hand owner of Apple products.
By the way, if you need to download pictures and videos taken on it from your iPhone or iPad to your computer, and you also have an account in Dropbox or Yandex Drive, then it will be enough to install the appropriate mobile app and it will allow you to do this automatically. Read more about that and.
Good luck to you! See you soon on the pages of the blog site
You can watch more videos by going to");">

You might be interested
Djvu - what is this format, how to open it and what programs to use for reading files in deja vu on a computer or android  How to upload photos and transfer videos from iPhone or any other phone to your computer OneDrive - how to use Microsoft storage, remote access and other features of the former SkyDrive
  Safari - where to download and how to customize the free browser for Windows from Apple
Updated in August 2018, added instructions for iOS 11 firmware. Added page navigation for faster access to sections.
An Apple ID account allows you to download content from iTunes and the App Store. It also allows you to sync reminders, calendars and contacts with iCloud, activates
FaceTime and syncs Messages between multiple devices. If you bought an iPhone and want to get the most out of it, be sure to create an Apple ID. Well, to make it easier for you to do this, I am publishing this step by step instructions.
Page navigation:
How to create a new Apple ID on an iPhone or iPad running iOS 11 or higher
How to create a new Apple ID on an iPhone or iPad running iOS 11 or lower

How to unlink an iPhone or iPad from Apple ID on iOS 11 and higher

How to unlink iPhone or iPad from Apple ID on iOS 11 and below
- Open Settings on the device.
- Open iCloud.
- Click " Go out«.
- Click " Go out" to sign out of iCloud and unlink your iPhone or iPad from your Apple ID. Please note that all photos are from the iCloid library and the rest iCloud content will be deleted from this iPhone or iPad.
- Choose to delete or keep iCloud calendars, Safari data, reminders, and contacts on your device.
- Enter your password to turn off “Find iPhone/iPad” and click "Turn off".

How to sign into iCloud with an existing Apple ID on iPhone and iPad with iOS 11 or higher

How to sign into iCloud with an existing Apple ID on iPhone and iPad with iOS 11 or lower
- Open Settings on the device.
- Open iCloud.
- Enter email and password associated with your Apple ID.
- Click " To come in«.
- Select " Merge" or "Don't merge" to sync Safari data, Reminders, Contacts, and Calendars.
- Click " OK" to confirm enabling the function " Find iPhone/iPad«.

Have questions?
If you still have any questions about creating new Apple ID? Are you having trouble signing in using a different Apple ID? Write in the comments, we will try to help.
The App Store is one of the reasons pushing many to prefer iOS devices. In the Apple app store you can find not only a lot of games, but also a lot of useful programs that can significantly simplify the life of mobile device owners. Another thing is that without an Apple ID, which is the key to Apple services, it is generally not possible to use the App Store or iTunes Store. Therefore, to be able to appreciate all the benefits using iPhone or iPad, you must first create an Apple ID account.
Contents of the instructions You can create a new Apple ID both on the iPhone itself and using a computer, through the iTunes program, or even do it through a browser from any device with access to the Internet. Each of the indicated methods is convenient and justified in its own way in certain life situations.
How to create an Apple ID through iTunes
Launch iTunes on your computer and look for the “Login” button in the upper right corner. We click on it and in the window that opens, prompting us to either enter an existing Apple ID or create a new one, select “Create an Apple ID.”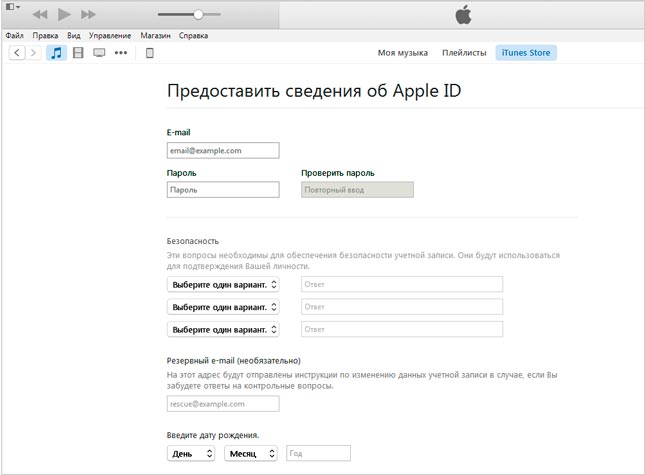
Here we need to indicate an active e-mail, password, select security questions and give answers to them, indicate the date of birth and, if possible, a backup e-mail. Unlike registering an Apple ID from an iPhone or iPad (see below), iTunes does not offer to create a new @icloud.com mailbox, so you must have an e-mail and, importantly, an active one.
After entering the required information, you will be redirected to the next page where you must indicate the payment method.

If you use a bank card, this registration step will not cause you any difficulties. Otherwise, read the instructions below.
How to create an Apple ID account without a card
The method of creating an Apple ID using the iTunes program requires registration with mandatory select a payment method and indicate the number bank card. This can be a problem for some, but it is very easy to solve.You can create an Apple ID account without a card in iTunes. Launch iTunes and go to iTunes Store > App Store.

Here we are interested in any free application. We choose what we like and try to download it.

In this case, of course, the program will immediately prompt us to either specify an Apple ID or create a new one. We agree to create a new one and go through the same procedure for filling out the data described above. Moreover, at the stage of specifying the payment method, a pleasant surprise awaits us - the opportunity to refuse to select a card.

We select “No” in the “Payment Method” line, after which we only need to fill out the “Billing Address” section. You will no longer be required to provide an iTunes card. Don’t forget to check your mailbox afterwards and activate the created account.
You can also create an Apple ID without a card on your iPhone in the device settings. The following explains how to do this.
How to create an Apple ID on iPhone, iPad
You can create an Apple ID on your iPhone or iPad in the following ways:- when activating the device using the Setup Assistant program;
- in the device settings;
- through the App Store or iTunes Store applications;
- on the My Apple ID website.
You can create a new Apple ID immediately when activating your device using the Setup Assistant. That is, when you bring home a brand new iPhone or iPad, you can immediately, during the process of activating and setting it up, acquire an Apple ID. It's very easy to do. We press the Power button, located on the side panel of the iPhone 6 and iPhone 6 Plus, and on more early models on top, and wait until an apple appears on the screen - the Apple logo. Next, we are greeted by the Setup Assistant program, following the instructions of which you can create a new Apple ID.
2. Create an Apple ID on your iPhone or iPad through the Settings application.
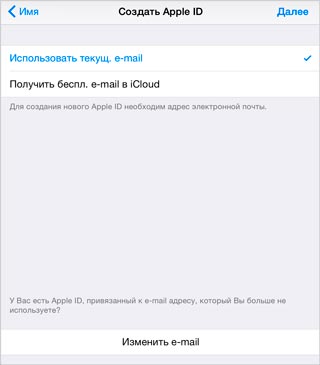
If your device is already activated, you can create a new Apple ID directly in iPhone settings or iPad. To do this, launch the “Settings” application and go to the iCloud section. Here you can find the treasured “Create Apple ID” button.

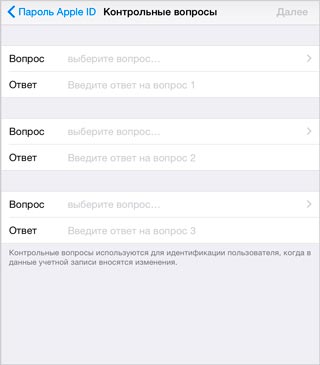
By tapping on it, we will be asked to indicate our date of birth, first and last name, e-mail, password, go through security questions, and so on.
After completing all stages of registration, you can safely use your newly created Apple iD in the App Store. However, when trying to buy something in the App Store or iTunes Store, users of the Apple ID created in this way will have to go through a number of steps, including specifying the payment method. What is noteworthy is that the Apple store will not require you to provide your bank card number.
3. Create an Apple ID on an iPhone or iPad through the App Store or iTunes Store (registration in the App Store)
Similar to the method described above, you can create an Apple ID through the App Store or iTunes Store. To do this, you need to launch one of two applications to choose from and go to the first section. For example, in the App Store it will be “Selection”. Here, at the very bottom of the page, there is a panel with quick links, under which there is a “Login” button. When we tap on the button, we will be asked to choose how we want to enter the App Store: with an existing Apple ID or create a new one. Select “Create an Apple ID” and patiently go through all the necessary registration steps.

Accordingly, if you already have an Apple ID, but need to create a new one, you can simply sign out of your iCloud, App Store or iTunes Store accounts and follow the instructions described above.
4. Create an Apple ID on the “My Apple ID” page.
So, open the “My Apple ID” page and pay attention to the “Create Apple ID” button.

Here we are again waiting for a number of fields for data entry. We need to indicate your full name, e-mail, which will be used as an Apple ID, create a password, select and answer security questions, indicate your date of birth, postal address and preferred language.

After this, you must confirm your e-mail. To do this, you will need to open your mail, find and open the letter from Apple. Next, follow the “Verify Now” link and sign in using your new Apple ID and password.
How to create a US Apple ID
It happens that the program or game you are interested in is not in the Russian segment of the App Store, but at the same time it is available for download in the American or New Zealand segments, which cannot be accessed without a “local” account. This happens, for example, with applications. How to create an American Apple ID, as well as New Zealand, Canadian, Australian and so on.Creating an American Apple ID account is no different from creating a Russian one, with the only difference being that when registering an Apple ID, at one stage you should indicate the country whose App Store segment you want to access.
If you haven’t found an answer to your question or something didn’t work out for you, and there is no suitable solution in the comments below, ask a question through ours. It's fast, simple, convenient and doesn't require registration. You will find answers to your and other questions in the section.