How to sharpen a photo in photoshop. Let's use a layer mask. Moderate sharpening
When you see a beautiful shot of a natural or urban landscape, the first thing you ask yourself is, “How did he manage to capture this shot like that?” Of course, the very moment of shooting plays important role in creating any outstanding photograph. Is the exposure set correctly, will the correct, well-balanced RAW file come out? Do I need to bracket to capture and then be able to process a wide dynamic range? Should you use a slow shutter speed to create a sense of movement or soften it (this is where ND filters come in handy)?
There are too many variables on this list, and you are probably already familiar with most of them.
Once you have a RAW file ready to go, post-processing software provides a wealth of options to make it sharper and stand out.
Using the 4 techniques in this tutorial, you can get your shots razor-sharp and ready to print or share online!
In the tutorial, I'll show you how to give landscape shots best view. However, these techniques also work for most other areas of photography. Since it's already spring outside, now is the time to get outside and capture some beautiful scenery!
1. Sharpening in Lightroom
The full name of Lightroom is: “ Adobe Photoshop Lightroom”, so when I talk about sharpening, I'm technically explaining the Photoshop method. However you want to call it, Lightroom has a very useful section in the panel. Details(Details) module Develop.
Sliders should be used when the image is open for at least full size 1:1. When making corrections, you need to see their impact even on the smallest details.

Holding the Alt key allows you to see the created mask.
All sliders can also be used in conjunction with the Alt key. Top slider - Quantity(Amount) will show the picture in black and white. Radius(radius) and Details(Details) will tone down the colors so you can see the outlines that are being made sharper. Slider Mask(Masking) changes to black and white, showing exactly where the sharpening is being applied (see figure above).
Sliders
Quantity(Amount) adjusts exactly what you might think - total applied sharpness. The further you move it to the right, the sharper the image will become.
Radius(Radius) is responsible for how far from the center of each pixel the sharpening increases. How less value, the finer the radius of sharpness. The more - the thicker the radius.
Details(Details) mainly affects the rest of the photo, not necessarily the edges (Radius is responsible for them). If there is a picture from large quantity textures, such as fabric or clothing, slider Details(Details) will accentuate them without creating an unwanted glow effect.
Mask(Masking) is nothing more than just a mask. If the slider is in the left corner, the mask is filled with pure white and the effect is applied in full. By holding down the Alt key and moving the slider to the right, you'll see that the white stroke only remains around some areas. If you drag the slider to the right, only the most obvious details will become sharp.
Even though it is very effective method, it is applied globally, and sometimes we need to sharpen only certain areas. This is where Photoshop comes to the rescue.
2. Unsharp masking in Photoshop
Unsharp masking(Unsharp Mask) - a function with a very ambiguous name. If you do not pay attention to the prefix "not" - this is a common tool for sharpening. The way it works is to create a slightly blurred version of the original image and take it away from the original to find the edges of the objects. This creates an unsharp mask. The next step is to increase the contrast of the edges using the created mask. The result is a sharper image.

Unsharp masking sliders
Quantity(Amount) is displayed here as a percentage and controls how contrasted the edges will be.
Radius(Radius) - Blur strength of the original to create the mask. The smaller the radius, the finer details will be affected.
Threshold(Threshold) sets the minimum change in brightness to which sharpening is applied. The threshold also works well to sharpen only the visible edges without affecting the rest.
Any sharpening operations must be applied at least at full 1:1 or better. The ideal zoom for working in Photoshop is 200%.
3. Smart Sharpening in Photoshop
most advanced Photoshop tool to work with sharpness - Smart Sharpen(Smart sharpen). It has the most options and correct use you can get the best result for landscape and almost any field of photography. Landscape photography is a very difficult subject, as you often have to deal with very close contours and very distant ones at the same time. However, each of them requires a separate approach. Working with masks in Photoshop, you can ensure that some areas are masked while others remain sharp. This is another advantage over younger brother- Lightroom. But back to the topic!
Also in tool popup Smart Sharpen(Smart Sharpen) You can save and load presets so you don't have to enter parameters every time.

Smart sharpening provides the largest number options. With its help, you can perfectly perform the finest corrections!
Slider Quantity(Amount) varies from 1 to 500%. In most cases, you do not have to cross 100%. Of course, no one forbids you to go further, but you will get common artifacts in the form of radiance and an unrealistic look.
Radius(Radius) is measured in pixels and is responsible for the edges that Smart Sharpen will adjust. You can choose from 0.1 to 64 pixels - the 0.1 step scale was created for the finest possible adjustment.
Noise reduction(Reduce Noise) is a very clear and excellent feature. This is another reason for the power and popularity smart sharpening. Now it becomes clear why Adobe created presets for this filter!
In line Delete(Remove) better install Blur at low depth of field(Lens Blur), since this item does a great job of reducing the glow effect.
Sections Shadow(Shadow) and Light(Highlights) also got their own set of fine adjustment sliders. Weakening the effect(Fade Amount) is responsible for the overall sharpening in light and dark areas.
Tonal Width(Tonal Width) sets the sharpening limits for certain tonal areas of the image. As an example, if you select a lower Tonal Width in these areas, the sharpening for them will be limited. More high value expands the range of tones.
Radius(Radius) here works the same as for Unsharp masking- moving the slider to the left defines a smaller zone, to the right - a larger one.
Its useful to note- to receive best results when using these tools, first convert copy original layer into a Smart Object. This can be done at the very beginning of post-processing, or later when the layer is merged and on top. Switching to a smart object will allow you to return and make corrections at any time. Also change Mode overlays(Blending Mode) sharpening layers (except Color Contrast) on glow(Luminosity) to avoid unwanted glow. This is highly recommended.
4. Filter Color Contrast in Photoshop
Another great way to sharpen landscape shots (and more) is to use a filter. Color contrast(high pass). Again, you can either make a copy of the layer itself, or a copy of all visible ones (Ctrl + Alt + Shift + E). Convert the resulting layer to a smart object by right-clicking on it and selecting the appropriate item from the drop-down menu. As already mentioned, this will allow you to go back and make corrections at any time.

Filter Colour contrast- very simple, but effective method sharpen the photo. Remember that with any adjustment layer or filter, you can always use a mask to hide unwanted areas. Slider Opacity(Opacity) - Another way to weaken the influence of the effect.
small radius within 1-1,5 usually enough with the head. Don't overdo it! We need quite a bit! After that, the image will turn 50% gray and only the stroke showing the edges will remain. This is exactly what we need.
Now just go to the layers panel and choose Blending Mode overlap(Overlay) or Linear light(Linear Light). The latter has a more prominent influence, while the former is less radical. A linear light is a better choice, as you can always adjust the layer's opacity and soften overly harsh areas with a mask. Using Luma Masks can also be a good option if you only want to sharpen a specific tonal range.
There are many more ways to enhance details with Photoshop - what's your favorite? Share your experience in the comments or ask a question of interest.
Practice shooting and editing more often!
Of the huge number of ways to sharpen a photo in Photoshop, I recommend you try this one. It will take a little skill to work with layers. This method preserves all the details of the photo and does not spoil the image. To simplify the process of processing your photos, you can create an Action.Step 1.
Opening the image in PhotoshopStep 2
Sharpen a photo with the Sharpen filter Filter - Sharpening - Contour sharpening (Filter - Sharpen - Unsharp Mask)

Step 3
We increase the size of the image twice. Image - Sizeimages (Image - Image Size). In my example, these are the dimensions:

Step 4
Duplicate the layer by pressing CTRL+J or by dragging the layer onto the appropriate icon.
Step 5
Apply to the duplicated layer Filter - Sharpening -Sharpen + (Filter - Sharpen - Sharpen More).

Step 6
Set the opacity of the duplicated layer to 40-60%(depends on the amount of small or large details in the picture). My opacity is:

Step 7
Merge layers CNTRL+E and return image size to original. Image - Image Size (Image -Imagesize), enter the value 50% :

Step 8
Duplicate this layer and apply Filter - Sharpening- Contour sharpness (Filter-Sharpen-Unsharp Mask)

And in the end, change the transparency of the duplicated layer by 5-30%
(depends on the amount of small or large details in the picture and the selected sharpness in step 2)

Merge layers and save the image.
Here is the result of our work.
Defocus, shooting in motion, long exposure are the main causes of blurry images. By means of Photoshop, it is quite possible to sharpen such photographs and improve a bad frame.
Even experienced photographers do not always succeed in correctly setting the focus, ISO and exposure. Beginning photographers who use non-professional equipment are even less likely to get perfect shots. Because of this, most photos have to be further processed in the editor before publication. Typically, processing includes: color correction, brightness adjustment, sharpening, and .
Fuzziness, imperceptible at first glance, may increase after changing the proportions or resolution of the picture. The following methods will noticeably improve the quality of an image if it starts to look washed out.
Unsharp mask: A quick way to sharpen
If the photo is blurred evenly and not too much, it is most convenient to use the Unsharp mask filter, specially designed to sharpen the image. It's on the menu Filters → Sharpen → Unsharp mask...

Unsharp mask settings...
In the window we see three sliders for different settings. These parameters are called Amount, Radius and Treshold. Their optimal values have to be selected manually, since they depend on the quality and color diversity of the image.
- Slider Amount adjusts the strength of the filtration. At low values, the correction is almost imperceptible, at too high values, noise and graininess appear.
- Paragraph Radius shows how many pixels will be involved in the calculation of the sharpness of the center point. The smaller the radius, the more natural the effect, but the less sharp. These two settings are set first. Their values should be as high as possible, but such that the noise in the photo is still weak.
- Treshold shows how many color levels the contrasting areas of the photo are divided into. The more levels, the higher the image quality. This parameter is set last - it helps to remove noise and graininess.
Sharpen part of a photo
If you only want to sharpen a part of an image, you can do so with the History Brush.

Click on the square on the left
To open the History panel, go to Window → History. In the panel that opens, you need to click on the box to the left of the Unsharp mask line, and then click on the Open line (New in my case). The sharpening of the entire image will be cancelled.
Then you need to find the History Brush icon in the toolbar located on the left side of the window. Painting with this brush will cancel the action of the Unsharp mask in the right place.
High Pass: Subtle photo sharpening
To sharpen the photo in a more subtle way, you can resort to manipulating layers. In addition to adjusting the sharpness, they allow you to remove some photo defects, such as scratches.
After opening the image, you need to copy it to a new layer. This is done through the menu Layer → Duplicate Layer (the default options can be left unchanged). Then you should make sure that the work is being done on a new layer (look at the Layers panel). A panel will open in which you need to click on the line with the name of the new layer. The image should then be turned into a "contrast map". This is done through the menu. Filter → Other → High Pass.

High pass filter
In the window that appears, set the value of the radius of the area for which the contrast is determined. The optimal values are in the range up to ten pixels.
You can then remove scratches and noise caused by dust on the lens or damage to the scanner glass. This is done through Filter → Noise → Dust & Scratches. Then the new layer should be desaturated to reduce the risk of color noise during adjustment (this can be done using Image → Adjustment → Desaturation).
After all the operations, you need to right-click on the discolored layer with the applied filters and select Blending Options. In the Blend Mode list, select overlay and use the Opacity parameter to adjust the desired sharpness of the photo.
Shake Reductions: remove blur from a photo
One of the most annoying and difficult types of blur to fix is motion blur. It appears when shooting from a moving vehicle, or when the subject is moving. With a short exposure time, the frame manages to be captured faster than the image shift becomes significant. But with a long exposure, “smeared” faces, buildings and trees appear.
You can try to save the photo using the Shake Reductions feature, which appeared in Photoshop CC. Photoshop analyzes the tracks - "tracks" and stripes that appeared when objects were smeared. The filter automatically finds the most blurred area of the image and calculates the correction parameters based on it.

Shake Reduction Filter Window...
To enable this filter, you need to find in the menu Select Filter → Sharpen → Shake Reduction. If you click the Advanced button, you can select a different section option for calculations. On the right side of the Advanced area there are icons for the Add Suggested Blur Trace tool (icon with a plus sign) and the trash can. Add Suggested Blur Trace is used to automatically select new areas with a blur pattern by Photoshop. The basket icon allows you to delete a section for calculations.
The filter can be configured manually. This is done using the toolbar at the top left of the Shake Reduction window.
- Dotted rectangle icon. Blur Estimation Tool ( hot key E) is used to draw a frame highlighting the new track for sharpening analysis.
- Arrow and curve icon. Blur Direction Tool (hot key R) , you can choose the length and direction of the tracks without specifying a section of the photo.
The Source Noise, Smoothing and Artifact Suppression parameters are designed to smooth out the noise that appears during image correction. The Blur trace bounds item is similar to the Radius item in the tools described above. With its help, the area of \u200b\u200bthe area that Photoshop analyzes to calculate the increase in pixel sharpness is set.
In this tutorial, we will look at a couple of ways to sharpen a photo in Photoshop.
So, we have a fuzzy photo, this can happen by different reasons: Focus miss, lens lenses smudged, certain natural conditions, and just a poor quality lens.
The entire sharpening process for Photoshop CS6 is shown in the video below.
How to sharpen a photo in Photoshop CS5.
The result is what we see below.
The first way is how to sharpen in Photoshop.
The simplest and most common, the "Unsharp Mask" filter.
Regular filter program Photoshop. The principle of the filter is simple, it highlights the places of contrasting color transitions, making the transition sharper and more contrasting. The sharpening filter is very easy to use. In the top menu "Filter" we find the section "Sharpen", and there, in turn, "Unsharp Mask". 
We see three settings:
1.Amount - the level of the filter, the larger the value, the higher the sharpness. Highly big values can lead to unpleasant results, such as the appearance of artifacts.
2.Radius - the filter propagation radius, measured in pixels, again controlled visually, because in processing we achieve only naturalness.
3.Treshold - the threshold for applying the filter, as a rule, if used incorrectly, it gives the photo a certain "plasticity".
For my 750x499 px photo, the values are as follows:

Amount - 122%
Radius - 0.5px
Treshold - 0 levels (I usually don't use it)
Let's see the difference: 
The second way is how to sharpen in Photoshop.
With the help of the "High Pass..." filter and an overlay in the "Overlay" mode.
So, take our unsharp photo, make a duplicate of the layer. 
In the top menu select Filter=>Other=>High Pass... 
We select the value of the parameter at which exactly those places where detailing is required will be visible. 
Next, change the layer's blend mode to "Overlay" and set the depth of the effect with the "Opacity" parameter in the same place. 
The result of sharpening in Photoshop, we can see by comparison: 
The next option can be based on any method of sharpening a photo in Photoshop. Rather, it can be seen as an artistic device.
Sharpening with the History Brush.
We sharpen the photo using, for example, the first method (Unsharp Mask). We reproduce the actions from the first option.
Next, in the "History" window, check the box next to "Unsharp Mask", and move up the line, highlighting the line "Open". 
Now in the left tool menu, select the "History Brush" tool. 
Select a soft brush size, set the Opacity to around 60, and now paint some sharpness on the photo with the brush. And it is in those places that it would be most interesting for us to highlight. 
This method can be used not only for sharpening, but for any action in Photoshop.
Good day to all, dear friends. I am with you again, Dmitry Kostin. And today we will photoshop again. Does it happen to you that you took several photos, but in the end it turned out that they are blurry and even a little blurry, and they already look somehow wrong? I guess it happened.
But thanks to our program, this can be fixed. Therefore, today I will tell you how to improve the sharpness of a photo in Photoshop. And already by tradition, I will show here several ways how this can be done.
Sharpen tool
The first thing that comes to mind in this case is to use the sharpen tool. So open the image in Photoshop and we'll get started. I took this picture. She's perfect for us.

To be honest with you, I don't use this method. I prefer the method below.
Sharpen filter
In addition to the usual tool, there is a whole group of filters specially tailored to our current needs. To do this, select "Filters" in the top menu and select "Sharpness". There you will see another submenu with several items. Let's consider a few of them.
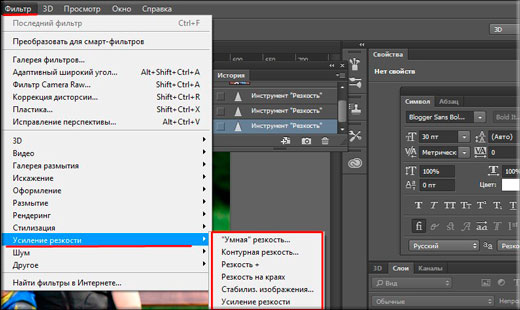

Well, no matter which filter you use, the image is still clearly better and much more pleasant to look at.

In principle, such chips can be used to make your image clearer and better. And which way do you prefer? Or maybe you use something else altogether? Please write in the comments.
Well, if you want to master all the tools of Photoshop, know what for what and how to use it, learn to swim in it like a fish in water, then I recommend that you check out one great course. These videos are for all levels. The main thing is that after watching you will not have a mess in your head, since everything goes from beginning to end, from simple to complex. And the presentation of the lessons is just great, so be sure to check it out.
Well, that concludes my post today. I really hope you liked it. And by the way, I recommend that you subscribe to my blog updates. Then you will always be aware of everything important and interesting. You can also see other articles on my blog. I'm sure you'll find something of interest there. Good luck to you. Bye Bye!
Sincerely, Dmitry Kostin.